We remain fully operational. Our teams are working around the clock to ensure your deliveries continue safely.

下载应用程序


Buy anything from 5,000+ international stores. One checkout price. No surprise fees. Join 2M+ shoppers on Desertcart.
Desertcart purchases this item on your behalf and handles shipping, customs, and support to Taiwan.
✨ DIY Marble Magic: Luxe counters without the luxe price! 🏡
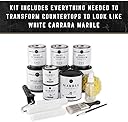
The Giani Marble Easy Epoxy Countertop Paint Kit in Carrara White offers a professional-grade, budget-friendly solution to transform laminate and other surfaces into stunning marble-look countertops. Covering 35 sq ft per kit, it features a durable, high-gloss epoxy topcoat that resists stains and water, combined with a specialized primer and mineral veining for authentic marble effects. Safe, low odor, and all-inclusive, this kit empowers millennials to achieve a designer kitchen upgrade in a single weekend.


| ASIN | B07Y8P9YBS |
| Age Range Description | Adult |
| Best Sellers Rank | #14,453 in Tools & Home Improvement ( See Top 100 in Tools & Home Improvement ) #9 in Household Countertop & Tile Paint |
| Brand Name | Giani |
| Color | Carrara White |
| Color Code | #f3f6f4 |
| Container Type | Can |
| Coverage | 35 square feet |
| Customer Reviews | 4.5 4.5 out of 5 stars (3,232) |
| Finish Type | Gloss |
| Global Trade Identification Number | 00856512007941 |
| Included Components | 31 oz. Marble White Primer, 6 oz. Grey Veining Mineral, 3 oz. White Highlight Mineral, (3x) 9 oz. Epoxy Activator, (3x) 18 oz. Epoxy Resin, 6" Giani Roller Arm & 3 Roller Pads, 2" Brush, 4" Giani Paint Sponge, 2" Foam Brush, Artist Brush, Misting Bottle, Practice Board, (3x) Wooden Stir Sticks, #600 Grit Sandpaper, Epoxy Gloves, 9'x12' Plastic Dropcloth, Step-By-Step Instructions |
| Indoor Outdoor Usage | Indoor |
| Is Waterproof | False |
| Item Form | Liquid |
| Item Type Name | Countertop Kit |
| Item Volume | 121 Fluid Ounces |
| Item Weight | 2.72 Kilograms |
| Manufacturer | Giani, Inc. |
| Model Name | Epoxy |
| Model Number | Marble |
| Paint Type | Epoxy (Topcoat) & Acrylic (Primer & Minerals) |
| Part Number | Marble |
| Size | 1 Count (Pack of 1) |
| Special Features | Water Resistant |
| Specific Uses For Product | Interior |
| Surface Recommendation | Indoor |
| UPC | 856512007941 |
| Unit Count | 1.0 Count |
| Warranty Description | Contact manufacturer regarding details of limited warranty |
K**8
Incredible Budget Renovation Option!
We’re currently living in a house that’s not ours- we have full range to do what we want, but I wasn’t going to spend money on granite/marble countertops in a house I won’t get my money back from, but I just couldn’t deal with the brown laminate counters. I am SOOOOO HAPPY with the results of this. It took a whole weekend for prep, painting, and sealing. I had over 100 sq ft to complete in my kitchen and two bathrooms. The paint goes much further than the epoxy. I was able to get through all the counters with 1.5 cans of the white paint (I bought two kits) and less than 1 can of the gray veining, but had to order two more cans of epoxy. Luckily, instead of buying an entire new kit you can just get the epoxy! I did 3-4 coats of white due to the dark color of the counters - a small bar section was a dark gray/black and the white still covered it great. Definitely practice the veining. Mine looked terrible on the practice piece but actually turned out great on the counter. I was sooo hesitant because I am not a crafty or good DIY person so I was worried the veining would be so obviously paint, but it actually looks incredible! The epoxy is MESSY. Take your time, follow the instructions to a t, and check for imperfections. Mine is definitely not perfect, but it is just about fool proof with the self leveling. My biggest mistake is that I forgot to take the tape off within the 2 hours in my bathroom and small pieces got stuck. Watch the edges for drips and stay around to keep wiping with a paint brush to keep your edges smooth. Also be careful of what you set on the counters for a full week. Small things without hard edges are okay but anything heavy or with a hard edge will leave an indent until fully cured in the 7 days. Overall, I would definitely recommend this to anyone that asked and if I ever need to remodel on an budget again it’s the first thing I would go for! There are absolutely imperfections, but if you take your time and follow instructions you can avoid them, and it still looks so much better than it did so I can complain!
J**H
So easy and gorgeous results!
Here is my review on the Gianni, white marble kit! It came out so beautiful. I can’t believe I did it! I read reviews and watched videos for probably a month while I decided if I wanted to take the plunge! I have granite and just can’t spend the money right now to get the white marble that I really wanted! I figured what do I have to lose since I hate the counters and if I ruin them I will just have to get new ones ha ha! The kit has everything you need except the frog tape, paper plates and paper bowls, which I used for the veining process and also for the highlighting at the end which really made the whole counter pop! I did not like the tiny brush they sent so on some of the videos I watched on YouTube they used a turkey feather. I highly recommend this as the lines came out beautifully and very natural! I dabbed the feather, then dabbed on a paper plate and dragged the feather up down back-and-forth to get some really nice lines! I needed a paint tray and used foil to line it for each coat so i could throw it out easily and use the tray for the next coat. I put my roller in a baggie in the fridge so it wouldnt dry out between coats. I did buy a few extra sponge brushes which I used, but the one in the kit is far superior. Whoever thought there was actually a real quality sponge brush! I studied the veining on YouTube videos, Google, Pinterest you name it since this was the most important thing to me…the right look, shading and design. I finally found a few I really liked and took pictures and put them in my phone in an album. I decided which ones I wanted to use on each section of my counters. I practiced drawing them on paper over and over, and then when I did them on the actual counters, I kept my phone right there to use them as a guide, which really helped! The kit includes a very small practice board and I did a few veins on it and saw how easy this would be. I really can’t believe how beautiful they turned out! I did 3 main veins on either side of my sink and played around with them then added some extended and some very light veins. Less is more and be careful not to go too dark. I set up a covered table the night before with everything that I would need. The whole process took about 14 hours but I have a very small kitchen with about 18 sq. ft. of counters. I got a good nights sleep and got up about 5 o’clock in the morning and started with my taping and then my first coat of primer which took about an hour total. I made a cup of coffee and waited an hour and did a second coat and then a third after another hour. My granite is dark, so it really needed a third coat. Then I proceeded to the veining. I have to admit I was very stressed hoping I could do this and do it right. It turned out to be so much fun very easy and I just love them! I used the pics on my phone as my guide which really was helpful. Then I waited four hours before I did the epoxy. I went out and had lunch and took a drive came back and again was very stressed because this part really scared me. It turned out it was so easy although it probably is the most detailed part of the entire project. I feel like I needed to use more of the epoxy than they said, unless I just didn’t figure it right. Make sure you tape and cover everything including the floors in front of everything. I actually didn’t get anything on my appliances or floor, which I was shocked! I checked my epoxy every 5 minutes for the first 30 minutes or so and found lots of small areas I missed or little “sink” holes that would pop up. Check under the edge constantly for drips. I used a sponge brush to even them out. If they dry you will have hard drips under the edge and I’m not sure how you get that off. Definitely use frog tape. I will never use blue tape again. The frog tape is unbelievably superior! I had a little tricky area on the counter sides on either side of the stove. I decided to not use the epoxy there and just use a water soluble polyurethane. I just felt it was going to be easier without having all the dripping going down the sides in that area and then I could put my stove back while I did the epoxy in the kitchen and I had more room to move around. I think that was a good move. I left the tape on for over an hour until there were no more drips under the edge. I have no pets and I closed my AC vent so I had no specs of dust, bubbles or hairs. It’s so beautiful like a sheet of glass! Note* wear rubber gloves when handling the epoxy incuding pulling off the tape. It’s VERY sticky and hard to get off your hands! All in all, the process was super easy and fun, but I did take my time to prepare with tape and the drop cloths. I have an Undermount sink so I felt that was a little tricky to tape around it, but I took my time and everything came out beautifully. Take your time enjoy it and you will be so happy with your counters when you’re done! It’s really an easy and fun project!! I feel like I have a model home now! Absolutely love my kitchen counters, and this product!
TrustPilot
2 个月前
1天前