We remain fully operational. Our teams are working around the clock to ensure your deliveries continue safely.

下载应用程序


Buy anything from 5,000+ international stores. One checkout price. No surprise fees. Join 2M+ shoppers on Desertcart.
Desertcart purchases this item on your behalf and handles shipping, customs, and support to Taiwan.
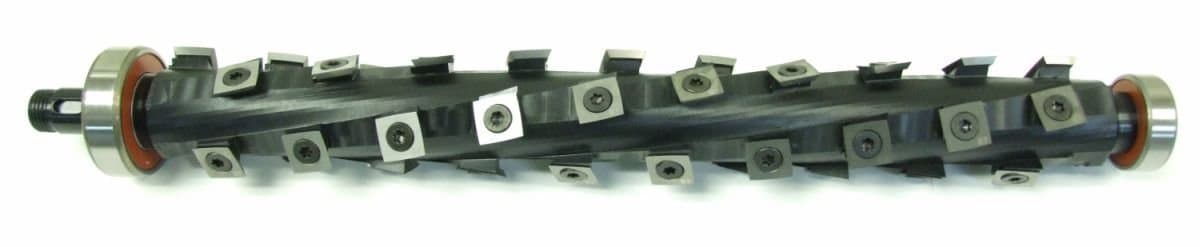
⚡ Upgrade your DW735 with the ultimate cutterhead for flawless finishes and whisper-quiet operation!
The OEM Shelix cutterhead for Dewalt DW735 is a precision-machined, spiral carbide insert cutterhead designed to provide a superior shear cut that enhances finish quality and reduces noise. Featuring an indexable design with 5 replacement inserts included, it offers cost-effective maintenance and improved dust collection. Made in the USA by Byrd Tool Corp, this cutterhead fits perfectly as a direct OEM replacement, elevating your woodworking projects with professional-grade performance.
| ASIN | B0973MQR4X |
| Batteries Included? | No |
| Batteries Required? | No |
| Best Sellers Rank | #83,850 in Tools & Home Improvement ( See Top 100 in Tools & Home Improvement ) #24 in Power Planer Knives |
| Customer Reviews | 4.4 4.4 out of 5 stars (207) |
| Date First Available | June 11, 2021 |
| Included Components | 5 extra cutter tips |
| Item Package Quantity | 1 |
| Item Weight | 8.68 pounds |
| Item model number | Dewalt P131519-1/B |
| Manufacturer | Byrd Tool Corp |
| Material | carbide |
| Package Dimensions | 20.2 x 6.2 x 4.4 inches |
| Part Number | Dewalt P131519-1/B |
| Power Source | ac |
| Voltage | 120 Volts |
G**N
Produces beautiful finish, low noise level,
This product is absolutely amazing and is the best upgrade you can do to any tool or woodworking machine I can think of. Amazing how quite it is compared to the blades that SCREEM as they chop along. The thing is slicing and the finish is just beautiful and every woodworker deserves this quality for their projects. Seriously the finish produced with this cutter head in the DW735 is as good or better than any planer I have own and I have owned a number of large, expensive machines. Just a few comments of those negative reviews, most of which have come about with people not understanding the proper procedures for installing the Shelix head and especially removing and installing the cutters. Many of the on line videos of this installation are being done incorrectly, especially installing the individual carbide cutter. Follow the directions closely and you will not have any problems, especially installing the cutters which must be positioned FLAT on the head allow the screw to pull/push the cutter back against the alignment wall. Do NOT allow the cutter to sit against that back wall until they are dead flat on the bottom surface. The screws and screw holes are not designed to align exactly over each other, which is what some are doing, and that means the cutter segments are not flat on the surface and they are misaligned and can be broken when tightened, and they will produce streaks that some are talking about. Just watch the companies website videos and you will be fine. I found it helpful to wrap the head without the cutters, in blue painters tape and slowly insert it into the planner. When resistance is felt, try moving the end of the cutter head slowly, left or right, up or down and you be able to step the each segment platform through the cutter hole one at a time. I had to remove the small gear on one end of the shaft and install it after the cutter head was installed in the machine, as it was preventing me from moving the shaft forward as it approached the far end bearing race. I found it easy to set the bearing and head into the planner races by putting the shaft pulley nut flush on the shaft and then striking it lightly with a large rubber hammer. It provides a much larger surface to distribute the rubber hammer strikes. A little light weight oil wiped on the races and bearing also help with the install. Most of the videos on line show the cutters being installed with a power driver, or one handed just cranking away, big mistake. One hand should be sliding the carbide and holding it FLAT on the base and the tightening screw will help pull it back to the alignment wall. You can use your thumb to make sure it is flat, then slide it toward the wall and tighten. The SCREW HEADS will not be flush in the cutter holes, they are designed to be slightly offset as that is what holds the carbide cutter tight and properly aligned. Hope this helps others, this is a fantastic product but you have to install it correctly.
T**N
SUPER SATISFIED!!!!
If you're not using one of these cutterheads in your planer, you don't know what you're missing!!!! I put one in my DeWalt DW735 and am truly amazed at the finish left on hard and softwood. It's quieter than straight blades but does have a downside in this particular planer. I can't make the depths of cuts as I did with the straight blades without tripping the internal thermal breaker. I can certainly deal with that considering the cut quality that I receive. Shipping time was excellent despite some sources saying that they were backordered. I think that it's great value for the money and even tried to get a cutterhead for my joiner only to find out that they're not available for that joiner because of the design (nonadustable cutterhead). Considering everything, I highly recommend this product.
P**N
Byrd shelix
This new system works extremely well. I didn’t have any problems installing it, it just takes a little time. Well worth the cost.
D**E
Like a whole new machine!
Worth every penny (and it takes a lot of pennies). Machine is quieter, doesn't work as hard and the finish is next level. Home run Byrd!
M**N
A big improvement...but not an easy install.
The end result of this highly regarded modification speaks for itself. The machine runs much quieter, with outstanding cutting results: say goodbye to snipe. Such an improvement, very pleased so far. That being said, I consider myself pretty handy, but I admit I was intimidated at the prospect of undertaking this installation. The .pdf instruction manual, available for download from the manufacturer's web site, is pretty thorough, and the photos are helpful. That being said, some parts of the installation weren't as easy as it looks, at least for me. Re-assembly instructions are limited to "install in reverse order of disassembly." Okay, great, but they don't really tell you, for example, the best way to get the belt back on the pulley, so you are left to your own devices. I set aside some time on a weekend, had a clean area to set aside disassembled parts, and managed to finish in a couple of hours. While most of the tools required for installation are standard, you'll need some snap ring pliers and a 15/16" or 24mm socket and socket wrench will be helpful. I've read some of the complaints about having to remove and re-install the cutter heads on the full size cutter, but really, that for me was the easiest part of the installation. Overall, very pleased. An expensive upgrade, but worth it.
C**4
Not perfect, but much better than the straight blades!
I believe this will be a great investment in time! The Pros: The noise level reduction was noticeable immediately. Hearing protection is still necessary, but it's definitely not as noisy. Installation was fairly simple but time consuming. The instructions are very easy to follow, complete with color illustrations. Plus, their are plenty of YouTube videos to guide you. I would highly recommend ensuring you have all of the necessary tools prior to starting. You will need spring clip pliers. I would also recommend a torque wrench to apply the 45 inch lbs to each of the blades. Hand tight just doesn't cut it (no pun). You can get one at Harbor Freight for around $20. Also get some general purpose grease. You'll need it as part of the installation, plus it'll be a good chance to do some routine maintenance. The Cons: With this being the oversize cutter, you'll need to remove all of the blades prior to installation. Re-installing the blades is both time consuming and aggravating because they have to be perfect. You'll likely go through a few test pieces of wood, adjusting blades accordingly. This is where the torque wrench is a must. With my arthritis and carpal tunnel, hand tightening to 45 inch pounds was impossible. Their are a number of videos to aid in blade installation. Overall, it was worth the purchase. The planer is quieter and smoother running. The planing results are much better than the straight blades. Not perfect though. With all attempts and techniques to fix the blades, I still had a couple on each end that leave slight marks in the wood; only minor marks which are easily sanded out with 220 grit. Their is the option of calling the Byrd manufacturer. I've heard the customer service is very good! It's still too early to determine whether this cutter is more cost effective versus the straight blades. I generally went through a set of straight blades at least once a month at roughly $60 a pop. With this cutter, you only rotate individual blades, which have 4 cutting sides. Plus it comes with 5 additional replacement blades. I foresee it being a premium investment, but time will tell.
M**D
So glad I switched
I have been wanting to do this upgrade for the past year. I finally had the opportunity to purchase it. You’ll need to give yourself 2 to 3 hours to install the new head. The printed instructions are so so but YouTube has a lot of great videos you can watch. I particularly like the video by The Snekker Show. Ben was very detailed and took you through every step along the way. He also provided great tips and tricks, especially in regard to reinstalling the 40 cutting heads. Because of his video, all of my cutting heads were installed perfectly the very first time. I did not have to adjust any of them. Like many others have said, the noise reduction by switching from Dewalt blades to the Shelix head is dramatic. Using a decibel meter on my phone my planer is now 20 to 25 dB lower than it used to be. The surface of my boards after being planed are much smoother now as well. I also haven’t had any issues with snipe since switching the cutter head. Overall, I am very impressed with this Shelix cutter head, and think it is worth every penny. I wish I had purchased this a year ago. If you do a lot of planing, then I highly recommend you get this Shelix cutter head. Also, go with this OEM version and not the smaller sized version. It is well worth the extra effort to install.
D**R
Defective from the factory and leaves ridges on the workpiece.
I bought this in April 2023 and had high hopes for it from the YT reviews and reviews on Amazon. Shelix/Byrd seems to have a pretty good reputation in this space when it comes to helical cutterhead upgrades for factory planners and jointers. Installation is a pain in the ass but you know that from the other reviews and YouTube videos. The other gentleman that commented on destroying the bearing race, I definitely see what he means. You have to be super careful not to score the bearing race taking the original unit out of the machine. Definitely have a pair of snap ring pliers or you are dead in the water. You also need to make sure you have a torque wrench that goes in inch pounds. 40 to 45 inch pounds is the spec for the knives. I had a wheeler "Fat Wrench" from my firearms projects that was perfect in this application. I'm not derating it for the install, it isn't easy but it isn't rocket Science either. The real issue is that this unit is known to have defects from the factory. Several users on Amazon reviews here and YouTube as well as lumberjock forums and other prominent Internet sources have elaborated on this at length. I noticed immediately after installing that I was getting a stripe down the center of the planing field. Approximately 3/16 of an inch thick and maybe a few thousands in elevation. Not impossible to sand out but certainly not appropriate for a brand new cutter head. I got busy with other things and didn't get back to the machine for a while. I had a big project recently where I needed to plane a whole bunch of pine. Soft 2x4 material. After getting a better feel for the rest of the planing field, there's several other areas where it's leaving step cuts and other irregularities that are completely unacceptable. Twice now I've removed all of the knives, rotated them 90°, re-torqued everything. It doesn't matter, it leaves the exact same marks in the exact same locations. It has to be coming from the actual cutter head spindle being out of spec. When I first noticed the stripe down the middle of the field back in 2023 when I first installed it, I had called Byrd. I got a middle-age female on the phone who clearly had no product knowledge whatsoever. Not to say that females can't have knowledge of woodworking tools but when I started to describe the issue she clearly had no idea about how any of the device works. There was no attempt to troubleshoot anything. Simply stated that since I bought it on Amazon they wouldn't warranty it. More recently after getting back into the unit, and finding more problems, I attempted to call Byrd at their telephone customer service line. No answer on multiple calls. I sent an email. I haven't heard anything back. Even posted to their social media. We'll see. It's a real shame the product doesn't work as advertised. It definitely is much quieter than straight knives and the surface finish, where it isn't marred by step cuts and stripes, is actually pretty outstanding. I hope they make this right and frankly I will update my review with five stars if they do, I care less about the $500 and more about getting my machine in perfect working order so I can finish my project. If I can't make this work I'll probably just sell it and get one of the bigger floor model powermatics with a helical head from the factory, but its certainly a big different between a 4 or 5k machine and the maybe 1k I have into this thing.
TrustPilot
1 个月前
2天前