🚽 Flush Smarter, Save Bigger — Upgrade Your Throne Today!
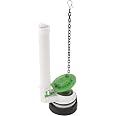
The Plumb Craft 2" Eco Water Saving Toilet Flush Valve is a comprehensive replacement kit featuring an adjustable flapper that reduces water usage by up to 54%. It offers a durable, leak-proof seal and fits most standard 2-piece toilets, including major brands. Easy to install with detailed instructions, this kit provides an eco-friendly, cost-saving upgrade for your bathroom.

| Material | Plastic |
| Brand | Plumb Craft |
| Item dimensions L x W x H | 12.5 x 4.2 x 3.5 inches |
| Inlet Connection Size | 2 Inches |
| Inlet Connection Type | Compression |
| Number of Ports | 2 |
| Outlet Connection Size | 2 Inches |
| Specification Met | WaterSense |
| Valve Type | flush valve |
| Global Trade Identification Number | 00028905764469 |
| Manufacturer | Waxman |
| UPC | 028905764469 784497709997 |
| Part Number | 7644611 |
| Item Weight | 9.6 ounces |
| Product Dimensions | 12.5 x 4.2 x 3.5 inches |
| Item model number | 7644611 |
| Is Discontinued By Manufacturer | No |
| Size | 2 Inch |
| Color | white and green |
| Style | Flush Valve |
| Item Package Quantity | 1 |
| Number Of Pieces | 1 |
| Included Components | Eco Water Saving Toilet Flush Valve |
| Batteries Included? | No |
| Batteries Required? | No |
| Warranty Description | Limited Warranty |
G**Y
Fixed our toilet!
No more running toilet. The overflow pipe is higher than my old pipe which makes our flushes even stronger. That was an unexpected bonus.I recommend watching the video for this product instead of reading the instructions. The included instructions have problems with where to put the washers - the instructions are just wrong and also do not agree with the included pictures.By far the hardest part of this install was getting the old parts off of our toilet. The old bolts were corroded and fell apart, the rubber had disregarded, etc. Once I got the old stuff off, then it only took a few minutes to install the PlumbCraft kit.I will be buying 2 more of these for our other toilets.
T**D
know before you go
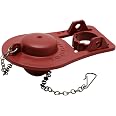
mostly the kit is fine ... only one (fairly big) problem that someone else mentioned - the spud gasket (that reddish brownish rubber ring doodad for all us non-plumbers) is very tall, about a 1" plus in thickness. this kit is an easy project to install for any non-professionals with 2 hands and a functional brain, BUT, if you have a low gasket with your tank like mine (1/2" total height) you will need to order a separate gasket to complete the installation. if you don't, your tank will sit much higher, be less stable, you'll have to really crank down the 3 (or 2) tank screws (and risk cracking the tank) to keep it from wobbling, and the water pipe won't reach the inlet thingy on the back side. overall good, but check the height of your gasket before you order, otherwise you'll be like me with a dismantled toilet in the middle of my bathroom floor - i'm pretending it's installation art for now - until the new part arrives.
C**C
Uses more water than my old valve
I was very excited to try out this water saving flush valve, but it turned out to use more water than my existing flush valve.Installation was pretty easy an straight forward, and as a flush valve it does its job. I adjusted the valve to use the least amount of water, but it was still significantly more than my other valve. I was very disappointed, and switched back to my old valve.I have a Kohler 1.6 gpf toilet, and my tank is stamped with 1.28 gpf. It says on the packaging that the potential 54% water savings are "based on reducing a 3.5 gallon per flush toilet to 1.6 gallon per flush." It doesn't say anything about it not being suitable for a 1.6 gpf toilet.
C**E
The flush valve is good. The tank bolts are throw aways
The flush valve assembly is well made and includes the necessary gaskets for an easy installation. The included tank bolts on the other hand are brass plated steel (use a magnet to verify). In my experience, brass plated tak bolts do not hold up and typically develop leaks causing rust stains on your toilet and floor below. By the time they leak, they are usually in such a state that they are a nightmare to remove and replace. Buy this product for the valve. Throw away the tank bolts and get a set of solid brass bolts (if you can find them anymore), or better yet, go with stainless steel tank bolts and avoid a future hassle.
V**N
Fixed our vintage toilet!
We have one bathroom in our house that is vintage and we wasted money and time trying to fix the toilet. This fixed it however we did have to use a different adhesive to get it to stay put. The "putty" included seemed to work well at first but quickly proved it would not stay put over time. That being said, by using another adhesive this perfectly fixed our vintage toilet! Flushes perfectly, does not leak at all.
B**B
Next "home project" !
Will be installing- calmly- soon ! I want to do it calmly- so there's a "minimum of problems"- as this is replacing an older- & a bit different distem that was installed "years ago" ! It's also less costly than the nearby "chain" store- & I think is better made.
B**I
Not impressed with this flapper valve replacement.
The scenario: A toilet running every 20'ish minutes due to a leaking flapper valve. Have replaced 3 times with replacements from the local big box store that lasted no more the 6-9 months. This particular toilet sees high usage for a residential toilet. We do not have hard water.The mark:I am not a pro at toilet tank repair, but I'm definitely no stranger to it either. I've successfully repaired probably 20 toilet tanks over the last 15 years.The execution:First off the instructions indicate that you have to completely dry the valve seat prior to installing the adhesive ring. So I said to myself, that's going to be a pain in the butt. I decided to first try installing the new flapper valve on the old valve seat, but the new valve hinge slots are made so that when they engage the old hinge pins the angle of the valve does not match the angle of the seat. I then soaked up every drop of water I could from the tank and let the whole thing air dry for 48 hours to give myself a fighting chance of getting the adhesive ring to stick. After letting the valve seat dry for 48 hours, I just followed the rest of the installation instructions and the install seemed to go as expected. Fast forward two months, the adhesive ring now leaks and I'm back exactly where I was before using this product, a toilet running every 20 minutes.
S**N
The gasket is too hard!
The gasket between water tank and bowl is too hard that can not seal the water, the gasket must make a little soft.