
🍳 Elevate your breakfast game with the pan that chefs swear by!
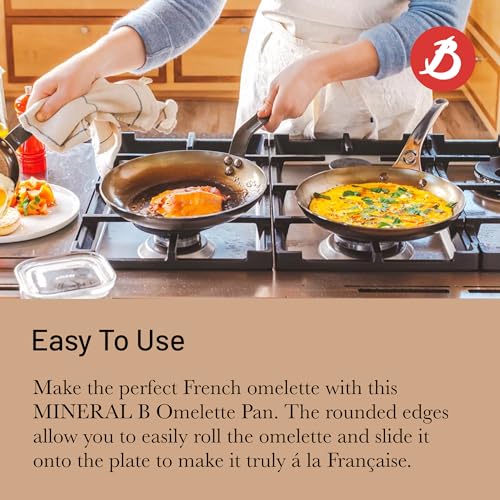
The De Buyer 24 cm Omelette Pan is a premium heavy iron pan coated with an organic beeswax finish that naturally enhances non-stick properties through seasoning. Designed with a thick, undeformable skirt and ergonomic shape, it offers superior heat retention and effortless omelette flipping. Compatible with all cooktops including induction, this pan is built for durability and professional-quality cooking at home.


| ASIN | B00F2GYNA0 |
| Best Sellers Rank | 261,901 in Home & Kitchen ( See Top 100 in Home & Kitchen ) 24 in Omelette Pans |
| Brand | DE BUYER |
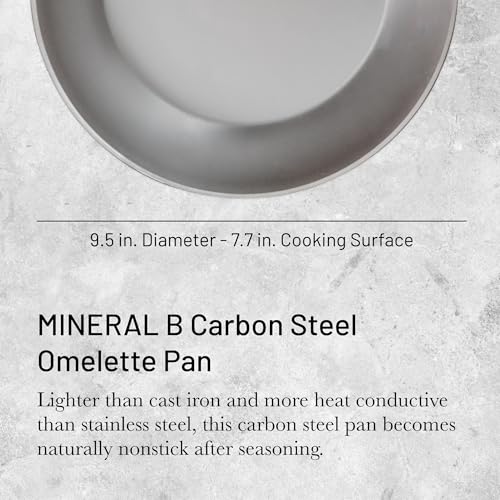
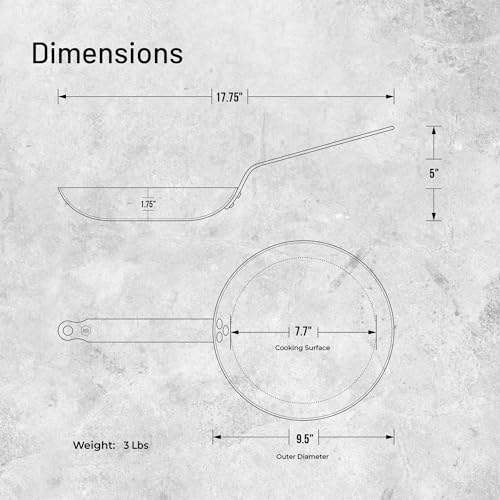
| Capacity | 0.4 litres |
| Colour | Silver |
| Compatible Models | Gas |
| Customer Reviews | 4.4 4.4 out of 5 stars (1,352) |
| Date First Available | 9 Sept. 2013 |
| Diameter | 24 Centimetres |
| Item Weight | 1.38 kg |
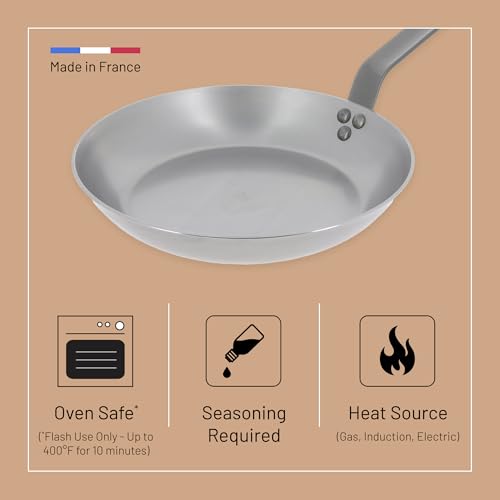
| Material | Steel |
| Model Number | 561124 |
| Special Features | Electric_Stovetop_Compatible,Gas_Stovetop_Compatible,Induction_Stovetop_Compatible,Microwave-Safe |
L**T
Perfect omelette pan.
This is perfect for omelettes: it is the only pan I've used that has the right shape, the right size (for a 2 egg omelette) and the right weight - heavy enough to have really good heat retaining properties, but not too heavy to handle easily. The advantage it has over non-stick (apart from being just nicer) is that you can whack the heat up to maximum and sear things properly at high temperature without worrying about ruining the coating. And if you do ruin the coating, you just scrub it off and put a new one on. However you have to be aware of some unavoidable facts about this type of pan: - it needs to be seasoned properly to work and the seasoning needs to be looked after. - once it is seasoned it will be dark brown or black, not like the nice shiny thing in the picture (De Buyer have a picture of a seasoned pan on their website). - it is only useful for cooking certain types of thing - basically anything acidic is out, which includes onions and tomatoes. So it's great for omelettes and pancakes, and also for flash frying meat or fish, but don't expect to use it as your only frying pan. - it is made of iron and therefore will rust very quickly if it is left wet, or with acidic food stuck to it. If the rust is bad, the surface will be pitted, which basically ruins it. It's only worth buying if you are going to use it regularly: if stuck in a cupboard for a year, it will probably rust.
W**K
Should’ve bought this years ago…
I’ve had a Sunnex carbon steel for a few years and it’s been good for certain things like crispy fried eggs, home fries, stir fry’s and shallow frying. I’ve cooked steak on it but have to remove from pan and let the temp come back up as it’s only 1mm thick so wouldn’t retain heat. Burgers would come out nicely crusted on one side and stewed the other. People often change from non stick to carbon steel because of the perceived risks of Teflon. The truth is I think there’s a place in the kitchen for both, in fact they are both a necessity for me. My pan collection now includes 2 carbon steel pans, 1 carbon steel wok, 1 stainless steel pan and 1 non stick pan. The non stick is only used to cook scrambled eggs in butter using a silicone spatula in low heat making the best scrambled eggs and potentially allowing the pan to last many years more than most non stick pans. Provided I don’t accidentally scratch the surface it could last my whole life. The stainless steel is a specialist pan for dishes that involve using the fond that develops from cooking proteins such as pan sauces plus anything acidic such as heavy tomato based dishes. For frying stuff, nothing beats carbon steel. My brother had a cast iron skillet but the weight made it very inconvenient to use for the whole family and having had a small carbon steel pan in the family for over 30 years, I knew this was the way to go. I finally got this de Buyer and I wish I bought it years ago. The seasoning it would have built up by now would be perfect. As you can see from the pics, it seasoned up really well. I did the obligatory egg test and it flew around the pan. Temperature control will take getting used to as it retains so much heat you could practically fry an egg almost all the way through off the residual heat from the pan. This pan, like most carbon steel pans, will outlive me and be passed on through future generations of my family. I can’t recommend this enough. It’s probably not for everyone as most get by with a non stick pan for most day to day light cooking but for people who want to cook restaurant quality food at home, know that the right tool matters.
M**N
Superb quality professional pan
Very good pan for frying at higher temperature. It’s a serious quality and I’m surprised the price is not higher. It’s a professional product so don’t expect anything less. It’s heavy, robust and needs looking after. Season it properly and use only water to clean it and make sure you oil it lightly after use. A previous reviewer said it rusted, but it won’t if you look after it. This a pan for life and is a better non stick than any coated pan or aluminium. These pans (and have 4 le creuset fry pans) are fine for medium heat cooking, but they aren’t designed for cooking at high heat, which these De Buyer pans are. I’ll be buying more of these beauties.
S**C
Good quality pan
Lovely pan, good weight, good size for dingke 1 portion omelette.. wish I'd bought the bigger one. Struggling to season it but never dine it before. I have induction and it's hard to season on induction.
S**G
awesome pan
This is a really nice frying pan but I wasn't prepared for how heavy it was, I should of realised as this is cast iron saying this I do use it, it does give instructions how to season it on the packaging, but I had to look on utube so I could make sure I was doing it properly, I did find this so easy to use but it gets very hot fast, so if you get this be careful, as I am only in a small house and I did a steak once to see how it cooked and it created so much smoke it set the smoke alarms off, so it was panic mode trying to wave the smoke away, so now when I use it I tend to put a lid on and keep the gas low, but it does cook steaks great
A**G
The best pan you can buy.
Most amateur cooks will buy non stick pans and end up having to buy new ones after a couple of years because the non stick coating deteriorates over time. This pan at half the cost will stay non stick forever if you treat it right. Season the pan and then deglaze the pan after each use and it will stay perfect, forever. As a former chef these are the pans we used to use. Just remember to use a cloth to hold the handles as they do conduct heat and get hot. My only gripe about these De Buyer pans is the handle is coated so you can only flash them in the oven for about 10 minutes. But this is usually more than enough time to finish off whatever you started cooking on the hob. Don't buy any non stick pans as you'll have to buy again and again. Buy this type of pan.
H**N
very poor.
Used once and has gone rusty. Bought because of the reputation but this has put me off buying anything else by De Buyer.
P**D
Une poêle professionnel, qualité parfaite. Une fois bien culotté, c'est impeccable plus rien n'attache. Je recommande vivement.
B**S
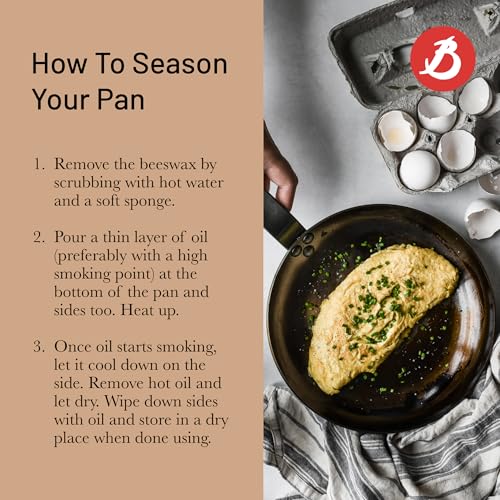
This is my second de Buyer carbon steel pan after a 10.2 inch mineral b skillet. I've had the other for years and have learned a lot about seasoning that has helped me with this new pan that I'll get to, but first, I'll give my impressions of the pan. COMPARED TO OTHER DEBUYER PAN: For some reason, when I ordered this pan I thought it was was 10.5 inches and would be slightly bigger than my other de Buyer skillet. This is actually 9.5 inches and although I'm a little disappointed that it's not bigger it's still a good size. It's only about 1/2 inch smaller but over a pound lighter than my other pan and has a shorter handle. The weight difference is very noticeable. The sides are also a little shorter. It's a pretty good size for an egg pan or for a burger, piece of fish or medium steak. I got this primarily to make French omelettes. I have made them in my other skillet with Lyonnaise-style angled sides which is not ideal when trying to flip and fold the omelette. I'm hoping the rounded sides on this will work better. Also, since this weighs less it will be easier on the arm to flip the egg. The build quality is pretty much comparable to my other pan however the bottom edge of the base of the handle where it is riveted to the pan is rather sharp. It was probably stamped out but not ground down or filed smooth. An errant grab could cause a bad scrape and/or cut. Not a huge deal as that is not a place I'll be putting my hand very often, especially if the pan is hot but I'll have to be careful when washing it. It can probably be fixed with a file. SEASONING: I'll try to make this brief and concise. After years of trial and error with my first pan and lots of reading and Youtube videos I feel I have a fairly good method of seasoning and understand it a lot more than I ever have before. Here's what to do. 1. Mineral b pans come with a beeswax coating that must be removed. I got a new Scotch-Brite kitchen sponge with attached scrub pad and scrubbed the heck out of the pan with the abrasive pad while running very hot water on it in the sink. I did this inside and out several times until the sticky feeling of the wax diminished. When I was done the pan felt smooth to the touch and I could see accumulated wax on the surface of the pad. The appearance of the pan at this point had not changed from it's initial dull silver color. 2. Wipe the water off with a towel and put it on the stove burner until all moisture disappears and turn the heat off then wipe with a paper towel. Gray metal residue will come off onto the towel, most likely left from the factory polishing job. Fold the towel and wipe until residue appears to diminish then run the pan under hot water again, add soap and scrub for 10 seconds or so then rinse, dry and repeat wiping with clean paper towel. Repeat this whole process one more time or until hardly any more gray appears on a clean paper towel. At this point the pan still appeared the same as when I began. Side note: I don't imagine any of this residue would be very harmful to ingest but I wanted to minimize it so that it doesn't interfere with the seasoning, possibly weakening it. 3. With a new clean and dry pan, add a dime's-worth or so of flax seed oil (I'll go into why I chose flax later). Wipe the interior with the oil. You might see oil streaks and it may be fairly glossy. This step is important. You do not want large amounts of oil on the pan. Wipe with a fresh paper towel (from now on PT) until you see no streaks and it appears as if you've wiped all the oil off. If you swipe it with your finger the amount of oil should be almost imperceptible. Now, put on stove top and heat at high heat on largest burner. You might need a pot older as eventually the handle will get too hot to hold. Constantly run the PT around the pan as you heat. Light swipes are OK and you don't have to lean into it. I just wad up a PT and use my hand. If you're afraid of burning yourself use a pair of tongs. As you wipe there may be spots appear on the pan that look wet. The goal is to constantly evenly distribute the oil around the pan and smoothing out any glossy spots that appear. One way to tell is to look at lights from the room reflecting into the pan. It will start off kind of semi-gloss and glossier spots will appear that you want to even out. You may even feel roughness over these wet spots. It's almost like buffing out the rough spots. Also, the pan will start to darken from the center out. It will progressively get darker with each seasoning layer. After several minutes, depending on your burner heat, you'll suddenly see the surface go matte and dry looking. Keep swiping your PT and keep heating. You'll notice a smell from the flax oil that will remind some of paint. It's kind of pleasant actually. The hotter it gets the more fragrant it is. At some point the oil will get hot enough that I believe it reaches its polymerization point. If you've been looking at the PT every once and a while as you were wiping, you would have noticed very little color coming off on the PT. Only a very light golden color. When I believe it reaches the polymerization point you will notice, especially if you're rubbing too hard, that darker material is coming off on the PT. At this point I believe you can stop wiping the pan as it will only diminish your seasoning. I heated several minutes more past this point but saw no change to the pan and I did not ever see any smoking. Turn off the heat and let cool for several minutes. Wipe the pan again gently with a clean PT. You should see no real residue coming off. Your PT should look almost clean. I believe that as it cooled the newly polymerized oil solidified and is now set. Rub some more and you should notice significantly less friction on the pan. Now, let cool until you can rub your hand on the pan and repeat steps 1 through 3 until you have the desired amount of seasoning (some put seven or eight layers on). I believe it's important to only add more oil when the pan is cool to the touch. If the pan is too hot and you pour oil in it, it may start the polymerization process before you can evenly distribute it and wipe out the excess which will leave you with streaks and splotches. I believe that this is the main problem people face. They get uneven, splotchy, sticky finishes because they're using way, way too much oil, or the pan is too hot when the put in oil, or they aren't constantly wiping during the heating. WHY I USED FLAX OIL. I used Barlean's Organic Flax Oil Pure Unfiltered 16oz, approx $10-$12 from Amazon, Whole Foods, Sprouts or a health food store. There are two types; the one I just mentioned and one with added lignans. You may also find other brands that add other ingredients. I chose to go with the pure oil and no additives. Also, you'll find it refrigerated. It needs to be refrigerated to prevent oxidation and it also doesn't have a long shelf life. You won't need anywhere near 16 ounces to season a pan and you probably can't use it all up seasoning as you'd have to have dozens of pans. I couldn't find any smaller amounts so, if you've done all your seasoning you can eat the rest of the oil before it goes bad. People take it like a supplement as it's a good source of omega 3 oils. It's also not real great for cooking with as high heat will reduce its nutritional effects, however that's what makes it good for seasoning. I found out about benefits of flax for seasoning after reading this http://sherylcanter.com/wordpress/2010/01/a-science-based-technique-for-seasoning-cast-iron/ which convinced me to try flax. The short of it is that flax is a drying oil which is what works well for the purposes of seasoning cast iron or carbon steel. If you've done everything right you should have a nice even, dark bronze to black colored pan . If you end up with slightly sticky spots in the pan or areas that are less slick than the rest these spots my not have fully polymerized. I haven't dealt with this enough on a new pan but I suspect that you can heat the pan and wipe with clean dry PT (don't add any more oil) until you feel the spots become more slick. I will update this after I've gotten some cooking with it under my belt. UPDATE 7/23/215 There are some things I didn't mention about the seasoning. I seasoned my pan about eight times. It got to be a real pretty deep bronze color that transitioned to lighter pretty blues the longer I heated the seasoning. For the bottom I only did 2 to 3 layers early on and then continued to add cooking surface layers. After I was all done the bottom was a real light blue color. Spots kept appearing which I finally realized were due to the burner grate that probably had oil residue from other pans. For the cooking I made my first omelette. I heated the pan and a tbsp of butter to almost browning it then poured in 2 beaten eggs at almost room temp. They formed a sort of "pancake" and the whole thing slid around like it was on ice. When I was ready to fold the egg partially over on itself I found out that the pan was actually a little to slick. As I flicked my wrist back to flip the whole egg pancake just slid back into the pan so I had to use a little more force in my wrist flick but I almost sent the whole thing flying out of the pan. Overall the pan was super slick. More nonstick than any other pan I've used. Almost a little too nonstick :). For my next omelette I may use slightly less butter so it's not so slippery. One more thing of note. After cooking in it for the first time the pan got noticeably darker approaching the color of my other carbon pan with years of use that has deep dark brown color.
U**R
Remove the yellow plastic from handle, coat it with an oil or pure fat (butter doesn't work, has milk particles, they become coal like). Put it into an oven hot as possible or even to direct fire. Let it turn black. If it has empty spots, do it one more time. Now you have the perfect pan, lighter than cast iron, durable til you die. It is non-stick but not as non-stick as teflon, you can't cook eggs without oil or butter. You can even put it into dishwasher but that can remove the blackness (seasoning). If you have solid enough seasoning, it will be okay, otherwise burn it again. I live in a studio condo. I could get away with the seasoning process.
S**O
Per chi usa piani ad induzione è la padella ideale! Acquistata in Dicembre 2016 al prezzo di 30,42.. ora è a 25,90. E' l'unica padella per fare le creaps. Il calore del ferro la rende ideale per rostire tutto l'impensabile. E' antiaderente ma nel contempo permette quella "crosticina" che le padelle antiaderenti non fanno. Mi spiego, a temperature (potenza induzione 5) basse scalda e cuoce perfettamente, ma quando si vuole avere la "crosticina" si alza a 7. La consiglio vivamente e a 25,90 a maggior ragione.
P**R
This is an excellent egg and omelette pan. Now I just need a 27 version for bigger omelettes and crepes.