We remain fully operational. Our teams are working around the clock to ensure your deliveries continue safely.

下载应用程序


🚀 Print smarter, faster, and in full color—join the 3D printing elite!
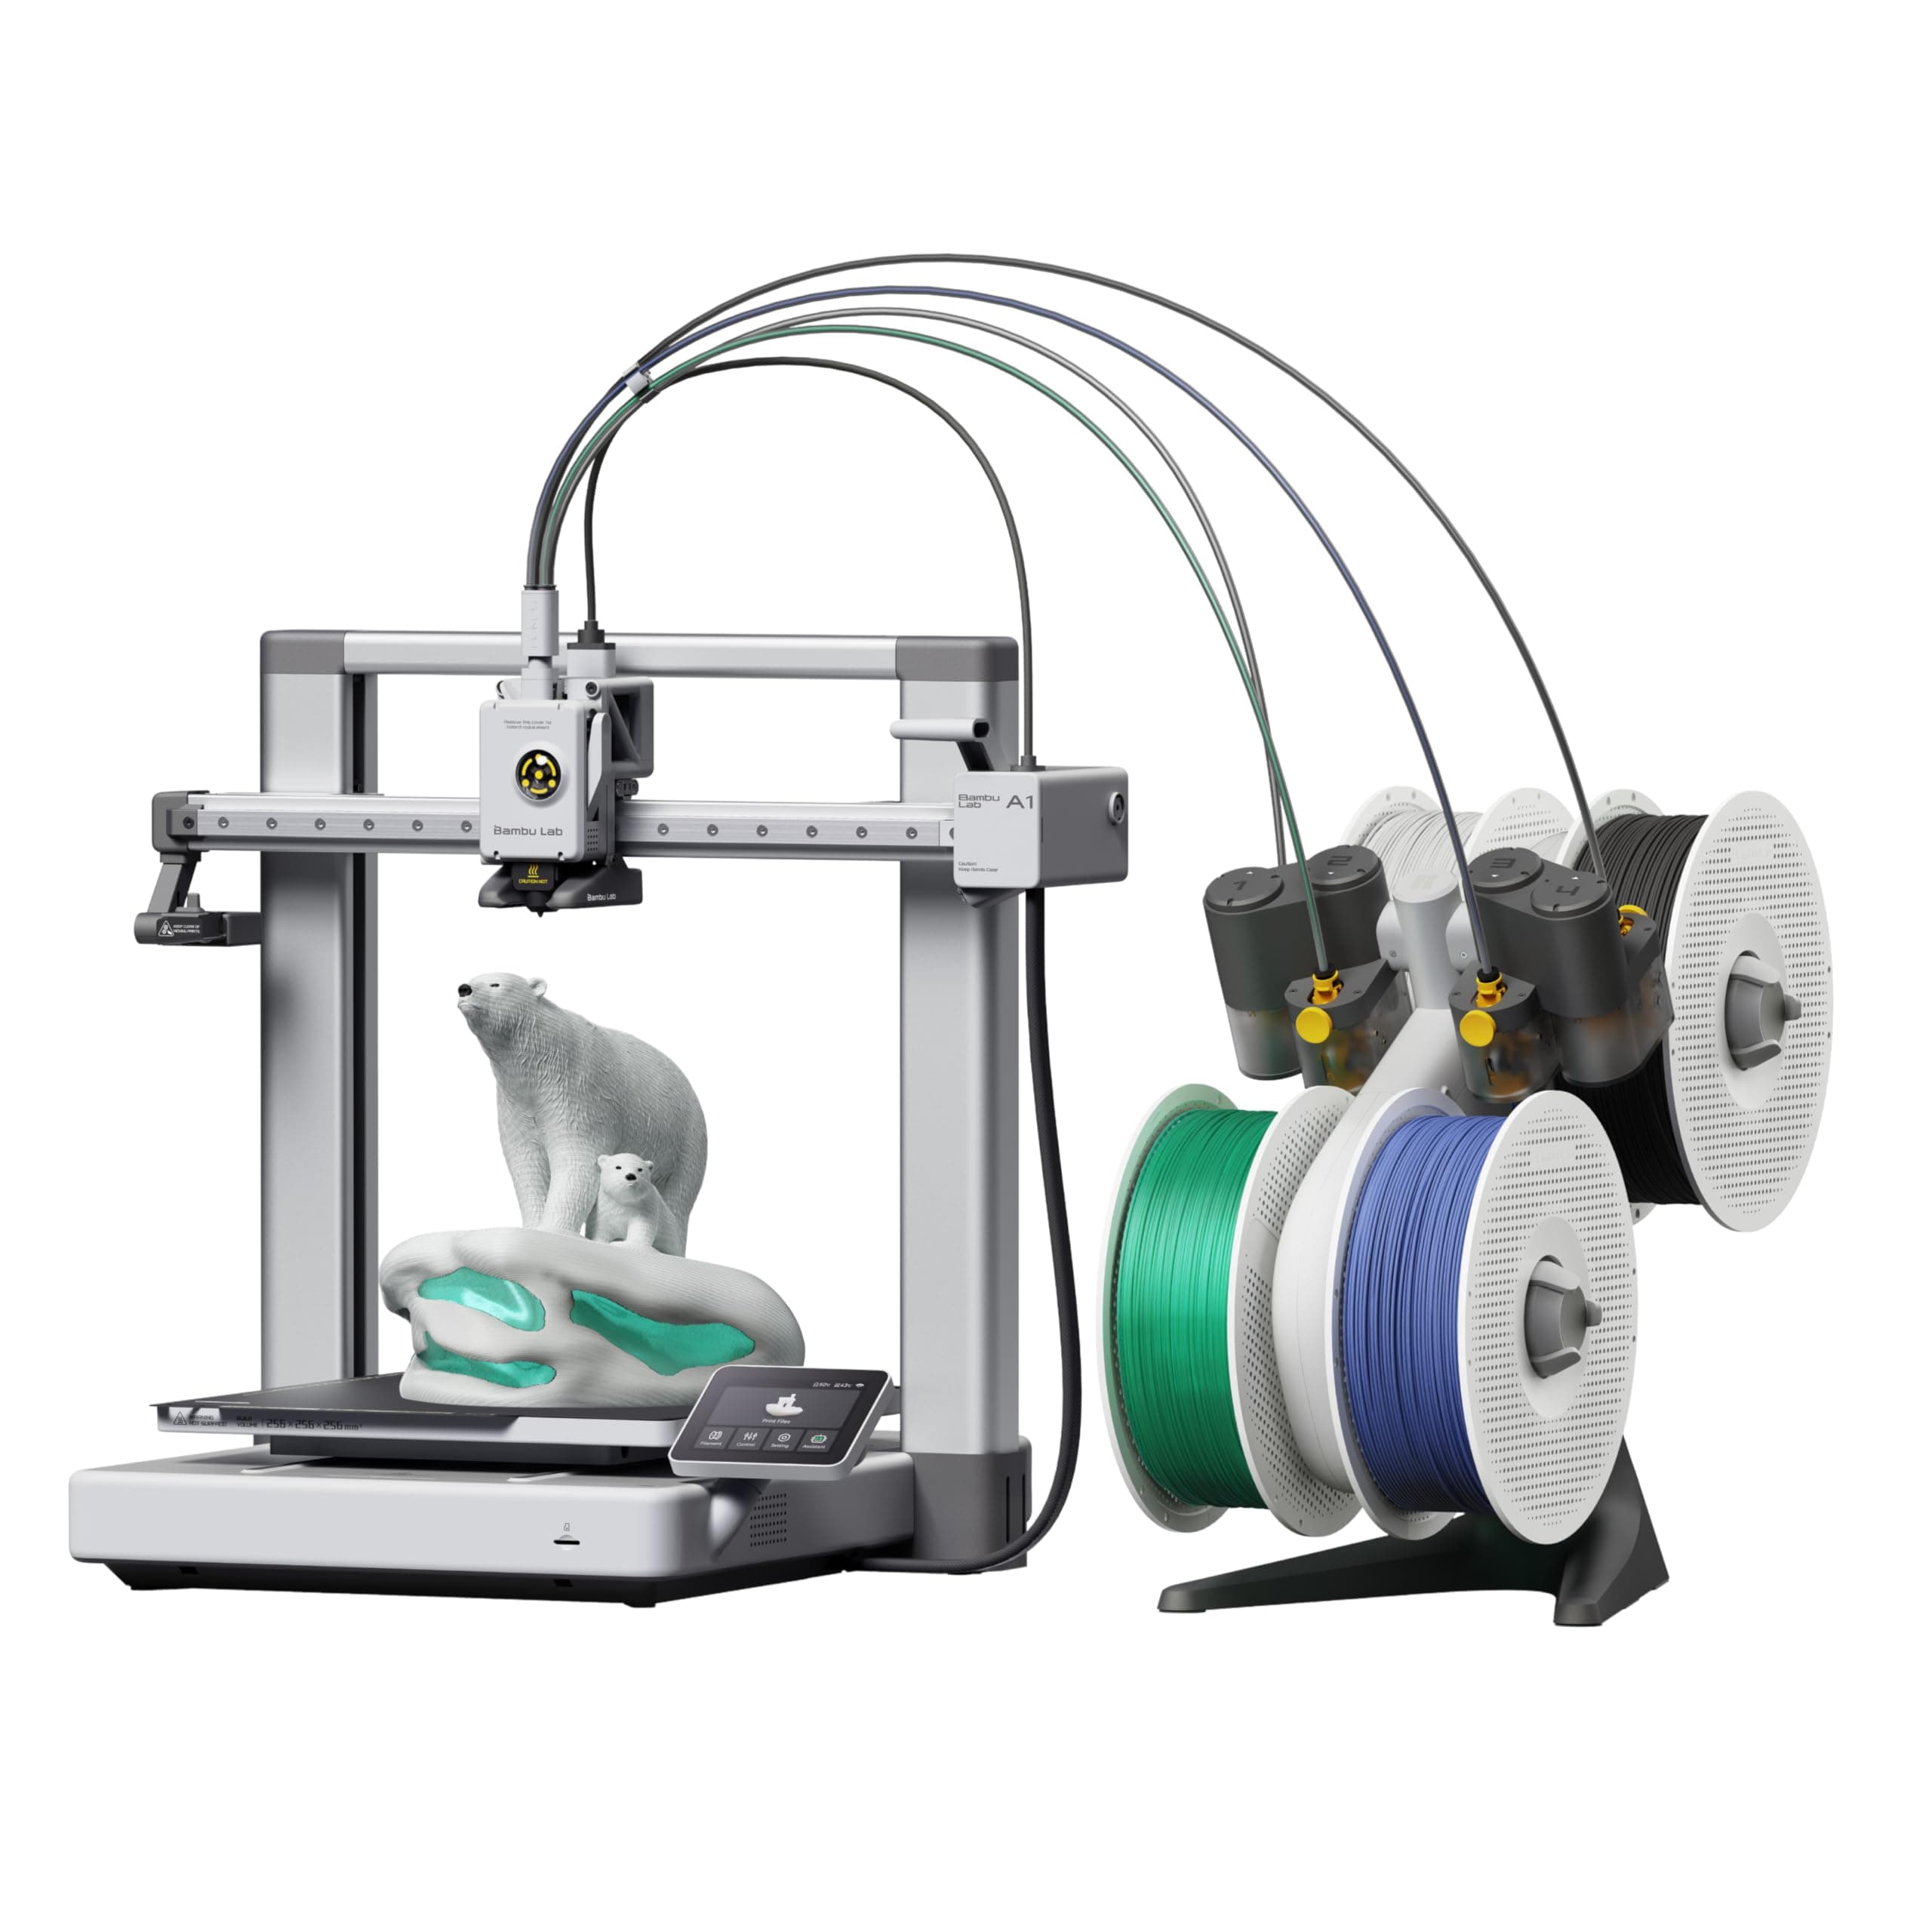
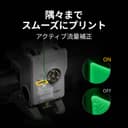
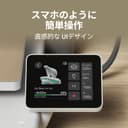
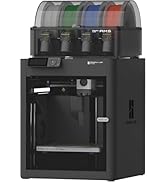
The Bambu Lab A1 Combo 3D Printer with AMS lite redefines desktop 3D printing by combining ultra-high speed (up to 500mm/s) with industrial-grade precision. Its fully automatic calibration and active flow compensation ensure consistently flawless prints, while AMS lite unlocks vibrant multi-color capabilities. Designed for professionals and enthusiasts alike, it features easy assembly, a quiet motor with noise cancellation, and a sturdy metal frame for stable, reliable operation. Perfect for those who demand speed, quality, and creative freedom in one sleek package.


| ASIN | B0D17V4SKM |
| Amazon Bestseller | #667 in Industrial & Scientific ( See Top 100 in Industrial & Scientific ) #2 in 3D Printers |
| Batteries Required | No |
| Brand | BAMBULAB |
| Color Name | gray |
| Compatible Devices | Laptop |
| Connectivity Technology | 3D Printer |
| Customer Reviews | 4.5 4.5 out of 5 stars (452) |
| Date First Available | April 10, 2024 |
| Included Components | Bambu AMS lite, Bambu Lab A1 3D Printer |
| Item Model Number | PF002-A |
| Item Weight | 12.93 kg |
| Item model number | PF002-A |
| Manufacturer | BAMBULAB |
| Material | Metal |
| Operating System | Linux |
| Product Dimensions | 58.45 x 53.49 x 42.6 cm; 12.93 kg |
| Size | A1 Combo (with AMS lite) |
A**ー
【良かった点】 ・最大500mm/sの高速造形でも品質が安定していました ・AMS liteによる多色造形で、作品に彩りを加えられました ・全自動キャリブレーションで、面倒な調整が不要でした ・アクティブ流量補正により、押出が安定して仕上がりが美しかったです ・静音性が高く、造形中でも生活空間に溶け込みました 【気になった点】 ・AMS liteが必須なので、多色造形を楽しむには追加投資が必要でした ・造形サイズは十分ですが、大型作品を作る人にはやや制限を感じるかもしれません ・ノズル交換は簡単ですが、予備ノズルを揃えておく必要があります 実際に使ってみると、組み立ては驚くほど簡単で、初心者でもすぐに造形を始められる安心感がありました。 高速造形でも造形品質に妥協がなく、細部までシャープに仕上がるのは感動的でした。 AMS liteを使った多色造形では、単色では表現できなかった鮮やかな作品が完成し、創作の幅が大きく広がりました。 静音性も特筆すべき点で、サイレントモードでは48dB以下。 『造形中でも図書館みたいに静かね!』と感じるほど、生活空間に馴染みました。 夜間でも気兼ねなく稼働できるのは大きな利点です。 電気代についても、定格消費電力を約300Wと仮定すると── 300 ÷ 1000 × 27 ≒ 8.1円。 『1時間造形しても電気代は約8円ね!』と安心できました。 毎日数時間使っても月額は数百円程度で、趣味として続けやすいコスト感です。 造形中にフィラメントが途中で絡まり、思わず『糸玉が逃げ出したみたいね!』と笑ってしまいました。 小さな事件も祝福のユーモアに変わりました。 まとめると、高速・高精度・静音・多色対応を兼ね備え、初心者から上級者まで安心して楽しめる3Dプリンターでした。
メ**チ
多くの人と同じようにA1 miniで驚愕し、A1(AMS lite付き)を追加購入しました。 当初はP1SやCentauri Carbon、Kobra S1やQidi Q2あたりのエンクロージャモデルを検討していたのですが、使い勝手やサポートの面が未知数だったため、結局慣れ親しんだBambu Lab製品を選びました。P1SではなくA1にしたのは、マグネット式ホットエンドの採用、ノズルが共用、静音設計、PLAやPETGが主、同等の造形クオリティ、そして何より価格が決め手となりました。 良かった点として、重量増と接地幅が広いことで安定感があり、振動による積層ズレが軽減されるように感じました。またAMS liteが優秀で、絡みや引っ掛かりのトラブルが激減しました。トップマウントできるので場所を取らないのもいいですね。本体の組み立ては難しくありませんが、時期によって若干仕様変更があるようで、組み立て動画は参考程度、説明書を確認しながら作業する必要があります。 じつは少しでも費用を抑えようと中華製オープンソースのAMSとやらも使ってみましたが、フィラメント絡みまくり、動作不安定でトラブル対処に追われて、うちでは使い物になりませんでした。情報が少ないので自力で改善できる方はいいですが、安定動作する純正の代用としてはまったくおすすめできません。 使い始めてまだ数週間ですが、総じて満足度は高く、P2Sへのアップグレードはしばらく先になりそうです。
A**ー
【最新追記】追記分の不具合は解消されたようです。 対応早っ! 以下、最初のレビューです↓ エントリーモデルからミドルクラスにステップアップしました。 速いし静かで良いですね。 キャリブレーションも全自動だし。 良い値段ですが、高いだけの価値があると思います。 単色印刷に慣れていたので、AMS無しでも良かったかな…。 AMSはスプール(フィラメントを巻いている糸巻きみたいの)をカッチリ取り付けないといけないのでフィラメント交換が面倒くさいです。 白、黒、グレーのような使いやすい色をセットしておくと良いかな? 1つはAMS無し用に開けておいて。 使いにくくて余っていた青、緑、赤、ゴールドをセットしたのは間違いだった…。 【追記】 あ〜。スライサーソフトにバグがありますね。回避方法はありますが面倒なのが。 今まで他の人が作ったプリンタ関係のアクセサリをBambu Handy(スマホアプリ)から印刷していたので気が付かなかったのですが、自分で作ったデータを印刷しようと思ったら、1レイヤー毎にヘッドが左端に退避する。 タイムラプス用の設定らしいのですが、タイムラプスを使用しなくても解除されません。 対処方法として、複数のオブジェクトを一度に印刷する時は、準備段階でビルドプレートにあるすべてのオブジェクトを選択してからマージして全体を1つのオブジェクトに変換。『プロセス』の『その他』の中にある『特別モード』の『造形シークエンス』を『オブジェクト順』に設定。『タイムラプス』を『通常』に設定するとヘッドの退避が回避されます。 または、オブジェクトの再配置でヘッドの衝突が無いところまでパーツ同士を離して『オブジェクト順』にしてタイムラプスを通常にするか。 オブジェクトが1つだけの時は設定変更だけでOK。 簡単に言うと『造形シークエンス』が『積層順』になっているか、または『タイムラプス』が『滑らか目』になっているとNGらしい。 スマホしか使わない人、タイムラプスを使う人には関係ないバグですが、タイムラプスを使う人は少ないだろうしなぁ…。 印刷過程を気にしない人には印刷面が荒れてプリント時間が延びるだけの無駄な動作。 AMSの置き場所などでフィラメントに負荷が掛かっていてもヘッドの退避は出るみたいですが、スライス後のプレビューで『移動』を表示させた時、添付したスクリーンショットの様にヘッドの移動が左側に集中している場合はこの対策で直ります。 ※バグのあるBambu Studioのバージョンは2.3.0.70 プラットフォームはWindows11です。 他のバージョン、他のプラットフォームでも同じ症状が出るかは不明ですが、今日(2025年10月19日)時点では最新バージョンのWindows版スライサーです。 本体側の設定がスライサーに影響しているかは分かりませんが、一応カメラの設定はOFFにしてあります。 この情報にたどり着くまで長かった…。 星を2…1つ減らすか。 製品自体は凄く満足しているだけに、スライサーソフトでコケるのが非常に残念。 うちにはブーリアン演算のやり過ぎで、グルーピングならギリギリ形を保っているけど、マージすると崩れるデータとかあるからなぁ…。 作り直せよって話ですが。 バグが消えたら星5に戻すので、早く対策してくださ〜い! 非常に単純なコードの割り当て間違いだと思うのですが、今年の1月頃から同様のトラブル報告がコミュニティサイトに投稿されているのに、未だに直ってないんですよね…。 【半月使っての追記の追記】 Bambu Studioのマージはグルーピングをやり直すだけで、オブジェクトをブーリアン演算するわけではないのでデータの崩れはありませんでした。 まずは一安心。 マージとオブジェクト順の手間はありますが慣れてきた。 これくらいの手間ならどうということも無いです。印刷物毎に設定をいじるのは普通だし。 印刷品質は非常に安定していますね。 ほぼ毎日何かを印刷していますが、失敗してパーマになったのは1回だけです。 その1回も、エントリーモデルのプリンタで何回試しても失敗していたデータなので、プリンタの性能ではなく造形物の構造の問題。 ビルドプレートの性能が良いのか、キャリブレーションが適切なのか、ベッドの温度管理が良いからなのかは分かりませんが、サポートは必要ない程度の軽いオーバーハングで始まるような際どいデザインでも剥がれませんね。 真冬になったら状況が変わるかもしれませんが、その時はスカートを巻けば良いだけなので。(本体を覆って保温するのは推奨されていません) 無名ブランドのフィラメントや、1年以上防湿処理もせずに放置していたフィラメントでも結構綺麗に印刷してくれます。 フィラメントが吸湿しているのでヘッドからプチプチ音がしていましたが…。 PLAしか使っていませんが、ベーシック、シルク、グラデーション、マーブルと節操なく使っていても反りも出ず、PLAに関しては特に苦手な物は無さそうです。 本体のカメラは正直使えないですね。 カメラアングルが悪いのと、秒間1コマくらいしか更新しないので、パーマの確認くらいにしか使えません。 ヌルヌル撮影してくれたら良かったのに。 タイムラプスで撮影しても、このアングルだと面白くないんじゃないかな…。 印刷過程を見たいなら、本体のカメラではなくWEBカメラで撮影することをお勧めします。 コミュニティサイトに大量のデータがあるので、自分で3Dデータを作れない人でも十分楽しめると思います。 生成AIでモデリングする事もできる(らしい)し。(生成AIは使っていないので、詳しくは分かりません) AMSも意外と便利でした。 多色印刷には使っていませんが、使いやすい色をセットしておいて、自動でフィラメント交換ができるのは楽です。 無ければ無いで困らないけど、有ると便利。 と言うことで、バグは消えていませんが、総合的にとても満足しているので評価を5に変更いたします。
S**Y
3Dプリンターベストバイ商品 3Dプリンターがここまで普及したのもこの商品のおかげかもしれません。 UIやクラウドサービス、ハード面でもユーザーライクで親切設計。 機械音痴の方でも手軽に楽しめるくらいの親切設計。 基本的に公式は英語ですがアプリは自動で翻訳されているので、あまり不自由しません。 過去mega-sを使っていましたがそれに比べると段違いの性能を見せてくれます。 なにより印刷速度も速い!綺麗!静か! A1miniのほうが静からしいです。 メンテナンスも簡単! いろんな人が作ったモデルをスマホから印刷できるのもお手軽感の要因。素晴らしい。
中**秋
3Dプリンター2台目、以前のものはオートレベリングもなく手動で調整しなければいけなかったことを考えると、 天と地ほどの差。初心者ならこれを買っておけば問題なし。細かい調整が全部自動でやっていくれるので、かなり楽だと思う。
A**ー
一度、ノズルが詰まり対応に苦慮しましたが、対処方法がわかれば問題ありません。 印刷スタートで、後は勝手に印刷してくれます。なんのストレスもなく、とにかく早いので印刷しすぎてエレメントがすぐに無くなりそうです😆
T**7
本製品は、非常に魅力的なアイテムです。 一度手にするとその魅力に引き込まれ、使うほどに楽しさと可能性が広がります。 導入を検討する際には、いくつかの選択肢があります。 特に、本体のみよりもAMS(自動フィラメント供給システム)付きモデルをおすすめします。 さらに、A1miniよりもA1モデルを選ぶことで、より大きな印刷サイズの利点を最大限に活かすことができます。(使っていくとわかります。) 本製品は、本体価格を抑えつつフィラメント販売によって利益を上げる、かつてのカラープリンターを思わせます。 高品質のソフトウェアとともに、MakerWorldを通じて優れたプリントデータに簡単にアクセスでき、アイデアをすぐに形にすることが可能です。 さらに、自身で印刷したパーツを使って本体を改造し、その成果を他のユーザーと共有する楽しみもあり、往年の自動車改造文化を思わせる熱中体験が味わえます。 この製品を手にすれば、オリジナル作品を生み出したいという意欲が湧き、自然と3D CADソフトウェアを活用するきっかけになるでしょう。 使用するほどに、マニアックな改造の世界へと誘われる、非常に魅力的な製品です。
R**L
瑣末な設定が多すぎる。少し神経質傾向。、確かにモデルの精度は高いね。でもガンガン造形スキルを上げるには向いていないかな?そんな悩んでいる時間があるならば時間をデッサン、モデリングに使いたい。anybubicのamsを今度は買う。あくまでもマシンは目的ではなく手段なので足を引っ張られたく無い、ストレスない方がいい。 何度か使っているがフィラメントを選びすぎるし、何度も失敗する。各種プリンターを様々使って10年程、所詮、機械は目的ではなく創作を手助けする手段であるはず。高尚な立ち位置であるならば必要はないその点では失格。やはり自分の中ではダメな機種という評価になる。
M**E
Super impressed. This model has had some safety upgrades since its been reviewed by some of the big youtube 3d print folks. The set up took about 30 minutes and was relatively easy. Remove some screws, plug in some wires and set up the filament. The AMS section is huge and not listed in the dimensions of the printer. Sounds obvious, but I bought a table based on the listed dimensions and obviously they dont both fit. This also doesnt come with filament and the printer is kind of picky about what it would prefer to interact with. I bought some filament that would come quickly and it just didnt work right - the filament had a knot in it, it broke inside the tube and it took about an hour of fiddling to clear everything. This has been the only problem so far. here is what I like - bear in mind I had a creatly CR10s that was a lot more difficult to set up and I am still not sure that it properly leveled. I cant say that the CR10 had one good print out of it that I really loved. The leveling is done automatically - takes about 20 minutes on the first boot then is an optional thing for every print at the beginning. The printer has four modes of printing - stealth, standard, sport and ludacrous. Standard is fine, but I will say that I run most of my prints on stealth mode as it reduces the amount of wobble and vibration put out by the machine. Another recommendation here is to find a surface that you can secure to a wall. The 3d printer table I have was not stable enough to provide a good base for this and prints can lose quality with the amount of movement this printer is capable of. Lets talk about finding things to print. Normally I would scour the internet, download somethings, pay for some items and figure out how to create the settings. Not so here. The bambu community has made some great files and found the best settings for things you might want to print. There is a lot there and most of those things are coming out looking premium. The community has things they recommend printing as essential add ons, which I will describe next. I did the get AMS combo, but ended up not using it yet because of space and the previously mentioned jam. One of the essential add ons is a top mounted system for this which I will be printing shortly. Also the machine likes to fling filament across the room as part of its constant cleaning process. I recommend making a waste catcher as the very second thing you print after the benchy. The slicer this uses is really cool. I havent gone deep into the settings fully but one of the problems I used to come across was printing a file that had multiple parts that didnt fit on the plate. In this slicer, you can set up multiple plates, choose which one to slice first, send that to the printer - this all works wirelessly and seamlessly - and watch it go. For some items i have printed, I first tried to print something with multiple pieces, decided not to try and run the machine for 16 hours and opted instead to add a new plate, clone one of the items and go one at a time. The plate is also cool. On the CR10, it was a glass plate that never felt like it was as clean as the first time it came out of the box. Here we have a metal, textured plate that has enough bend in it to pop off a print and has great adhesion. It magnetises to the machine and is easy to pop off and then requires a bit of lining up to get back on. The build plate is a little small, but so far everythign i have found on the app has been for my printer. I will start looking into bigger cosplay prints soon and am thrilled to see that the slicer also has a feature for cutting prints into smaller pieces. no 3rd party apps required. There is nothing beginner about this hobby, but if you are looking for a first printer and am budget conscious this is a good option. The CR10s made me 3d printer engineer and repair guy... the A1 combo has allowed me to print and enjoy making.
A**7
This review is exactly what I wish I had read when I first started researching this printer. As a beginner, this printer was more than enough to take me to the next level in 3D printing. It is an excellent printer, very beginner-friendly, easy to use, and simple to operate for daily printing tasks. The setup process was straightforward, and the printing quality has been consistently impressive. One important note: the printer does NOT come with filament included, so you will need to purchase filament separately before you start printing.
D**W
After reading many reviews about 3D printers, I settled on this one with AMS Lite. I was not disappointed. The Bambu Lab A1 was recommended as an excellent unit for beginners and intermediate users, at an affordable price point. I have to admit that I am a complete 3D printing novice but reasonably tech savvy and quick learner. I was still a little nervous about setting it up, but the instructions from Bambu were very clear, and all the parts were well labelled and packaged. With lots of care, I took about 90 minutes to set it all up and needed about another hour or so to figure out the basic configuration and settings. After downloading the Bambu Handy app for my iPhone and later, Bambu Studio for my computer, I was off and running. Depending on your level of familiarity with tech devices and 3D printing, your experience could be quite different. The initial learn could take some time. But I am pleased to say that I managed to set up my printer including my AMS Lite (external filament spooler) and completed my first print job in the same afternoon. The printer comes with some 3D models preloaded into the printer and I selected a simple scraper which can be used to scrape the printer bed. By the next day, I was able to download 3D models from the internet and had them imported into Bambu Studio and successfully printed off on the Bambu Lab A1. But a word of caution, you do have to be patient as 3D printing takes time and there are many concepts and terminology that you have to become familiar with, and I still have a long way to go. But it was very satisfying to have my first 3D printer fully set up in an afternoon and successfully get my first few 3D prints working. I have already printed off 4 models, one taking up to 8 hours to complete. But if my experience is anything to go by, the Bambu printer is an excellent unit to get started with and offers so much more. The results so far have been amazing. I'm very happy with my purchase.
J**L
Great 3D printer for someone starting out or just a hobbyist. Easy to use and quiet. My wife set it up herself and used it first. I bought this for my wife for Christmas and we've printed gifts for people, containers for fruits and vegetables, and light switches. I've also printed shelves and holders for the network gear and hubs on the office desk. It's compatible with many filament types - you can even print your own shoes similar Crocs. Recommend any first timer for any 3D printer watch a few videos about protecting filament from moisture in the air and you'll have great success with print jobs. I've found the Bambu filaments the most reliable and easiest to use - especially since their spools are tagged so the printer automatically knows what kind and color filament is on the roll. The AMS lets you keep four different spools loaded which is great for multi-color prints
H**0
جميله جدا وعلى الوصف
TrustPilot
2 周前
2 周前