We remain fully operational. Our teams are working around the clock to ensure your deliveries continue safely.

下载应用程序


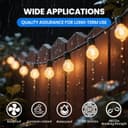


✨ Elevate your outdoor vibe with tension-perfect lighting! 🌟
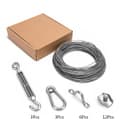
The Globe String Light Suspension Kit by Litcher features a 150ft transparent PVC-coated 304 stainless steel cable with an 81 lbs breaking strength, designed for durable, weatherproof outdoor light hanging. Complete with turnbuckles, hooks, and easy-to-install hardware, it ensures sag-free, customizable lighting setups ideal for patios, cafes, and backyards. Backed by a 12-month warranty and lifetime support, this kit combines professional-grade materials with user-friendly design.


| ASIN | B07GJQQ9RT |
| Best Sellers Rank | #12,610 in Industrial & Scientific ( See Top 100 in Industrial & Scientific ) #18 in Cable & Wire Rope |
| Brand Name | Litcher |
| Color | Original Rope |
| Customer Reviews | 4.6 4.6 out of 5 stars (2,458) |
| Finish Type | Polished |
| Grade Rating | Commercial |
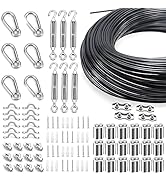
| Included Components | steel cabel,tumbuckle,carabiner hook,wall anchor,Wire Rope Clamp |
| Item Dimensions | 5.91 x 3.94 x 0.79 inches |
| Item Form | Coil |
| Item Shape | Linear and Metal |
| Item Weight | 1.18 Kilograms |
| Manufacturer | Litcher |
| Material | Stainless Steel |
| Number of Items | 1 |
| Part Number | 304 |
| UPC | 738596636166 |
| Unit Count | 150.0 Feet |
M**E
Easy to use, high quality, and lots of material!
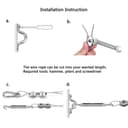
I'd been putting off using a tension wire for cafe lights in my backyard, because I was worried it would be hard to install. These were far easier than expected. All the necessary hardware was included, and the instructions included clear photos. I was surprised by how many attachments and types were included. I had everything I needed to attach the wire between two sturdy trees. I put up about 25 feet, with cafe lights running the full length. The tension wire helped them stay perfectly straight, no sagging, even through a hot Texas summer. The wire was the perfect thickness and well coated. Great quality. I would buy this set again, if I needed more.
A**S
Quality materials; intelligent kit
I was very impressed when I opened the box. It consists of strong, durable cable that is easy to work with and bags of high-quality stainless steel fittings. The possibilities are endless, but I had a specific design in mind before I ordered this kit and I already had two stainless steel eye bolts in backyard trees. The "hump" fasteners are perfect for the house. I only have a few parts left over--they've thought of everything, including zip ties, which I won't be needing. On the downside, the terse instruction card is written in near-English and doesn't begin to discuss layout or theory. I will look for the Litcher brand in the future--I'm a very satisfied customer.
H**!
Good product
Good product, good quality, easy to string lights on
S**6
Convenient and Complete, just need tools
This is a great little kit if you're looking to hang up string lights. I am using it for outside above my deck, and everything is included... very convenient. My only issue was with the screws that were included. They were an oval head type, but in my opinion, a pan head type of screw works better. I purchased pan head screws and this kit worked great! Very sturdy and stainless steel for weather resistance. I would definitely recommend if you're going to need support for string lights. Do keep in mind that you will need to have the right tools. The cable will need to be cut, and you will need a good quality cable cutting tool. You'll also need a 5/16 inch wrench or socket to tighten the nut that clamps the cable ends. Lastly, you'll need to have wire ties, or whatever you're planning on using, to attach the string lights to the cable.
K**N
Perfect for hanging sun shade
Worked great for hanging my Home Depot sun shade over my pool. Comes with plenty of cable too! Easy to hang and seems like it will last a long time!
B**3
Sturdiness
Exactly what we needed
G**S
First learn how to mount your lights, and pre-plan, so as to order the correct parts.
I’m glad I did some research on reviews and questions for this product. I saw rope lights on sale and bought 2 strings (96’) without knowing a thing about mounting them. Based on the reviews and product info, I found it was cheaper to order a kit like this one, instead of buying pieces-parts for the needed components. Secondly, I learned to buy everything in stainless steel since the support cable and hardware will be outside 365 days. The light strings themselves will come down for inside storage for the winter. To make the job of taking down / putting up easier, I bought some Wilbond stainless mini s-hooks (thru Amazon, of course) to use to hang the lights from the support wire. My lights have a small tab with a hole at each bulb. I placed one side of the S thru the tab, and crimped it down. The other side if the S was slightly crimped so as to still fit over the wire but narrow enough to resist minor movements of the lights during wind. Thus, they are easily removable/replaceable with the seasons. Before ordering, sketch out your layout, keeping in mind that where the light string(s) begin should be near your electric supply. Also plan on having some sort of switch to turn the lights on/off. Without a switch, plugging and unplugging will take a toll on the lights’ plug and the electric receptacle. The next couple of paragraphs describe how I laid out and installed the support wire. If you are already comfortable with how to build your plan, you my skip over them. In my plan, I needed to outline a rectangular area. So I began with sturdy screw eyes at each of the four corners. I selected the corner which was least obvious to viewing the power supply cord. On that corner’s screw eye, I attached two turnbuckles. Then i installed the “hump screws” along each side of the rectangle, between the corners, every 7-8 feet. Next the wire was strung around the perimeter, thru the screw eyes and hump screws, with the ends meeting in the corner nearest the power. Lastly, each end of the wire was passed thru the closed screw of the turnbuckle, clamped with a rope clamp, and the turnbuckle’s open screw hooked to the screw eye in that corner. You will need to use your own wits to figure the best way to remove the slack from the support wire as you are installing the turnbuckles. Do this before attaching the turnbuckle to the second end of the wire. A second person is valuable at this stage. I did it by myself by using the leftover rope clamps at each corner. Secure one end of the wire to its turnbuckle, go “upstream” to the next screw eye, pull the wire taught, then fasten a rope clamp to the wire on the “upstream” side of the screw eye. The clamp prevents the wire from going slack, slipping back “downstream”. Repeat at the next two corners. Now attach the turnbuckle to the second end of the wire, taking the slack out of the last section of wire with the turnbuckle. Finally, remove the three rope clamps that you temporarily used at the other corners. Finally, I’d like to point out that your pre-planning for locations of screw eyes, hump screws, turnbuckles, and clamps will dictate which of the many packages of hardware you should select. I did NOT plan in detail. I had a mental plan in mind, and figured that this package would fit the bill. It did not, exactly. I had a turnbuckle, 3 snap hooks, and 10 rope clamps extra, and needed to buy more hump screws. If you found this rating and my construction advice helpful, please tap the “helpful” button below the review. Since I was not paid for this review, my “pay” is knowing that I helped someone make a good choice thru my experience.
J**L
Excellent. Even a a nurse can install!!
Well made. Heavy duty. I am a 40 year old woman and was able to install this myself to hang curtains in my pavilion to add coziness to my hot tub area. The wire is strong enough to hang and not sag the curtains. I am a nurse by trade, not a mechanic. So there was trial and error during the install. The biggest thing I learned is to keep the turnbuckle open while hanging the wire as tight as possible. Then turn the turnbuckle to make it super tight. Of course this may be common sense for some people but was a learning curve for me. So turnbuckle open, attach anchors, Install wire, cut wire to needed length (leave extra length- you’ll need it when making adjustments) install the clamps to hold wire in place. Tighten turnbuckle. That simple. Very well made. And 150 feet of wire!! For this price ya can’t beat that. Just the wire at my local hardware store was 0.99 per foot. Craziness. I got the whole kit for WAY less than that. Definitely would purchase again.
TrustPilot
1天前
2 个月前