We remain fully operational. Our teams are working around the clock to ensure your deliveries continue safely.

下载应用程序


🎯 Nail perfect color every time — because your shots deserve to stand out.
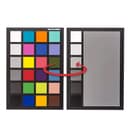
The Datacolor SpyderCHECKR 24 is a professional-grade color calibration tool featuring 24 precisely engineered color targets plus a grey card, designed to ensure consistent, accurate color across multiple camera systems and lighting conditions. Compact and travel-ready, it integrates seamlessly with major editing software like Adobe Lightroom and DaVinci Resolve, streamlining your post-production workflow with custom HSL presets. Ideal for photographers and videographers seeking budget-friendly, reliable color accuracy and multi-camera alignment.


| ASIN | B00LPS46TW |
| Batteries | 1 Nonstandard Battery batteries required. |
| Best Sellers Rank | #7 in Photographic Light Meter Color Calibration Charts |
| Customer Reviews | 4.6 4.6 out of 5 stars (1,991) |
| Date First Available | August 5, 2014 |
| Is Discontinued By Manufacturer | No |
| Item Weight | 5.3 ounces |
| Item model number | SCK200 |
| Language | Multilingual |
| Manufacturer | Datacolor |
| Product Dimensions | 8.6 x 6.3 x 0.59 inches |
D**O
Confusing at first, but let me help.
So, getting this for photo editing and photography to help me because I am what is called "Protan" color blind (I can't distinguish reds or variations of red or other colors with red in them, i.e. pinks, purples, oranges, etc) so color grading has come as a challenge. Enter in discovery of the SpyderCheckr24. I got this after seeing someone else do a review of them somehow importing a tool into Lightroom and editing their photos there just by the click of a single button. I couldn't figure out how to get it to work, so here's what you'll need to do: Pre-reqs: A. Download/register and install the SpyderCheckr App on your computer. You can find this link in the box to download. B. Choose your editing software suite (in my instance, that would be Lightroom) How to use: 1. First, you need to take a picture from the location of where your camera is, in the environment its in. Unfortunately, to keep color grading and white balance accurate, you need to redo this every time something changes about your photo/video shoot. When you take a picture of it, you'll want to fill as much of the frame as you can with it, and keep it square or parallel as close as possible to the camera. 2. Now, import your files into lightroom (or whatever your choice of editing software is) 3. Find the file(s) you took a photo of the spydercheckr24 and crop down and rotate it so it has the greyscale at the bottom row. Export this as JPG, and exit your editing software. 4. Open the Spyderchekr24 program, and browse to your JPG export, and import it. At this point you should see little boxes to square up. Move these boxes so they fit within the image, and process the color correction and export it as a preset to lightroom with whatever preferred settings you want. Once done, you can exit Spydercheckr24 app. 5. Relaunch lightroom, then you should find under "user presets" under the development module the preset to color correct accurately your environment. You can right click and move this to another folder or location if you choose. That's it, then enjoy having properly colored edited files! As for the product itself, you can see others reviews. Its not as nice as some of their other color correcting cards, but I keep mine in the box, and is of decent quality. Remember, you're paying for the software more than you are paying for the card. Sure its one extra thing to carry, but it ensures my colorblindness won't be a hinderance in my editing process!
A**E
No need to get the more expensive one if you are on a budget.
For those of you that are browsing here and are on the fence (as I was) based on some of the negative reviews, I would like to offer an additional point of view. 1.) This device is not made of cheap cardboard. While it is not a hard solid plastic, it is not "cardboard" fragile, and it seems to be coated with some layer of plastic or vinyl - making it "durable enough" for the task. It comes with a plastic sleeve for travel and storage. There is a small risk that this could get bent if mishandled, but if you take care to store and transport it properly, you will be fine. 2.) $50 for a piece of colored plastic may seem over the top, I must caution you that you are paying for the color science, as well as the material that provides accurate color despite glare and reflection. There are less expensive versions on EBay and Amazon that seem to accomplish the same thing, but you will find that they are less accurate under certain lighting, and DaVinci does not recognize these generic color checkers. Conversely, the SpyderCHECKR is the least expensive option that seems to be software-recognized. 3.) The other brand has a nice case, but I do not believe that it is worth the extra $$$ for my needs. The SpyderCHECKR also has white a white balance palette on the other side. I use the SpyerCheckR for matching disparate branded cameras. In my first test today, I took my Canon t6s and my Lumix G7 and filmed a short scene. I was very impressed with the workflow of using the SpyderCheckR with Davinci Resolve to generate 3D LUTS for each camera. I used the LUT's in Premiere/lumetri to create matching scenes. The process was also quite easy. The result was a footage match that is "close enough" for me, and I am quite sure that my customers would not be able to detect the difference. Coming from my past unsuccessful attempts to match cameras manually, I feel like this small piece of plastic has upped my production quality as well as sped up my workflow. I have attached my graded/ungraded tests for folks to review. In conclusion, if you have mix of camera brands, this is the least expensive, Davinci-recognized tool to ensure that the colors of your shots match across camera brands. I Highly recommend this device. (FYI, I was not paid for this review, nor given a free product - I purchased this tool because I was failing to get the colors across my cameras to match)
T**R
Chart is great. Gizmo not so much.
Color chart is Great. Still using it. Spyder Gizmo not so much. Expensive junk. Didn't last but a couple months.
J**A
Great Quality and Ideal Size for Travel/Locartion Work
The card provides the colour accuracy required to calibrate my different camera systems, but the size makes it an ideal tool for those who work on location or travel a lot and require compact packing, as the original charts were big and delicate to handle and maintain in top shape, while this smaller version can be stored in almost every small space available in any bag. So, top quality and convenient size make this my choice for now and in the future if I have to replace it.
V**A
Accurate. Works well.
Using this with LUMIX cameras and FCPX. Works great. Swatches seem accurate and make color correction a breeze. I like having the larger-sized card for video use, and at less then half the price of the Passport, it’s well worth it.
Ç**A
çok iyi
P**J
The Datacolor SpyderCHECKR 24 has become a crucial part of my workflow, especially when shooting in mixed lighting or across different camera setups. It’s compact, easy to travel with, and gives me consistent, accurate color across my videos and photos. If you’re serious about your image quality and want repeatable results across cameras and shoots, this tool is worth every penny. Highly recommended for filmmakers, photographers, and YouTubers alike.
S**H
Very good
J**E
Makes my editing so much easier. Great value for money.
S**R
You may think that this is an over-priced piece of flimsy plastic, but when you realise that it's engineered to have perfect colour fastness for years, and the resulting images you process will be colour perfect, it really is worth the investment. To use, you select your camera body, lens and lighting condition, and take a picture with the checker roughly central and about 1/4 of the frame. Bring it into the photo editing suite of your choice and crop it down to include just the checker, set the white balance using the 50% gray patch, then send it to the Spyder Checkr24 program (you can do this in Lightroom by using Edit In, and selecting the Spyder Checkr24 Editor. The software displays your image, along with an overlay showing where it will sample the image. This can be moved and scaled, but if you've done your cropping properly you'll not need to adjust this. You then tell it to save the calibration - in my case as a Lightroom preset. I recommend saving it as [camera body] [lens] [lighting condition] e.g. D810 24-70 VR Daylight. When you next start Lightroom you'll have a User Profile with the name you gave. Apply that, and it uses the HSL panel to adjust your colours to match reality. I calibrated every combination of my bodies and lenses that I shoot with in about 10 minutes. In reality you shouldn't need to create a profile for every lighting condition, as it works by adjusting colours relatively to ensure consistency. But it would be useful to take a calibration image if you have very challenging lighting conditions, or if you require absolute accuracy for product shots, or fine art, then it's a godsend. It really comes into its own if you shoot multiple cameras and/or lenses on the same shoot, and is pitched heavily at videographers to ensure colour matching between their A and B rolls. I'm delighted with the results, and you can really notice the difference, even if you apply the profiles to your back catalog.
TrustPilot
2 周前
1天前