We remain fully operational. Our teams are working around the clock to ensure your deliveries continue safely.

下载应用程序


🚀 Elevate your creativity with speed, precision, and effortless control!
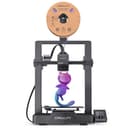
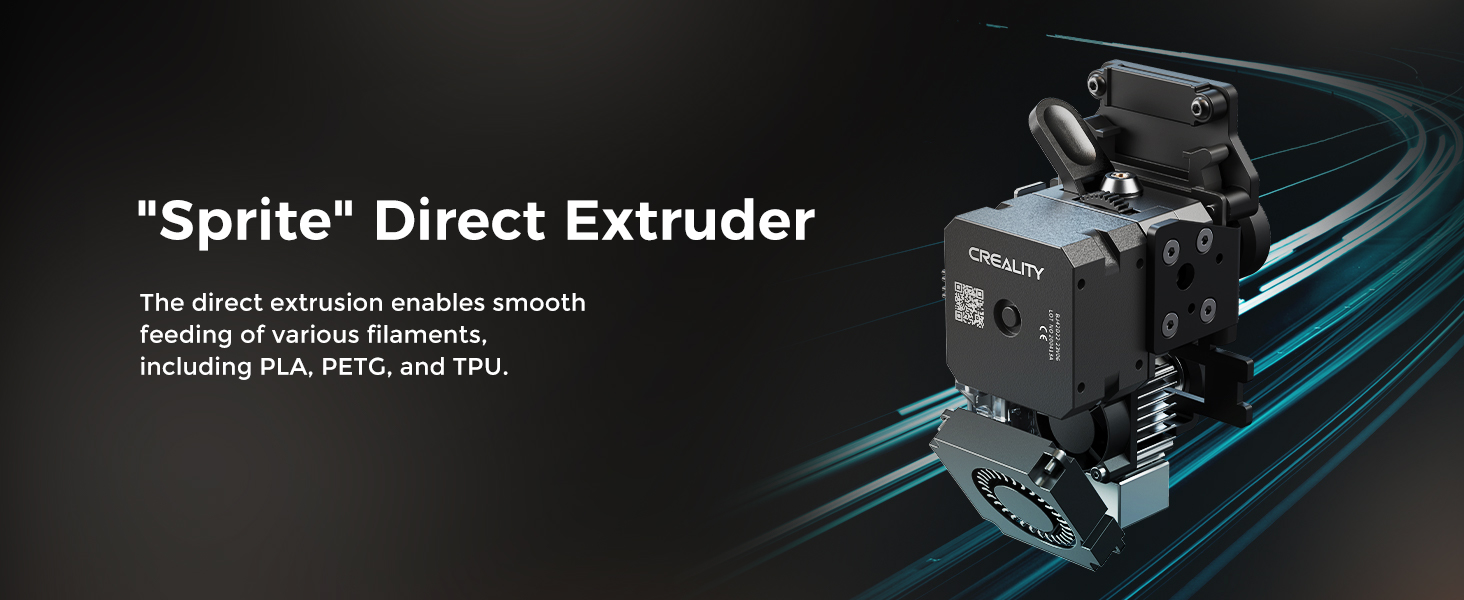
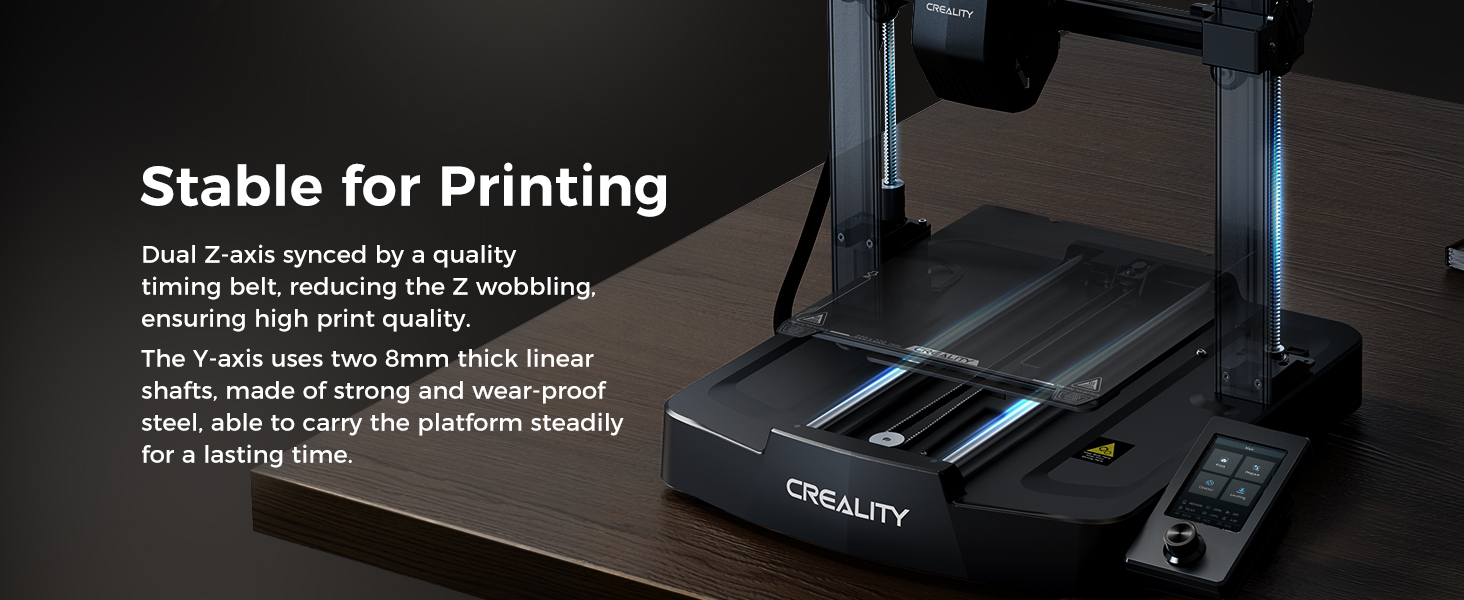
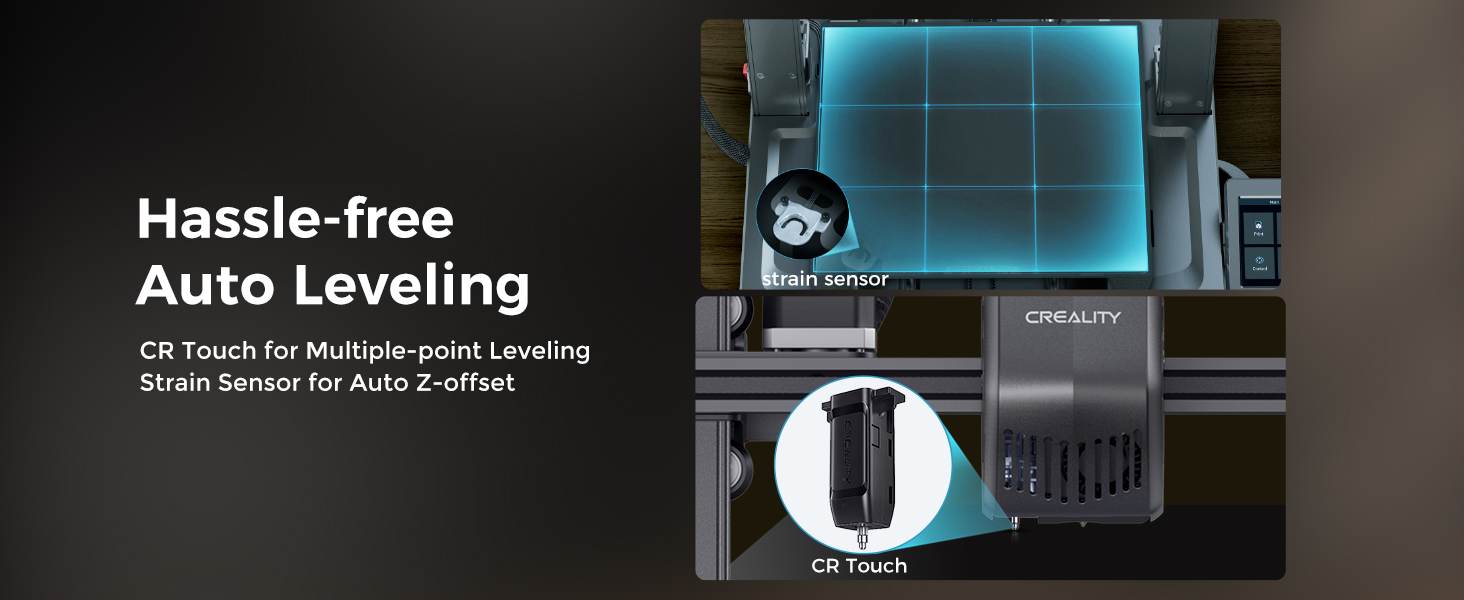
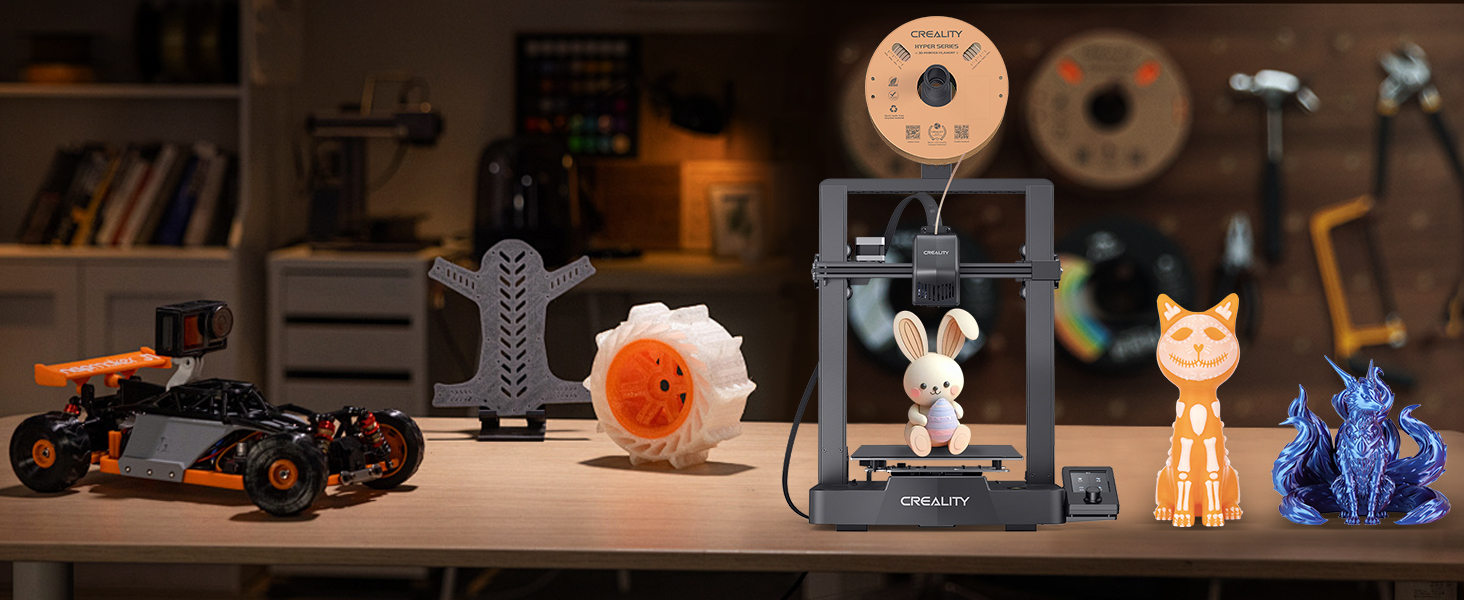
The Creality Ender 3 V3 SE is a high-performance DIY 3D printer featuring a rapid 250mm/s print speed, CR Touch auto leveling, and a reliable 'Sprite' direct extruder compatible with multiple filament types. Its dual Z-axis and reinforced Y-axis ensure stable, high-quality prints, while the 32-bit silent mainboard offers quiet operation. Designed for both beginners and pros, it assembles quickly and supports a sizable build volume of 8.66x8.66x9.84 inches, making it a top choice for efficient, precise 3D printing.


| ASIN | B07D18L9K6 |
| Best Sellers Rank | #8,833 in Industrial & Scientific ( See Top 100 in Industrial & Scientific ) #17 in 3D Printers |
| Customer Reviews | 4.1 4.1 out of 5 stars (26,057) |
| Date First Available | December 29, 2018 |
| Is Discontinued By Manufacturer | No |
| Item Weight | 15.43 pounds |
| Item model number | Ender 3 V3 SE |
| Manufacturer | Creality 3D |
| Product Dimensions | 17.8 x 16.93 x 20.47 inches |
L**Z
Amazing printer!
The Ender 3 marked my entry into the 3D-printing world, and I love it! The 3D printer has been a godsend! If you're also newbie and searching for advice, here's my brief take on the Ender 3. It's awesome! The Ender 3 arrives in pieces that you must assemble. Since it is essentially a robot, assembly can seem overwhelming at first, but if you take it one step at a time, you'll be printing in no time. I found the printed instructions accompanying the unit to be more sizzle than steak, but, fortunately there are several videos on YouTube that make assembly a breeze. Believe it or not, assembling the unit yourself is beneficial because it familiarizes you with the device. It will allow you to easily make the minor adjustments that 3D printers often require. My wife and I have found that 3D printing comes with somewhat of a steep learning curve, but it's fun. YouTube and websites such as "all3DP dot com" have proven themselves to be life savers. The most common adjustments you'll make while 3D printing is "bed leveling." In truth, though, you're not actually "leveling" the print bed, but rather you're ensuring that the print nozzle is uniformly distanced from the bed (the print surface) on all its 4 corners. The nozzle needs to be super close, too. ...not about an inch or two away from the print bed, but rather it needs to be no further than the thickness of a piece of paper. Crazy, huh? When my wife and I printed a test file provided by Creality (the manufacturer), we frankly sat mesmerized at the unit's precision. It was like staring into a campfire and getting lost in the flames. The nozzle just zipped back and forth across the print bed leaving tiny bits of corn-based "plastic" one layer at a time, and eventually (over time) created a cat/dog thingy. In search of more things to print, we settled on two websites with tons of 3D-printable files that are very often free to download. The websites are "thingiverse dot com" and "cults3d dot com". The latter site takes longer to load, but seems to have more options. Creality has one too, but I haven't really checked it out yet. It's important to note that the files you download from such websites are *.stl files, whereas the Ender 3 needs *.gcode files. To make the file conversion, we downloaded a piece of software called Cura. It appears to be the best (free) software on the market for "slicing" 3D files into *.gcode files. That too has a steep learning curve, complete with complicated settings. But fortunately there are lots of tutorials online along with settings you can copy from experts. I mostly rely on "all3DP dot com" for that. After a while, we decided to invent our own designs and then print them into existence. In my opinion, the cat's meow -- the best and easiest 3D design application -- is Fusion360. It has a limited free version for students and schools, but otherwise it's quite pricey. My wife then found free, open-sourced design software called FreeCAD. We love it, and haven't turned back since. The filament we prefer is PLA. In our experience, PLA produces little to no fumes and it's guilt-free because it's corn-based and biodegradable. It should be noted, though, that not all PLA is created equally. This is primarily because (according to what I've read) pigments affect the PLA in different ways. So, when I order PLA from Amazon, I always look for the PLA with the most and highest reviews. Then, I refer upon their temperature recommendations. Overall, we absolutely love the Ender 3. At under $200, it's extremely affordable, and the process of printing things into existence can be (in my experience) somehow transformative. And if you find yourself confused about something, take my advice by not wasting time by trying to figure it out for yourself. Just refer to the experts on any of the websites I mentioned so, later on, you can focus on things that really matter...like design. Note: the bearing on a little fan went out. So, I reached out to Comgrow, they got back to me immediately, and now a new fan is on the way. No fuss no muss. Finally, at the risk of getting to personal, I'm a disabled veteran who benefits from focusing on tangible things. The process of 3D printing has proven itself to be such a godsend in that regard, that I think the VA should seriously explore ways of getting more vets 3D printing. I hope this helped newbies like me. Happy printing!
D**R
Works well and easy printing
I've only printed a few things so far but it's enough to give some good feedback. At this price point don't expect any frills. That said this bare bones printer performs great. First off from my pictures you'll notice I upgraded the print bed to glass. It's only an extra $12 at the time I purchased. I read some other info online that lead me to believe this would be more likely to be level and perform better. i don't regret it. It works great. My advice would be to take your time assembling this printer. Expect it to take about 4 hours, perhaps more. Make sure everything is tight and aligned properly in terms of the rollers, belts etc. Do not rely on the quick start guide or included instructions. Go out to Youtube and follow the assembly video. Pause it for each step. When you are done stay on Youtube. There is a "Complete beginner's guide" on there from an Australian creator that demonstrates using this exact model. I noticed his menus are a little different due to software changes but his leveling guide and calibration files work great. For being one of the cheapest printers you can get the performance is surprising. I'm very happy with the print quality. I love that I can use tools on Linux or Windows. You don't need to be plugged in as you can simply print from G code on the included micro SD card. The videos online can get you up and running quickly. Every tool needed to build and run the printer are in the box. Nice touch. There is a small amount of PLA material but you will want to order more right away. The included spool is small and really only enough for a couple test prints. If you are a beginner why spend more? This is the perfect first printer. Update: I thought I would add to my review now that I have had some time working with this printer. I've made a lot of improvements to the device I first received. The nice thing is most of the improvements are cheap or you can print them. First thing to note: I was having a lot of problems with printing anything large that took a bit of time. After a lot of digging I found the hotend shipped with the printer was (in my opinion) put together wrong. They either built it cold or inserted the nozzle before the heat break. Either way there was a gap that could not be fixed in the hotend. I bought a Creality spider hotend which is all metal. Way better and it works great. Add to that a BL Touch sensor for autoleveling the bed. Best addition ever. You still need to start with a level bed but it fixes all the little problems with uneven bed surfaces and stopped my extruder problems. While on the extruder. Calibrate your machine! Take the time to measure the output from your extruder. They use a generic setting from the factory. You NEED to set up this machine. Calibrate the extruder, the retraction distance, the nozzle temp for the filiment etc. Pay attention to the details and you will get great results. Really happy with this printer. It takes work but it's a fun project that leads to other projects, and for a beginner it's hard to beat. Some say you should buy higher end and avoid all the minor issues. I disagree. I think this has been a learning experience that prompted me to understand the machine. I think that basic knowledge of the process is important. Your mileage may vary.
P**C
I really gotta give props to Creality for making this printer so affordable and (relatively) easy to set up and use. Since getting it I learned a <ton> of stuff about 3D printing (both by being forced to do it and trying to troubleshoot all the different issues :P) It's a great printer for the price, not sure what else I can say. Initial assembly was relatively easy and took around an hour. Then I realised I haven't done it properly so I had to re-assemble parts I assembled before (another 1h). Then a couple of days later I realised the frame is not straight... So I disassembled and re-levelled the whole thing from scratch (another 2h or so) Then i've done it yet again a couple of days later to straighten the gantry :P Unfortunately factory pre-assembled parts were not perfectly assembled. The bed is not perfectly even either, seems a bit warped but oh well the glass bed upgrade is too expensive. Usage is straightforward after assembly, there's an amazing amount of 3D-printable improvements to the Ender 3, tons of guides and information readily available. SD card slot is a great addition but you'll probably want to move to an Octoprint setup for ease of use and to flash a more recent Marlin firmware. Unfortunately the Pause feature has bugged out multiple times on me on the original firmware (just freezes printer in place, ruining prints) but at least the power-loss recovery works fine (once it freezes just shut it off and back on and it will give you an option to resume). No such issues with the custom-built Marlin fw. Worth noting is that my unit came with a 4.2.2 32-bit motherboard, an extruder guide enforced with metal and adjustable tension. Attached amount of filament was almost enough to print the sample doggy figure - you can clearly see where the filament ran out ;( Overall it's a fun learning experience but if you're expecting to just "buy, print and forget" - this might be the best choice for you as it has no auto bed levelling and other features present in more expensive printers (unless you upgrade it yourself) Definitely watch one or two assembly videos to get an idea of what to look out for during assembly, it will save you time in the longer run
D**R
Ich bin ein 3D Druck Neuling. Daher war der Ender 3 pro auch mein erster 3D Drucker. Vorerst war ich etwas geschockt über einige schlechte Bewertungen (sowohl auf Amazon, als auch auf YouTube), die über verzerrte Drucker und durchhängende Druckbetten berichten. Jedoch habe ich mich wegen des guten Preises für den Ender 3 pro entscheiden und wurde nicht enttäuscht. Der Aufbau des 3D Druckers war sehr einfach und toll in der Anleitung beschrieben. Auch die Verkabelung war sehr eindeutig in der Anleitung beschrieben. Im Vorfeld habe ich mir schon eine 3D Datei vorbereitet und diese im Prusa Slicer gesliced. Nach dem Zusammenbau habe ich den Drucker an den Strom angeschlossen und die SD Karte mit der G Code Datei eingesteckt. Nun habe ich die Nozzle vorgeheizt um das Filament einzufädeln. Das ging nicht so leicht wie erwartet, ist aber mit ein bisschen Fummelei schnell zu machen. Anschließend habe ich den Druckvorgang gestartet und der Drucker fing mit dem automatischen Nullen der Achsen an und heizte danach das Bett und die Nozzle. WÄHREND DES GESAMTEN DRUCKVORGANG STAND ICH IMMER MIT EINER HAND AM STECKER DES DRUCKERS, UM IHN ZU STOPPEN, WENN ETWAS PASSIERT, DAS SICH NICHT RICHTIG ANHÖRT ODER NICHT RICHTIG AUSSIEHT. Fazit: Ich bin sehr alles in allem sehr zufrieden und habe einen guten Start in den 3D Druck bekommen. Die Druckqualität reicht mir, ist aber wenn es um Feinheiten geht manchmal nicht ausreichend. Für große Drucke reicht es aber alle Mal! Er bekommt von mir klare 5 Sterne, weil er ein super Einsteiger Drucker ist, der mir einen tollen Start in den 3D Druck gewährt hat. Große Empfehlung!
T**R
Die Rezension bezieht sich auf die Version Ender 3 Pro V1. Inzwischen gibt es die V2 die klar bevorzugt werden sollte da diese das Silent Mainboard vorinstalliert hat. Als Einsteiger in die 3D Druckwelt habe ich mir dieses Modell gekauft da es recht verbreitet zu sein scheint und dementsprechend einfach Hilfe bei Problemen zu finden sein sollte. Aufgrund diverser Empfehlungen aus dem Netz hab ich den Drucker von Anfang an nicht in der Standardkonfiguration betrieben sondern ein paar Teile ausgetauscht: - Capricorn PTFE Schlauch - Redrex Bowden Extruder Aus dem großen Thingiverse Schatz hab ich mir auch das ein oder andere Upgrade selbst gedruckt. Für die Druckqualität wichtig scheinen so kleine clips zu ssein die ein wackeln des PTFE Schlauchs verhindern. Der Aufbau ist mehr als simpel und sollte niemanden vor eine Herausforderung stellen. Einzige besonderheit die ich auch im Netz nachgoogeln musste: Der Schlitten der x-Achse also wo der Extruder dran ist war nach dem Zusammenbau seeeeeehr wackelig. In der Anleitung nicht erwähnt wird, dass an der unteren Schraube mit der Rolle eine Exzentermutter angebracht ist die gedreht werden kann damit der Schlitten spielfrei läuft. Jetz der wichtigste Punkt überhaupt: Lasst euch zeit beim Einstellen des Bed Levelings. Für einen erfolgreichen druck ist es das A und O. Beim ersten Versuch hab ich nicht richtig aufgepasst und es zu eng eingestellt, sodass die Düse leicht "durch" die Magnetplatte gefahren ist. Zum Glück nur am Rand, aber es wäre ärgerlich es auf die Art kaputt zu machen. Ebenfalls ausdrücklich davon abraten möchte an diese Platte mit dem Spachtel zu gehen, da man jedesmal einen dünnen teil der Oberfläche mit abträgt. Wenn das Bed Leveling stimmt lassen sich Reste oder ähnliches leicht mit dem Fingernagel entfernen. Auf der beiliegenden SD Karte sind 2 oder 3 Beispiele drauf. Es ist Zeitverschwendung diese zu Drucken. Ich habe in meiner Unkenntnis das Sparschweinchen gedruckt. Es dauert nicht nur ewig, die Qualität ist auch absolut mies. Daher lieber etwas schönes aus dem Netz suchen und durch den Cura Slicer schicken, die Qualität dieser Drucker ist einfach nur unfassbar besser. Keine Ahnung warum der Hersteller hier sein Produkt unnötig schlecht macht. Die Lautstärke in der Roh-Version (die es inzwischen wahrscheinlich nicht mehr gibt da durch die V2 abgelöst) ist... nicht Wohnzimmer geeignet. Definitiv nicht! Durch Austausch des Mainboard und diverser Lüfter lässt sich durchaus was rausholen. Da es mein einziger Drucker ist konnte ich die Qualität nur anhand einiger Youtube Videos mit anderen Modellen vergleichen, aber ich selbst bin überaus zufrieden mit dem was der Drucker ausspuckt. Die Bedienung ist sehr leicht und wie erwähnt empfehle ich den Cura Slicer dessen Ender 3 Profil "perfekt" ist. Hatte jedenfalls keinen Aufwand daran herumzufummeln oder Werte anzupassen, das lieferte Out of the Box prima Ergebnisse. Ich habe bislang ausschließlich PLA gedruckt, kann also über andere Materialien nichts sagen. Nachträglich habe ich mir das Creality Board 1.1.5 Silent zugelegt was die Lautstärke der Stepper massiv reduziert. Inzwischen würde ich allerdings zu dem neuen BigTreeTech 2.0 Board raten, da dieses nicht nur Silent Stepper Driver verbaut hat sondern auch einen größeren 32Bit Controller verwendet, der genügend Platz für alle Features der Firmware bietet während die Crealitiy Boards nur die Sanguino atmega1284p verwenden die einfach nicht mehr den benötigten Platz bieten um "alle" Features der Marlin Software unter zu bringen. Ebenfalls habe ich mir Dämpfer für die Motoren gekauft, diese sind aber nur mit SEHR VIEL gebastel am Gerät anzubringen, da die grundlegende Konstruktion nicht für ein vergrößern der Abstände ausgelegt ist. So müssen beispielsweise die aufgepressten Riemenzahnräder weggeflext werden und durch Schraubbare ersetzt werden um Abstände auszugleichen. Diese Modifikation würde ich nicht nochmal machen. Fazit: Würde ich das Gerät wieder kaufen? Ja definitiv. Es sind zwar meiner Meinung nach einige Mods und damit Zusatzkosten nötig, aber da ich gerne Bastel ist das durchaus Willkommen. Die Druckqualität ist meiner Meinung nach hervorragend und die Bedienung kinderleicht, kompliziertester Teil ist das Bed Leveling.
I**Z
"¡Increíble impresora 3D! La Ender 3 V3 SE es una joya en términos de calidad y facilidad de uso. Montarla fue pan comido gracias a las instrucciones claras, y en poco tiempo estaba produciendo impresiones de alta calidad. Lo que más me sorprendió fue lo fácil que es usarla y lo rápido que se aprende a sacarle el máximo provecho, incluso sin experiencia previa en impresión 3D. La relación calidad-precio es insuperable; esta impresora ofrece mucho más de lo que cuesta. La recomendaría a cualquiera que busque una impresora 3D confiable y asequible para sus proyectos. ¡Totalmente satisfecho con mi compra!"
C**E
****UPDATED FEBRUARY 2021**** Most problems have been solved, thanks! They sent me replacement and/or partial refunds for the problematic parts. Thanks a lot! Ender 3 pro is long to build - be sure to watch Youtube Videos as written info isn't enough - but it's fully customizable, affordable and printing quality is amazing. You have to put some efforts into it, beware, but the satisfaction of your 3d printer working perfectly is worth it.
TrustPilot
1 周前
1 个月前