Desert Online General Trading LLC
Dubai, United Arab Emirates
Desert Online General Trading LLC
Dubai, United Arab Emirates


🚀 Elevate Your Space with Style and Functionality!
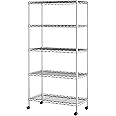
The Seville Classics 5-Tier Wire Shelving with Wheels is a robust and versatile storage solution, featuring five adjustable steel wire shelves that can hold up to 300 lbs each. With dimensions of 30" W x 14" D and a height of 61.75" on wheels, this shelving unit is designed for easy mobility and customization, making it perfect for both home and office environments. Assembly is a breeze with no tools required, ensuring you can organize your space quickly and efficiently.


| Item Weight | 2.3 Kilograms |
| Size | 5-Tier, 30" W x 14" D (NEW MODEL) |
| Item Dimensions D x W x H | 14"D x 30"W x 60"H |
| Furniture Finish | Alloy Steel |
| Style Name | 5-Tier, 30" W x 14" D |
| Color | Plated Steel |
| Frame Material | Metal |
| Product Care Instructions | Hand Wash Only |
| Material Type | Steel |
| Required Assembly | Yes |
| Maximum Weight Recommendation | 1500 Pounds |
| Number Of Shelves | 5 |
| Shelf Type | Tiered Shelf |
T**L
Great shelves. Repeat buyer
Bought 4. Very sturdy. Easy to put together. Lots of space to put stuff. Love them.
T**.
Great product!
Sturdy construction, easy to assemble.
J**L
You Can't Beat It For This Price
For $60, this can't be beat, it's very well designed. I've constructed similar shelves, so I didn't really need the instructions, but I did notice that they were very clear. You'd pretty much have to be an idiot not to be able to figure out how to assemble these shelves. But there are some definite tips and tricks you might want to know beforehand.First off, constructing any kind of metal shelf isn't good for your wood or nice tile floor, unless you don't care if they accidentally get a scratch. Not to say that it will happen, but sometimes it does. So you'll want to have a space to build this that has some thin carpet, or a floor you don't care about. For tools, an adjustable wrench will come in handy for tightening the nuts that attach the castor wheels. The shelf comes with one, but it's pretty flimsy and sort of a pain to use. A rubber mallet is also useful if you decide (as I did) to change the shelf heights halfway through and end up having to take a few apart and put them back on. Certainly beats banging them apart with your hands.It's a pretty standard wire shelf, it's got black plastic clips that go around the upright poles, and the shelves slide down over them. They conveniently marked each plastic clip with the word 'top' and an arrow, and the upright poles have the usual inch markers as well as some periodic double-line markers so you don't have to do all that counting to make sure your clips are even on all four sides. Like I said, super easy to put together.They recommend having two people for the 5-tier shelf, but I did it myself (and I'm a binky little girl fyi) without any problems. The only place I could see the benefit of a second person was when I was undoing some of the shelves to adjust the height. If you bang up one side to unhook it from the clip, it's helpful to have someone to hold it there while you go to bang up the other side, otherwise it falls back down and wedges itself fast again.I wasn't expecting this to be commercial grade, and it isn't, but I was pleased at how sturdy it was for the super low price. (These shelves can be several hundred dollars). The only really cheap part of the shelf were the plastic wheels, the locks are a joke (I actually pushed this thing into place down a hallway with the wheels locked and didn't know until I got there) but that might be because the shelf itself is pretty light. I know the weight allowance says 200 lb. a shelf, with 1000 lb. for the whole thing, but I highly doubt those wheels are going to take being rolled around with that much weight on them. I'd guess that you could store 100 lb. or maybe 150 lb. on each shelf, any more than that and you'd run the risk of it bowing under the weight over time. And, considering the cheap plastic wheels, I probably wouldn't use it if my intent were to roll it all over the place.For my own home purposes it's great, a sturdy, cheap wire shelf, that's easy to get behind when I want to clean.
T**F
(Update: 8 years on and going strong 💪🏼) Nice, Sturdy Shelves
Update: I bought 2 of these back in 2016 as basement storage. They’ve been in the same place I originally put them, and they still look brand new.They hold a lot of stuff, both on the shelves (including 18-gal storage tubs) and hanging off of the wire surfaces. I got some S hooks in different sizes, and I have things hanging from inside the shelves, on the 14” ends, and I use the tops of the corner poles for a bag of clothespins, some light seasonal items in drawstring pouches, and as temporary hangers for whatever, when needed.They’ve held up spectacularly in an unfinished basement area all these years. I’m generally not a big “wire rack” kinda person, but I wanted something that would do well in a space that experiences more temperature and moisture fluctuations than other parts of the house. These shelves have proven themselves over the past 8yrs to be both versatile and quality pieces.Side notes:I still don’t mind that the shelves don’t come with shelf liners. I wouldn’t have used them, and it’s easy and cheap to make or buy some if I did.I also still haven’t used the wheels, and probably never will at this point 🤷🏻♀️2016:I bought two shelves to use as storage in an unfinished basement. They arrived in perfect condition and were easy to assemble.They’re currently holding a bunch of tools and household maintenance items like air filters, boxes of light bulbs, spare parts, etc. as well as several 18 gallon Sterilite tubs*☟and some boxes full of holiday decor. I have the shelves along a wall (about 4” away from it), so I can slide the tubs in a little bit deeper to further reduce the little bit of the tote lid edges that stick out in front. (see below for storage tub dimensions to get an idea of how they fit in the shelves)All in all, I’m pretty happy with these. They’re sturdy and seem like they’ll last. I have two final comments— both on things I don’t use with these shelves. 1) I’m not using the wheels, so I can’t comment on those apart from confirming that they’re very easy to put on by self-screwing into the base of each corner post. 2) These shelves don’t come with shelf liners, but I don’t plan on using any, so that’s fine with me. Just mentioning that to confirm that there are no liners included. 👍🏼 Okay, now go buy it!*Sterilite 18-Gallon Plastic Storage Box, “Recycled Gray”Model #: 1815-97Manufacturer’s Assembled Product Dimensions (L x W x H)24.00 x 18.50 x 15.75 InchesMy measurements24”L at lid (18”L at base) x 18.5”W at lid (~13.5”W at base) x 15.75”H with lid
TrustPilot
1 个月前
3天前
2 周前
2 个月前