We remain fully operational. Our teams are working around the clock to ensure your deliveries continue safely.

下载应用程序


Buy anything from 5,000+ international stores. One checkout price. No surprise fees. Join 2M+ shoppers on Desertcart.
Desertcart purchases this item on your behalf and handles shipping, customs, and support to Taiwan.
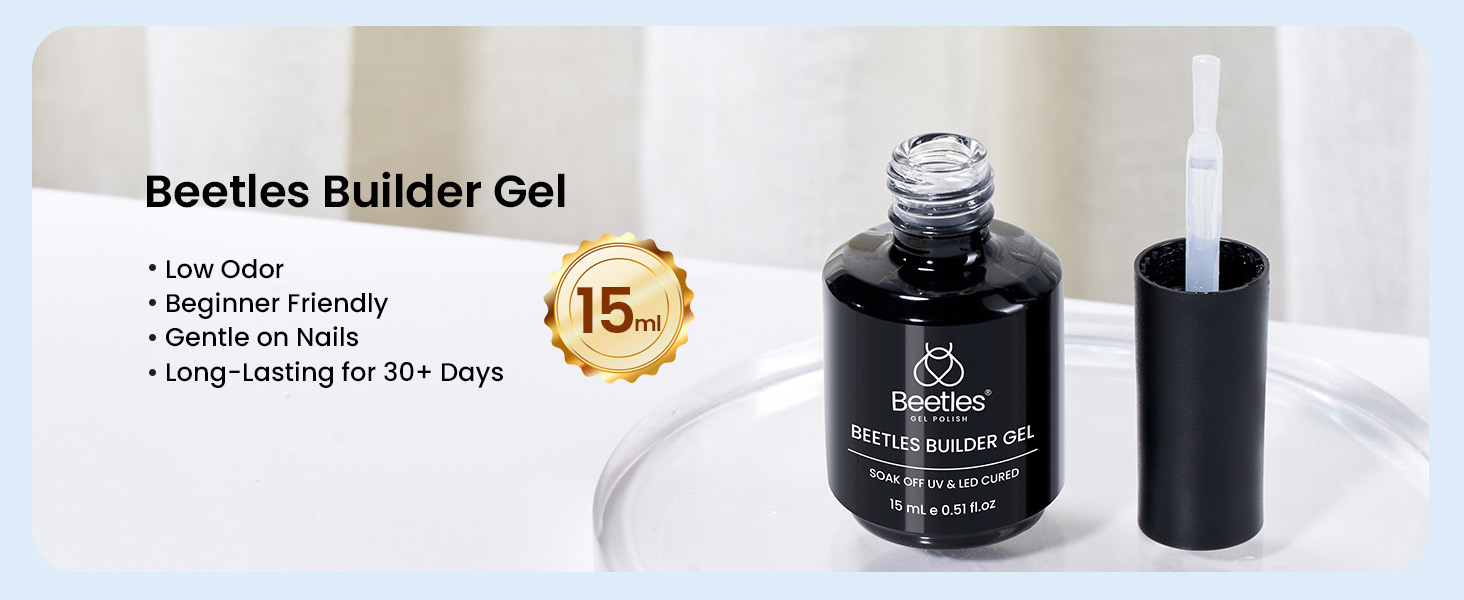
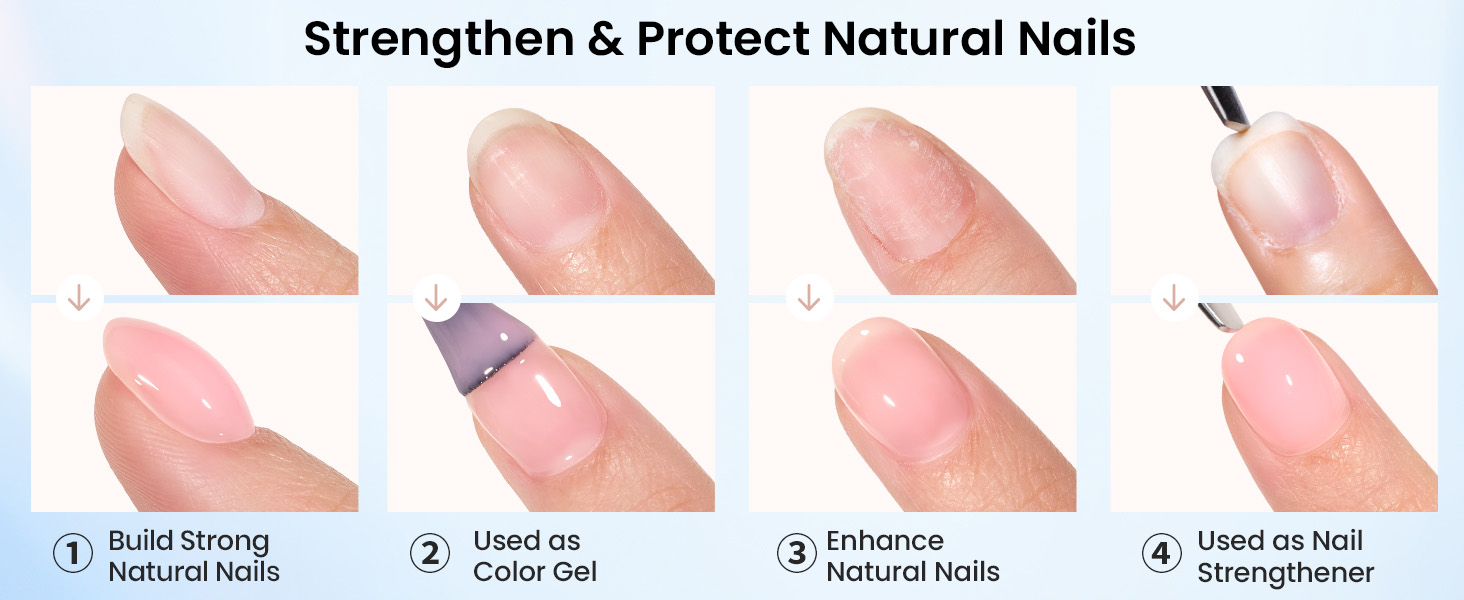
💅 Build your dream nails faster, cleaner, and stronger—DIY like a pro!
Beetles Builder Gel is a 15ml clear, odorless, and lightweight nail enhancement gel designed for easy at-home use. It offers 8-in-1 strengthening benefits with a self-leveling formula that cures quickly under LED or UV lamps. Perfect for beginners and DIY enthusiasts, it creates durable, chip-resistant nails without the dust and smell of traditional acrylics, delivering salon-quality results with a natural finish.


| ASIN | B08Y17L51L |
| ASIN | B08Y17L51L |
| Additional Features | Chip Resistant |
| Best Sellers Rank | #1,484 in Beauty & Personal Care ( See Top 100 in Beauty & Personal Care ) #2 in False Nail Gels |
| Brand Name | beetles Gel Polish |
| Color | 0-Clear |
| Container Type | Bottle |
| Customer Reviews | 4.4 4.4 out of 5 stars (13,173) |
| Finish Types | Clear |
| Item Form | Liquid |
| Item Weight | 0.07 Kilograms |
| Liquid Volume | 15 Milliliters |
| Manufacturer | Gelab cosmetics LLC |
| Manufacturer | Gelab cosmetics LLC |
| Manufacturer Part Number | BG006SA-TP |
| Material Features | Natural |
| Material Type Free | Gluten Free |
| Nail Polish Type | builder |
| Number of Items | 1 |
| Number of Pieces | 1 |
| Package Dimensions | 3.23 x 1.34 x 1.3 inches; 2.4 ounces |
| Product Benefits | Lightweight yet strong, self-leveling, odorless, chip resistant, long-lasting, beginner-friendly |
| Target Audience | Women |
A**N
Worth Buying!! Easy and Odorless!
I tried this with white nail tips and the entire process was a fraction of the time compared to my usual acrylic powder and monomer. My family appreciated it was odorless. I normally stink up the house lol. Here's what I did and it turned out great. 1) Push cuticles back. I didn't clip mine this time because I had an allergic reaction the last time I cut them, so left them. 2) Use a buffer to remove the shine on the nails and any dead skin. 3) Apply dehydrator to nails 4) Use buffer on the nail tip to add texture for better adhesion. 5) Glue on the nail extension. 6) Apply a layer of base coat. It will be sticky so make sure you don't touch anything that may stick to it. (Avoid skin!) 7) Put nail under UV lamp for 120 seconds 8) Add builder gel. I like to brush a layer on, then follow up with a pea sized ball at a time to build up thickness just past and just dab the brush to move it around. You will only be able to do one finger at a time because it's a bit runny. Place it under the UV light for 30 seconds to hold it and move to the next nail until all are ready for the official 120 second bake. Use nail file to fix any messy edges. (Avoid skin!) 9) Add top coat and put under UV light for 120 seconds. (Avoid skin!) 10) Use nail file to shape any messy edges. 11) Wash hands with soap and water and add cuticle oil. Make sure you avoid any of the gels leaking off the nail bed. This will help prevent skin irritation and premature lifting. So far the product seems pretty good. Hopefully it will last two weeks, but if it doesn't I still think it's worth buying just to save time and avoid the strong odor of monomor. Follow up: It's been a week since I used the builder gel and it has lasted without lifting surprisingly longer than the acrylic powders that I've been using, so I changed my review to 5 stars. Even though I was very careful I did have another reaction from the beetles product. I'm not sure what chemical agent is in their polishes and gels, but it always makes my skin itch and if I'm not careful I have broken out in blisters all around my cuticles and it runs up my fingers. The itching and pain when that happens is UNREAL and lasts for weeks! I recommend applying their products on one finger (I know that is tough when you are excited to do your nails) and wait a couple of days to see if you have any type of allergic reaction or skin sensitivity to any of their products before you go all in and do a full set of nails.
E**E
Works great for DIY nails!
I’ve been using this builder gel for a bit now and I actually really like it. It functions the way it should and gives my nails a nice strong base without feeling heavy. It stays put and holds up pretty well during the week which is all I really need. It’s pretty easy to apply too. The gel levels itself just enough to help smooth everything out so even if you are not super experienced it still looks decent. I didn’t feel like I was fighting with it or rushing before it got gloopy. For the price I think it is good value for money. You get enough product to last a while and it performs just as well as some of the more expensive brands I have tried. The look is nice and clean. The finish leans more matte before you put a top coat on which I like because it is easier to see the shape. It also dries clear so it can work with pretty much any polish on top. The smell is not bad either. It definitely has a nail product scent but it is way lighter than some of the really strong builder gels out there so it did not bug me at all. Overall I think this is a solid option if you want something easy to use that gives good results without spending a ton. I would buy it again.
O**R
Perfect for beginners
Honestly, this is a great option for beginners! The photo shows my very first attempt (I had never done this on myself before), and I was pleasantly surprised. It’s easy to work with — it doesn’t run or spread, but still blends nicely with a brush. The color is soft and forgiving, so it doesn’t highlight small mistakes and actually helps everything look more even and neat.
G**.
Good consistency, high quality gel!
On the thinner side, little more runny than I’m used to. But over all cures very nicely, you get a lot of product. More than you think. Gel itself does NOT oxidize and turn yellow or have a weird tint. States clear before and after curing and is really durable and strong!
S**R
We Have A Winner!
I've been using Beetles Builder Gel for about four months now to do my own nails. Uggh! My nails! Thin, peeling, even at their healthiest they would grow but then tear off. I tried the dip manicure stuff - never could perfect it. I tried gluing fake nails on - they looked nice, but never lasted. I tried just about everything. I finally found what works for me. I don't believe I use the product the way most people do. I looked at a couple of tutorials on YT, but ended up just brushing on a nice coat of the Builder Gel over my base coat. I have two nails that have no apex, so on those, I do build them up a bit. The rest? Just apply a good base coat, then apply builder gel, clean up the sidewalls and cure. Then a top coat and I'm done. I do like the natural look, but I've also begun branching out into colors. My kids got me the Beetles kit with a number of colors in it and I'm having great fun with that, as well. But I don't see me ever replacing my Beetles Builder Gel.
K**.
Great product
Started doing my own nails over a year ago. Takes some practice but very easy product to use. Gets really strong and keeps my natural long nails from breaking. Smooth texture and dries quickly under UV light.
I**S
Okay
Its a pretty good product, however it got some flaws. For one, the product had a tendency to run down the sides of the bottle when I wipe off the excess from the brush. I don’t know why exactly and other BIABs from different brands don’t do it, so I guess it has to do with the design of the packaging. Secondly, it’s a pretty high viscosity, which I guess is personal preference however for me it doesn’t self level as well as I would like. However, it dries as it should in the lamp, even with the high viscosity it’s workable, on the plus side it doesn’t flood the cuticles as easily because it stays in place and you get a longer time to work it and it’s a nice color. It’s also very affordable. I don’t know if I would buy again tho.
R**I
Colour is exactly as pictured, very easy to work with and looks stunning!!
K**R
Love this builder gel. I have the pink and now the clear. Easy to use and now I don't have to pay to get my nails done. Team it up with the beetles base and top coat. Takes me about 45 mins to do both hands with base coat, gel coat and top coat. Not perfect, but I'm getting better.
A**F
Oh my God, where do I start? This product? Is so good it lasts for so long. Really great price for what you get. I’m very happy with it.
R**I
Love such a pretty colour and so easy to use!
P**X
This is my first builder’s gel and I like it a lot. I love that it can be soaked off. It’s very easy to use once you get the hang of it, but definitely don’t skip out on proper nail prep and make sure you’ve learned how to use this type of product properly.
TrustPilot
2 周前
2 周前