Desert Online General Trading LLC
Dubai, United Arab Emirates
Desert Online General Trading LLC
Dubai, United Arab Emirates


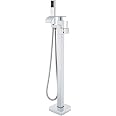
🛁 Elevate your bath game with sleek control and custom comfort!
The Senlesen Chrome Freestanding Tub Faucet combines durable stainless steel and brass construction with a single lever handle for easy temperature and flow control. Featuring a diverter valve for switching between tub spout and handheld sprayer, it includes 90cm braided stainless steel hoses customizable to your plumbing needs. Mounted on a stable tripod base, this floor-mounted faucet offers a modern, elegant upgrade to any bathroom.


| Brand | Senlesen |
| Color | Chrome |
| Material | Stainless Steel, Brass, Ceramic, Zinc |
| Number of Handles | 1 |
| Handle Material | Zinc |
| Item Weight | 4.36 Kilograms |
| Mounting Type | Floor Mount |
| Included Components | Handles |
| UPC | 603629675941 |
| Manufacturer | Senlesen |
| Part Number | B01982SJGW |
| Item Weight | 9.59 pounds |
| Product Dimensions | 5 x 6 x 3 inches |
| Country of Origin | China |
| Item model number | SE4289 |
| Is Discontinued By Manufacturer | No |
| Item Package Quantity | 1 |
| Batteries Included? | No |
| Batteries Required? | No |
M**Z
Standing Faucet
This standing faucet is beautiful, the quality is a 10 for its affordable price. It has a powerfully water flow and the water hose is very functional. Looks amazing in my new remodel bathroom.
D**N
Love the look, functionality, and quality - AWEFUL instructions
This is a beautiful faucet and sprayer. All metal (except for some of the hand-sprayer) and it works well. As you can see the instructions are almost worthless and they did not include which of the two holes in the faucet are hot and cold (plus it isn't marked). I wish they would have applied a sticker or something that would explain which hole is for the hot water line and which is for the cold.I learned that the cold inlet is closest to the front (nearest the diverter's square knob) and the hot inlet is closest to the rear.I noticed some people had a hard time removing the plastic piece that will protect the faucet in shipping and from debris. Mine simply came right off after removing the 2 black plastic bands and pulling the white plastic piece away from the faucet.If you're a DIYer like me this is pretty easy and I don't think you need to hire a plumber (but don't hesitate to do that if you are not up to the task). If you decide to take it on yourself, please let me give you a few tips on the installation. The system should be built from the ground up, connecting the facet last. Here are my notes for a new installation. This list is FAR better than the ones provided. Obviously, if you are replacing an existing system, you will already have the water supply off as noted in step 9, before removing your existing system.1. Screw the floor-mount bracket to the bottom of the pole (don't mount it to the floor yet).2. Run the provided water lines inside the pole with the long metal ends at the top where the allen wrench screws are. I used a pencil and some rubber bands on top to keep the water lines from falling out.3. Attach the screw-on floor mount to the pole making sure water lines feed out the bottom past the floor mount.4. Potion the pole so that it is closest to the rim of the tub without touching it and the allen screws are facing the rear, mark and cut a hole in the floor using a drill mounted 2 inch. hole saw, then attach the mounting bracket to the floor. Note: I did not use their screw/bolt below screws they provided, but instead I used 3, inch and half long wood screws with washers on the ends (super easy).5. Position the faucet so that the hand sprayer is on your left and the hot/cold handle is to your right (as you're facing the tub). Connect the faucet by inserting the long metal end of the cold line to the faucet's front-facing inlet, closest to the square diverter knob, and use a wrench to tighten. This may require 2 people (one to hold the faucet and one to attach the water lines).6.. Repeat step 5. for the hot line in the faucet's rear-facing inlet.7. Attach faucet to pole using provided allen wrench to tighten 2 allen screws.8. Connect the hand sprayer to the faucet (hand-tighten as hard as you can is all that should be needed).9. Turn off the water source and connect provided water lines to your water supply (use provided brass connectors and optionally the 2 provided extension lines if needed). Note: I did not use the provided extension lines as they were not needed. It is also a good idea to add shut-off valves to the 2 supply lines if you do not already have them.10. Once attached, turn the water back on and inspect for any leeks as you test the faucet and hand sprayer.I hope that helps.
A**
Good quality, beautyfull
Good quality, beautyfull
P**H
Love!
Great product!
G**E
Leaks
Leaks newly installed from Valve . does not appear can replace gasket where it is leaking
E**R
Beautiful Faucet! Looks Gorgeous With Our New Tub
Easy to install. The only complaint is the water doesn't come out real fast but other than that love it!
G**A
Nice Faucet
Very easy installation. It's designed for hoses that are installed on the flooring, however, we were able to improvise with our older home's hoses, which are installed from the wall, since we installed it in a corner behind the tub, one can't see the hoses anyway. The down side is the slow flow of water. Tania long time to fill the tub.