描述
- Connector strip light LED extension kit 4 pin comes with Solderless Connectors of Innovative clasp connection design,peeling free,tapping free and twisting free to SOLVE The PROBLEM of loosing that most Strip connectors have.Tighter and the most convenient extension connectors to Save your money and time.
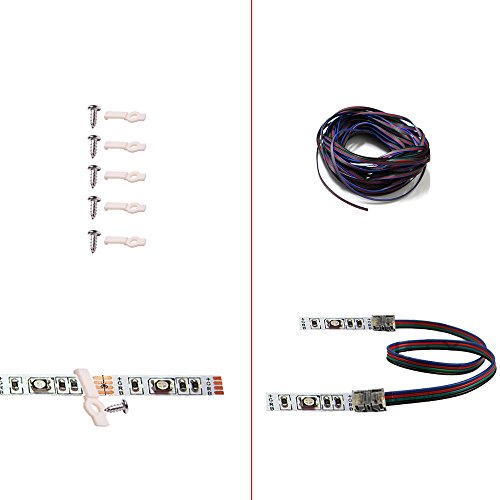
- The Strip Mouting Clips and Screws for RGB led strip un-waterproof will overcome the common problem (falling off) on the tape most led lighting strips have.The unwired strip to wire extention cable is FREE FROM THE LIMIT OF TERMINAL POSITION and free from the consideration of the length of terminal.
- 100% DIY: Just A few minutes to connect,extend EVERYTHING and cut length as YOU NEED. Solderless,No wire-stripping and No need to peel off Silicon cover.Quick and flexible work.
- This LED strip light connector kit includes :6 x solderless Wire to strip connectors 4 pin,2 x Gapless solderless Strip to Strip Connectors 4 pin ,1 x 6 Feet Strip Extension cable/wire ,5 x Strip mounting clips and 5 x Screws included in package.EVERYTHING YOU NEED in one Strip light connector kit for 1-2 rolls Flexible LED strip lights RGB.VALUE -As least $24.6 if purchased separately
- COMPATIBLE WITH: SMD5050 RGB LED Strip Light 10mm Wide (Non-waterproof).And 22-18 AWG Solid Wire / Strand Wire
SMD 5050 led light strip connector Kits that without wire-stripping design allows you to 100% DIY for your LED light strip connection and extension needs.You connect whatever the wire length you want to connect and no longer worry. Product Features: • Everything you need for a Small (1-2 Roll of Strip light) Project • Value : Save as least 24.6 Dollars over buying these items separately • Super Easy to connect your led strip light and 100% DIY. Installation Instructions: NOTE: Make sure your section of LED light strip is Non-Waterproof LED Strip Light RGB,10MM wide ,4PIN . Strip End: 1.Open the transparent cover of connector up to 90 degrees. 2.Peel off the 3M glue from the back of the strip light. 3. Insert the LED light strip into the clasp,making sure to match the + and - on the strip to the + and - on the clasp. 4.Close the transparent cap with a plier until it is fully seated on both sides of the bottom base. Wire End: 1.Cut the desired wire length and insert it directly into the guide slot. 2.Make sure that the positive & negative on the strip light surface are corresponding to the ones on the wires. 3.Close the transparent cap with a plier until it is fully seated on both sides of the bottom base. 4.Your connection is made!.