We remain fully operational. Our teams are working around the clock to ensure your deliveries continue safely.

下载应用程序


Buy anything from 5,000+ international stores. One checkout price. No surprise fees. Join 2M+ shoppers on Desertcart.
Desertcart purchases this item on your behalf and handles shipping, customs, and support to Taiwan.
🚀 Spray it, slay it: The ultimate DIY armor for your ride!
LinerXtreeme’s 1.5-gallon Spray-On Bedliner Kit combines a premium epoxy urethane formula with a free spray gun, delivering the thickest, most durable protective coating available. UV-resistant and rust-proof, it bonds to multiple surfaces for versatile use beyond truck beds. Trusted by DIYers and pros alike, this kit offers professional results with easy application and long-lasting rugged protection.
| ASIN | B008IGOVHQ |
| Best Sellers Rank | #321,403 in Automotive ( See Top 100 in Automotive ) #97 in Truck Bed & Tailgate Bed Liners |
| Brand | LinerXtreeme |
| Customer Reviews | 4.4 4.4 out of 5 stars (133) |
| Date First Available | July 7, 2012 |
| Is Discontinued By Manufacturer | No |
| Item model number | AA2 |
| Manufacturer | LinerXtreeme |
| Manufacturer Part Number | AA2 |
C**N
Excellent bedliner / undercoating material
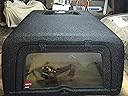
I needed a durable material to seal the wet bay on our motorhome after replacing all of the rotted wood and rusted steel framing. I sprayed the LinerXtreeme directly on top of the pressure treated plywood, and even the silicone caulk that I used to seal the corners. This stuff has an affinity for everything! It stuck like white on rice, and like flies on.... well, you get the idea! The 1.5 gallon kit was enough for me to do the whole wet bay and all of the underside of the storage basement and wet bay locker area of the coach. The temperature was around 60 degrees and the humidity was very low. As it is, this worked out well, because when I write that this stuff sticks to anything, I mean ANYTHING. Thankfully I had anticipated this from some of the reviews I read already, and donned a full Tyvek suit (with booties), nitrile gloves, a respirator, and goggles. Using the supplied spray gun, I applied most of the material to the intended surfaces, and a spattering of it to everything else, including my driveway, the Tyvek suit, the goggles, the respirator, my gloves, and the few areas of uncovered skin left on me. All but my skin, the respirator, and my driveway were disposed of when finished. A 3-gallon mixing bucket was purchased from the local home improvement place, along with a large funnel to pour the mixed material into the reducer can. I ended up using about twice the amount of reducer (xylene) as was suggested in the instructions - probably due to the cool temperature when it was sprayed. Of note is that the hardener has the consistency of warm taffy. This stuff is GOOEY at 60 degrees. I was worried that it would not mix, but I think the extra reducer helped get it blended in well. All in all, a couple of minutes with a paint stirrer had it ready to shoot. It was poured into the empty reducer jar, and the sprayer screwed to the can. This immediately showed two problems. First, the thread size on the can is different from the sprayer. It simply doesn't thread all the way on. I was able to cross thread it far enough to hold firmly though, and this may be designed this way on purpose. The second issue is that the end of the trigger hits the can, making it impossible to pull. For the first batch of liner goo I sprayed, I got around this problem by disconnecting the air from the sprayer, crimping the air line, connecting to the sprayer, and turning it on and off with the crimp in the line. After the first batch, I just bent the edge of the trigger far enough out of the way to allow me to use it. I shot the pot at 90PSI regulated pressure, but held a crimp in the line to drop it down to a point where it was a bit more manageable - which brings me to the final point; shooting the liner material with the included sprayer is like painting with a shotgun, no matter the pressure I used. What little bit got on my skin, the air hose, and part of the motorhome that I didn't mask as well as I should have was easily cleaned up with Xylene, even 3 hours later when I removed the masking. It took about 6 hours for the stuff to not be tacky, but a part I sprayed that I let sit in the sun was tack-free in just a couple of hours. The next day things were quite solid, and a week later I think only fire would stand a chance of putting a blemish in the product! If it matters, I didn't add any of the texture/rubber material. In a nutshell: -Wear something to cover everything, plus a NIOSH properly rated respirator! -Use Xylene as a reducer - you'll need more than they supply, which is fine, because you'll need it to clean up. -Make sure nothing is close by when shooting that you don't want covered in black speckles. If you spray it on the bottom of anything, whatever is under it will be covered in speckles. -The stuff sticks well to vertical or upside down surfaces, even when thinned with twice the amount of reducer. I was able to fill small voids, seams, and cracks with this - even though the manufacturer said it's not meant to do this. I suspect this may be temperature related. I am VERY pleased with this product, and will be using it again in the future... perhaps even to line a truck bed instead of things that it's probably not specifically designed to do.... I wonder how hard and expensive it would be to paint my house with this? ;)
S**R
DURABLE , GOOD LOOKING, EASY APPLICATION, PROFESSIONAL GRADE, A USE ANYWHERE PRODUCT.
OUTSTANDING , WORKS GREAT, USED ON EVERYTHING UNDER COATING OF LIFTED TRUCK. DIAMOND PLATED TOOL BOX PAINTED BLACK. ENGINE BAY . PARTS, WHEEL WELLS. INTERIOR FLOOR, RUST PREVENT-OR, SOUND DEADNER, I PUT THIS STUFF ON ALL EXTERNAL METAL. HITCH PARTS. BUMPER BRACKETS. SKID PLATES. SUSPENTION COMPONENTS. N FAB STEPS. WHEEL WELLS ,, LOOKS FANTASTIC, AND THE BEST THING IS JUST HOSE IT DOWN AND A LITTLE SOAP AND LONG HANDLE SMALL BRUSH AND YOU CAN REMOVE MUD AND DIRT, BLOOD, GUTS. FISH SCALES. HAIR. , YOU GET THE PICTURE. PLUS HANDLES ALL THE CONCRETE , BRICKS, SAND, WOOD, EVERYTHING YOU USE A TRUCK FOR, I PUT MY BED THROUGH HELL, ITS A REAL WORK TRUCK,,,, BOUGHT INSTEAD OF RHINO AND LINEX. I GOT 4 KITS FOR THE PRICE OF ONE OF THERE COMMERCIAL LINERS. . I CSN EASYLY RE APPLY TO AREAS THAT MIGHT OF GOT DAMAGED, THROWING BRICKS IN BED. YOU KNOW THINGS HAPPEN. TALK ABOUT DURABILITY. AND THROW A LITTLE SAND IN IT AND MIX, THEN ROLL ON AND WA - LA INSTANT ANTI SLIP. NOW ONLY WISH IT CAME IN WHITE , FOR USE ON THE BOAT.. ALSO USE THIS STUFF ON ALL OUT DOOR METAL,, KEEPS RUST OFF. PROFESSIONAL GRADE.
S**N
Awesome product
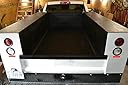
The original package was damaged during shipment. I contacted the vendor and they sent me replacements for the pieces that were damaged. This delayed the installation a little while, but once I had everything and actually sprayed this in, it worked extremely well. I love the way it looks, how quick it dried, and how tough it is. It was a mess to try to clean everything up, but otherwise, it worked as the directions stated. I would certainly use this again and appreciated the responsiveness of the vendor with the damaged shipment. This looks as good or better than any other spray in liner I have seen. I applied this as on over the rail installation and that turned out just as well, only a lot more masking off of the paint was required. The length of time to work with it was about right - seemed to be 35-45 minutes. I did have to use lacquer thinner to make it less thick and make it spray more evenly.
R**N
Great product for a great price!
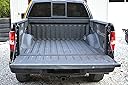
I have used several do it yourself spray on bed liners over the years and this kit is by far the best. The price was comparable to what I can get locally but the quality and flexibility of the product is it's best feature. I sprayed a 2001 Chevy Sonoma short bed pickup using the supplied crumb rubber on the first and second coats and then left it out for the final coat. This product covers extremely well and build to a decent thickness. Don't think this will get as thick as the professionally applied bed liners but it comes close. If you bought 2 kits you could easily get it that thick but I don't know why you would want to. Being able to thin the material with lacquer thinner is great! Don't over thin but you will need to cut it a little to make spraying a nice even coat easier. The kit comes with everything you will need except sand paper, tape, plastic, stir sticks and an air compressor. Get a large plastic container to mix it in as well to make your life easier. Don't forget the gloves!
S**L
great value and quality for diyers
I have used both the color and black kits from this company. It is pretty fool-proof to spray and is way tougher than brush on liners once it has fully cured out. I usually don't add the rubber granules in, and it makes for a very sleek look that is not ridiculously slippery. I have read that a two part urethane liner like this is essentially what the old rhino liner formula was. (I doubt this is quite as tough as the new line x or rhino formulas, which are proprietary stuff sprayed on at like 250 degrees.) at any rate, at 90% of the performance and 10% of the cost of a professional name brand product, this one is a win for me.
R**Q
not like i have used before
i give it a 3 because it is not as easy to as it would seem. it is a two part mix one part looks like paint and the other looks like half dried rubber cement realy thick. That made it hard to do small mixes. This stuff makes a realy bad mess overspray goes everywhere. Final finish not what I was looking for. Had to have it baked and sand blasted off to start again.