Breathe Easy, Live Freely! 🌬️
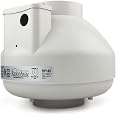
The RadonAway 23030-1 RP145 Radon Mitigation Fan is a high-performance, energy-efficient solution designed for both commercial and residential use. With a whisper-quiet operation at just 30 dB and a powerful airflow capacity of 166 CFM, this fan effectively mitigates radon while ensuring a peaceful environment. Its durable, water-hardened motorized impeller and sealed seams provide long-lasting protection against radon leakage, all while meeting stringent electrical code requirements.


| Manufacturer | RadonAway |
| Part number | 23030-1 |
| Item Weight | 2.72 kg |
| Product Dimensions | 24.64 x 24.64 x 21.59 cm; 2.72 kg |
| Item model number | RP145c |
| Size | RP145 |
| Colour | White |
| Style | 166 CFM |
| Material | Polycarbonate |
| Power source type | Corded Electric |
| Voltage | 120 Volts |
| Item Package Quantity | 1 |
| Air Flow Capacity | 166 Cubic Feet Per Minute |
| Noise Level | 30 dB |
| Included components | Fan |
| Batteries included? | No |
| Batteries Required? | No |
V**E
Highly recommend
Well it's was pretty easy to install and works wonderfully. It's not noisy at all and does the job by taking care of the radon gas in our house. We had relatively low radon gas like you can see our worst week was 120bq/m3. We had a pretty warm winter this year in ON, 🇨🇦. It's probably not representative from other years and we probably had way more than this year. My husband was coughing all the time because he was mainly in the basement either working on his computer or sleep because he often work nights shift. The highest we had during the day was 189 bq/m3 this year and I heard him cough none stop. Since we installed the radon fan he stopped completely cough when he is in the basement. On another note, like I said it was relatively easy to install but we had more issue to find the accessories and materials to build and install it correctly. We live in ON, Canada in a city where we have the highest level of radon but yet no one's knows about radon side effects on their health. It's like talking about a unicorn when ask help in store with materials or advice. So, we needed to watch a lit of YouTube and Google about how to install it. This fan quoted one of the best one from our research. Also, from professional and reliable sources we decided to install it outside because if you have any issue or it's breaks you might have leak on high radon gas inside your house especially if you install it in the basement. I would suggest if the weather his really bad and cold like Manitoba or Alberta to install it in the attic of the house and never in the basement like I see many companies does in ON. Bottom line, we are really satisfied and now we will make sure to patch up some minor crack to our basement floor and sealed it with radon sealer epoxy. We need to better find a way to also sealed our sump pump because again it's really hard to find in Canada a well fitted radon sump pump cover without paying 300$ on Amazon. We spent easy 1000$ just in materials to install it because we have no manufacturer who produce radon fan in Canada. Thank you and we are really satisfied with our radon fan. One more thing maybe providing a nice plan how to really install it would be nice. So, people don't pass hours to find how to install it.
J**S
good quality
It's good products, running very quiet and flow very strong.
J**7
Replaced my old unit
I purchased this to replace my old unit Which had become very noisy. This was easy to install with basic tools. Just remember to turn off your electricity before replacing the old one. It’s nice and quiet and moves a lot of air!
B**Y
Perfect replacement for my 12yr old RP145 fan that was tripping a circuit breaker
This was a perfect replacement for my 12 year old RP145 Radon Fan that began to trip the circuit breaker. Before you say "It may have just been the capacitor", the old fan was also only giving about 1/2 of the suction from when it was new, when it did work.Took about 10 minutes to replace.The biggest "Con" of this new RP145 is that the capacitor is about 2x the size of my old one. The wiring compartment was tight before, now it is super tight. But it all did fit and the fan is working perfectly now.
A**.
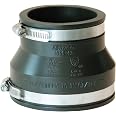
[READ] Time-Saving Information Below
If you are replacing an old radon fan or have a newer home, with a passive random system already (e.g., a pipe leading from the sub-slab of concrete through the attic and to the roof), along with a pre-installed electrical outlet in the attic, then this is a fairly simple project to do yourself.The RadonAway 145c is the most commonly used fan. It has moderate suction, and it is ideal for gravel and concrete slab basements. Below is a variety of information pertaining to installing the RadonAway 145c and more:Get a radon detector that measures a weekly average because radon can vary greatly throughout the day and week. I have the AirThings radon detector from Amazon. I had a second one and the readings were the same, so at least the reliability is good.Get a RadonAway manometer to test the suction of your radon fan. This will ensure the fan is working well and there are no leaks in the system. For installation, search “Installing And Understanding Radon Mitigation System Manometer” by Heathy Air Solutions on YouTube. However, ensure you drill the hole in the pipe about two inches lower than the top of the manometer. Also, when you get the manometer, it might not be even on both sides or set to 0. Don’t worry because it adjusts by sliding up and down. As for it not being even on each side, that is also normal. It will even out once you take the tube stoppers off the top of either side.As for installing the fan, here are the steps I used:1. Get all the supplies: radon fan, 2 pipe-to-fan connectors/couplings (the 145c model has a 4” connection size and my radon system pipe was 3”, so I got 2 Fernco 3”-to-4” couplings), electrical cord (HomeAire (AKA RadonAway) Power Cord Kit - 6 foot on Amazon will get the job done) [yes, it does not come with a power cord for some reason], PVC hand saw or fine-tooth sawzall, razor for reaming the inside of the pipe after cutting (optional), file for filing the edges of the PVC after cutting (optional), and flat-head screw driver or socket wrench for tightening the coupling.2. If applicable, and the pipe goes to the attic, install in the attic, not the basement.3. For installing the power cord, your fan might have two or three wires for the electrical. According to an Amazon answer by RadonAway, either way is fine, and it just depends on which manufacturing facility produced it. However, the power cord has three wires. If your fan only has two, then just cap the third one on the power cord, the green/ground wire.4. Test the fan by plugging it in prior to going up in your attic. Shake it to ensure nothing is loose or trapped inside the fan.5. Affix the coupling to the fan on both ends prior to heading into the attic.6. Take all your supplies to the attic.7. Cut the pipe. I cut out a 11.25” chunk of pipe because the total length of the fan and the couplings was 14.25”. Then, I subtracted 1.5” for each end of the coupling.8. [OPTIONAL] File the outer rim of the pipe on both sides.9. [OPTIONAL] Using a razor or reaming tool, ream the inner rim of the piper on both sides.10. Plug the fan in, then check your manometer to ensure it has proper suction. The max should be about 1.75, and mine come out to 1.25.As for the sound, it has a fairly mild humming, even through the ceiling, but you will get used to it in no time. I sleep with a sound machine, and at worst, it just adds to that noise.I hope this helps and saves you some time!