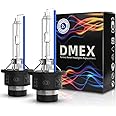
💡 Light Up Your Life with Confidence!
The Replacement Xenon HID Ballast Headlight Control Unit KDLT003 DDLT003 is a high-quality automotive part designed to fit various Lexus and Toyota models from 2004 to 2014. With a voltage of 12 volts and a sleek white light output, this durable 2-piece set ensures optimal visibility and performance, making it an essential upgrade for your vehicle's lighting system.
| Voltage | 12 Volts |
| Light colour | white |
| Auto part position | Left |
| Number of pieces | 2 |
| UPC | 853914007043 |
| Manufacturer | GenXenon |
| Model | GX-KD3 |
| Product Dimensions | 10 x 10 x 2 cm; 340.19 g |
| Item model number | GX-KD3 |
| Manufacturer Part Number | GX-KD3 |
| OEM Part Number | 85967-51040, 81107-33761, 81107-12A80, 81107-47150, 81107-52680, 81107-30D30, 85967-24010, 81107-47240, 81107-21150, 81108-30B90, 81107-60D50, 85967-52020, 85967-20021, 85967-52021, 85967-53040, 85967-20010, 85967-33030, 85967-0E010, DDLT003, KDLT003 |
| Item Weight | 340 g |
T**O
Worked great on 2011 Lexus RX 350
Pic is of the original ballast that had gone bad on the right side of my 2011 Lexus RX 350.I live in Canada. Ordered it on Amazon.ca. Paid $67.99 (CAD) + $8.84 (CAD) Import Fees. No taxes. OEM product costs almost 6 times more with taxes included.This after-market product arrived in 2 days with Prime delivery, as promised. Had it replaced by my mechanic the next day. It fitted well as advertised and worked great. I watched the whole installation process and there’s no way, I could have handled it myself. Better left to the professionals. The plastic shield under the roof had to be taken off and the same with the front bumper on the right, which had to be dropped to the ground to access the headlight / ballast. Although it looked cumbersome, my mechanic made it look so simple.Hope this product lasts. If it malfunctions, I will leave an update. In the meantime, I highly recommend.
B**N
Great deal. Here's some more comments on the installation.........
So I purchased and installed these for a friend's 2007 Prius. My mechanical background is ~45 years of serious auto tinkering, and prior mechanic. At any rate, my friend was quoted $1200 by the dealership due to both lights being out (1st 1, and then the other a month later), assuming both ballasts needed replacing. The 2 ballasts I purchased here were a fantastic value and works perfectly (I avoided the under-$30 versions of this ballast, due to concerns of longevity...... I was looking for a long-term fix and the difference in price for these seem worth it).INSTALLATION TIPS/COMMENTS: So I had never done this particular task on this model of car before. It's definitely very doable if you have any degree of mechanical experience. Hands down, the biggest issue of replacing this part is fishing the bulb socket head out of the headlight housing. I reviewed many videos and comments about the method of doing this. I did the way that made the most sense, and it was fantastically straightforward (after the first one of the 2 anyway....):1. Take out the dozen or so easy screws to partially "drop" the front bumper cover. This is really really easy and I've tried getting at the backside headlights the other way, I'll never do it again.2. Remove the headlight(s) entirely. Be careful not to break the numerous plastic electrical connector clips. Remove the 4 screws holding on the ballast as everyone says. CAREFULLY pull out the black blood with the 2 (black and red) wires on it. Again, try very very hard not to break this black plastic insulator.3. Rotate the headlight bulb connector ~1/8 turn counterclockwise to disengage it from the housing body. You'll then immediately discover that the connector is too thick to pass between the headlight housing body and the inner headlight structure. Various methods talk about disconnecting the replacement ballast socket, and numerous other tedious techniques. Not necessary. Use the "remove the headlight adjuster screw" technique --> use a 8 mm socket on a cordless drill and spin out the adjuster screw the 40 or so turns (to save your wrist). This is normal (right-handed) threading (counterclockwise to remove). Note that once the screw is loose it's easiest to just also remove the plastic socket which this adjuster screw turns through. No problem, just set it aside for the time being.4. Like another review of this part sez, once the long adjuster screw is removed, the socket cord now has much more room to swing to and fro inside the headlight housing. It's not perfect and not instantaneous, but if you swing it around to the biggest area on the side of the internals, the socket will squeeze through the tight spots with just a little friction.5. Now thread the new ballast light socket back the same way. Be very careful to not have the socket head "rotate" once it's inside the housing, and become too large to retrace your steps on the way out. If it does, just pull it back out and start over. The first time this took me for 5 minutes. The 2nd time it took me 20 seconds.NOTE: The new ballast part(s) that I received had a socket cord that was maybe 2 inches shorter than the original light cords. This is absolutely no problem, but note that the original "path" of the ballast cord went OUTSIDE/AROUND the adjustment screw. On the new part with the shorter cord, I just ran the cord to the inside aspect of the adjustment screw. It's plenty long to do it this way, and doesn't interfere with anything.6: The rest is just continuing the reversal of the disassembly procedure. Make sure to plug in your black/red wire plug the correct way (the red wire goes towards the "fat end" of the white receptacle socket --> which is important if you break the black plastic retainer like I did, because you forget which wire went where....). If your black plastic retainer breaks, you can just plug the spate fittings in and cover with HPV cement or make your own insulator. Also don't forget to reinstall the black foam gasket/seal that sits under the ballast in the housing, and the black rubber O-ring under the adjuster socket.I hope these comments help. I tried not to repeat the obvious but point out the most important things I learned.
M**W
Failed shortly after purchase
Failed after 3 Months, would not recommend to buy this product. Very difficult to return or claim as is after 30 days.
J**É
Perfecto.
Funciona perfectamente. Muy contento con la compra.
C**O
So far so good .
Honestly thought I was going to have trouble with this item due to some reviews however I chose this item because it had less bad reviews. Respectfully . But due to how expensive things are in store it’s definitely saving you lots of money . Especially if you do it on your own. Now I’ve only had it for 2 days and it’s been working just fine . No flickering or anything . Was a very difficult brain draining activity however if your capable of doing so DO IT ! I hope it lasts …
TrustPilot
2 周前
3天前