📡 Tune In, Stand Out!
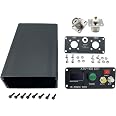
The Malahit ATU-100 Antenna Tuner Box is a compact and stylish housing solution designed for the ATU-100 Automatic Antenna Tuner. With a robust aluminum alloy construction, it features a user-friendly OLED screen and is compatible with a range of tuners, making it an essential tool for any serious radio enthusiast.


| Impedance | 50 Ohm |
| Maximum Range | 500 Meters |
| Number of Channels | 1 |
| Item Dimensions L x W x H | 5.51"L x 3.46"W x 1.5"H |
| Color | Black |
S**N
Perfect case for the tuner kit.
I had a sense of trepidation when I bought this case set and the tuner kit: at that price would it really work? Now, months after assembling the tuner and putting it into this case I am delighted. I think this is an excellent tuner for a portable 100 watt or less mobile HF radio. I leave it connected and turned on all the time. I hear it automatically tuning when I change bands for FT8. The display has developed some dim spots, but they're still legible. The case fit perfectly. Only one thing to be aware of and that is to plug in the power plug before turning on or connecting the power supply, otherwise you may burn the fuse.
S**I
Great Kit But NOT For New Or First-Time Kit Builders
I FINALLY got my ATU-100 Antenna Tuner kit and this Tuner Box built after watching several YouTube videos done by previous builders. The Tuner works great and this box makes the whole unit look fabulous! However, I had to re-work some wiring errors I made due to the lack of detailed instructions and the fact that I am not an Electronics Assembly Expert.The difficulty is that there are no detailed Step-By-Step Instructions for this kit. There is adequate information on the document along with the Schematic to enable an experienced kit builder to assemble the kit. However, a relatively new or first-time kit builder probably will not be able to get it assembled.Here are a few things I learned (some the hard way!) -Unless you have SUPER eyesight, use a large magnifying glass/light before you attempt to build this kit.1. For the Malahit ATU-100 Antenna Tuner Box, the image of the wiring on the back of the green TuneSwitch is incorrect. The wire connecting half of the Auto, BYP and Tune switches together goes toGROUND, NOT the + wire as shown in the picture that comes with the Tuner Box. The OTHER side ofthe Tune switch gets the + wire.2. The hookup wire necessary to fully assemble the ATU-100 kit does NOT come with the kit! You willhave to provide the stranded insulated hookup wire yourself (NOWHERE is this mentioned on AmazonNOR the single Instruction sheet!).A. I used some 18 ga. stranded insulated wire for the initial power connector but the hole in the PCBmade it tough to fit that size wire in the (-) PCB hole. The other wire (+) goes to the On/Off PowerSwitch so there was no issue there.B. I used 22 ga. stranded insulated hookup wire (very flexible!) for the other hookup wire connectionsthat were necessary.C. The Yellow and White wires needed to connect the Auto and BYP switches to the BACK SIDE of thePrinted Circuit Board (PCB) must be VERY small to fit into the two tiny PCB holes they must besoldered into. You will need to be very careful soldering these two wires to the back of the PCBbecause the solder pads are so small and so close together!3. This is a very compact kit. Use a very small pointed Soldering Iron to prevent overheating the PCB orthe already installed SMD components.4. As another Amazon customer suggested, I recommend building and installing the Toroids FIRST. I alsowould add to build and install them in their numbered order. Trying to install the Toroids AFTER theRelays are soldered onto the PCB will be a nightmare.5. Pay close attention to the size and LENGTH of the wire required for each Toroid as stated on theInstruction sheet.6. As suggested in the instruction sheet, I used Allen Wrenches the described diameter as described towind the three air core windings.7. Take your time and be sure you understand EXACTLY where each component and wire should besoldered to the PCB. I initially soldered the four light yellow enameled wires for the Tandem MatchTransformer "binocular" toroid into the WRONG 4 holes (underneath it!). They actually go into the fourSMALL holes just outside the "binocular" toroid's diagram outline on the PCB.8. The Electrolytic Capacitors have a very distinct mark on one side. Be sure that side of those Capacitorsgoes into the PCB hole that shows the white mark on the edge of the circle images on the PCB.9. Examine the picture of the vertically installed diode as it is shown on the Instruction sheet. Be sure thewhite ring mark is at the TOP when you solder it into the PCB (you will have to bend that end of thediode's terminal wire down toward the other wire end to install it vertically).10. If you buy the Tuner Box, BEFORE YOU SOLDER THE SLIP ON TERMINALS ONTO THE OLED, be sureyou draw yourself a diagram showing which terminal on the OLED display module is which connection(i.e., Gnd, VAC, SCL and SDA). After you solder the slip-on terminals to the OLED display module, youwill no longer be able to read those markings on it!11. If you buy the Tuner Box pay close attention to how the four green mounting tabs are oriented in theInstruction sheet picture when they are attached to the PCB.12. If you buy the Tuner Box, when pushing the On/Off Power Switch into the end panel, do your best tokeep the switch even and press it straight into the rectangle hole (i.e., NOT one side in before theother!).13. If you buy the Tuner Box, I suggest sticking a piece of electrical tape or other insulation material ontothe back side of the front end panel. This tape will insulate the inside of the front box end panel. Thisis BETWEEN where the OLED display's soldered slip-on connectors are located and the inside ofthat box end. This should keep those solder connections from contacting the inside of that metal boxend. The Instruction sheet does not mention this. It just didn't make sense to me to risk those solderconnection points touching the metallic box end panel and potentially shorting out. I actually used asmall file to flatten the sharply pointed solder points to make their thickness narrower and less likelyto punch through the tape and contact the metal end panel.As I said, my completed ATU-100 Tuner and Tuner Box works great (the box looks great too!). However, my language during the build process was not fit for human ears! I hope this was helpful to others considering to buy and build this kit and that they have a much better experience building their kit.73!
G**S
Well worth the money
I had an older version of the finished tuner in a smaller case without the automatic and bypass function buttons. Far to cramped to be able to add them. This case has ample of space and all the parts are there to transfer that PC board right into this case. Moreover, with the original tuner the board was just glued to the case with RTV whereas this board has sturdy standoffs creating a good ground and stable mounting.
R**S
missing components and instructions for the worng board
Not only did it arrive late, the nuts and spacers to mount the display are missing. The screws to attach the front and back panels are supposed to be black matching the enclosure and the picture but they are chrome.Only 2 nuts provided where 4 are needed for the PL259.2 solder lugs included for the PL259 but missing for the ground connection.No instruction on how to mount the display and missing spacers, nuts.Otherwise it looks good and nice finish.
J**M
Awesome fun project.
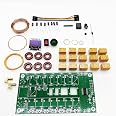
This is a very lightweight tuner. Made with light components. 100 watts SSB is definitely max I would use.Now the kit is definitely an advanced level technician. Not all pieces are in the kit that is required. But easily obtainable.As for the function. Super fast, easy to use and has potential to mount any place. Recommend you get the battery pack with it. It would be easy enough to directly attach it to the antenna and strap it to the mast for temporary setups like pota.I’ll be doing as portable setups soon, Ytb: jimsspareparts
M**Z
Fun Project
I am an amateur radio operator and was looking for a usable tuner without spending too much. I was also interested in a new electronics project and enjoy the building aspect of such devices.Everything was well packed and the fit and finish of the board was good. The instruction sheet provided some basic specs but is lacking a bit on construction instructions for those who aren't fairly experienced with building such devices. A web search provided enough help from those who have experience with such things to figure the steps and assemble. I was pleased when the completed project was plugged in and powered up/worked like it is supposed to.The unit itself is a budget tuner but will meet your needs unless you need a tuner that will remember the "tune" for your band etc when powered off and back on. If you are fair at soldering and can wind wire through and around the torrids you should have no problems. I can't comment on the life span since I've only had mice a couple of months but for me it was worth the price for the fun of building alone. I also purchased the metal enclosure kit which was a perfect fit.
J**.
Fun kit works nice
Fun build. Im using it with my field kit on an end fed and I works well.
TrustPilot
1天前
2 个月前