Desertcart purchases this item on your behalf and handles shipping, customs, and support to Taiwan.
🚽💦 Upgrade your flush game—save water, save money, save the planet!
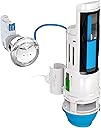
The Danco HYR270 HydroRight Dual Flush Valve converts standard toilets into efficient dual-flush systems, reducing water usage by up to 70% on liquid flushes. Designed for easy, tool-free installation in under 20 minutes, it replaces worn-out flappers, chains, and handles to fix common leaks. Compatible with most 1.6 to 3.5+ GPF 2-piece toilets, it features a durable plastic build with a chemical-resistant silicone seal and a stylish chrome finish, making it a smart, sustainable upgrade for any modern bathroom.


| ASIN | B00D8GC5K6 |
| Best Sellers Rank | #43,299 in Tools & Home Improvement ( See Top 100 in Tools & Home Improvement ) #63 in Toilet Flush Valves |
| Brand | Danco |
| Brand Name | Danco |
| Connector Type | Barb |
| Customer Reviews | 4.1 out of 5 stars 1,424 Reviews |
| Exterior Finish | Chrome , Plastic, Silicone |
| Included Components | Building Materials & Ladders;Other Material Handling;hydraulic-valves |
| Inlet Connection Size | 2 inches |
| Inlet Connection Type | Barb |
| Item Dimensions | 4 x 3 x 10.5 inches |
| Item Type Name | HydroRight Water-Saving Dual Flush Valve with Push Button Handle |
| Item dimensions L x W x H | 4 x 3 x 10.5 inches |
| Manufacturer | Next by Danco |
| Manufacturer Part Number | HYR270 |
| Manufacturer Warranty Description | 1 year warranty |
| Material | Plastic |
| Material Type | Plastic |
| Model Number | HYR270 |
| Number of Items | 1 |
| Number of Pieces | 1 |
| Number of Ports | 2 |
| Outlet Connection Size | 2 inches |
| Size | 1 Pack |
| UPC | 188670000459 |
| Unit Count | 1 Count |
| Valve Type | flush valve |
K**F
Fantastic
First off, measure your tank to be sure this fits before ordering. See product details for fit. I had no problem here. Read the directions and look at the parts and your tank so you know what will fit where before starting. It is not that confusing but it makes sense to know what you will be doing instead of reading each step for the first time as you go. Install was easy, I found the directions easy to follow. There was no need to shut off the water, especially since my value leaks when turned and it is perfect, not leaking, where it is set so I didn't want to mess with that. What I did was remove the tank top. Flush to empty the water out. Then I wedged a something under the arm on the refill float to hold the arm up so it would not keep running while working, although it appears you can do this without that, but you do waste some water while working. Remove the old handle and flush arm. Remove the old flapper. Stick the new Dual Flush Converter in place of where the flapper was. There is a piece at the back that fits around the drain tube with a wedge type fitting to hold it down, rather easy to insert. Screw in the top section of that mechanism. Stick the new flush button in the hole. Test out a few times adjusting as shown in the directions. The new mechanism fit easliy in the flapper hole and was not at all difficult to place there. The only tool I needed was a pair of slip joint pliers to loosen the old handle and nut and put the new nut in place, only because I have a weak left wrist. I would say it took about 15-30 minutes total, i was not trying to set any records. All in all it was much easier than I anticipated. I didn't even get wet or have to mop up when done ! Not that I really needed to conserve water, I live at the beach and we're only in trouble here of a shortage if the Atlantic Ocean dies up. Although we sometimes have flooding so reducing the amount of water flushed certainly won't hurt on stormy days and be easier on the drain field. Plus it might reduce my water bill some and in the long run pay for itself. It won't make much difference for me, a single person, but i'm sure it would make a bigger difference for a larger family. I only really got this because it sounded like a neato gadget to have. What I like is the kwickness of the reduced flush and fill. It gets the job done. I guess it uses about 1/3rd of a full flush. It certainly does not hurt to conserve when possible. All you need to get used to is pushing the top less than half the button in, unless you need a full flush where you push oth parts in. Then also it is push and not flip the hanlde. But that comes quickly and you wonder why you didn't have this earlier. I did find it slightly difficult to push the smaller reduced flush button, but there again because of my weak wrist and also a previously broken finger on that same hand and unfortunately it is easier for me to use that hand than my other fully good one. I found it easier to do by using my middle two fingers, not counting the thumb, instead of one finger. Once I figured that out it is not a problem.
B**N
Simple, quick, and easy way to save water
I have now replaced all of the flappers on all three toilets in my house with these. I ordered one to make sure that the dual flush mechanism would actually work and flush everything on the single flush. It worked perfectly on the first toilet on and I ordered 2 more. The mechanism to attach the device is a simply cable tie. It comes with one already attached. I did have to cut off the one that came installed on the unit and use the spare that was included to get this to slide down over the fill tube. Not really an issue, but you might want to remember it when you install. And, the size of the fill tube was not an issue. One of the toilets in the house had a very large fill tube. I was able to use a bigger cable tie and it works perfectly. I had the correct type of water supply in all of my toilets. As others have mentioned, check to make sure you have the correct fill type in your toilet. The units are very adjustable for both the single and full flush. It does take a few minutes to get all of that adjusted correctly. I have gotten my first water bill since I've installed them. With these converters only installed for half of the billing cycle, my daily water usage went down 15 gallons a day for a 2 person household. I'm assuming that this will go up to 20 or more gallons a day when it covers the whole billing cycle. I am really pleased with the results and would recommend that anyone who wants to save water, without replacing your toilets, this is a great option. Update 05/11/2010 We have not gotten a water bill that covers the entire billing cycle. The average gallons per day is down 50 gallons! The three converters that I put in have almost paid for themselves already.
I**M
Been using these for years and seem to work well.
As the headline suggests, I installed these in my parents' respective homes over 10 years ago with no complaints. Seems there's a handful of complaints about the seal thickness and leaking here, but that hasn't been my experience. Also, as others have said, depending on the age and configuration of your toilet (i.e., if it has a traditional ball float valve) you may need a new valve. I've used both the Danco valve included with the retrofit kit (not this product, but includes it in the kit), and and float less valves. Installation is super easy as a DIY project and the instructions are pretty straightforward as far as getting the thing into the toilet tank and running. Where I'd dock points is the explanations on optimizing water use, which they base on measuring the existing water levels in the tank and bowl. It's not hard to figure out, but directions are unclear. But just getting dual flush to work is easy enough. You don't need to be a toilet 'power user.' The other drawbacks: the pushbutton action and the button itself. Since the button lifts a valve fighting the weight of the water in the tank via cable pull, it takes a pretty heavy push compared to my purpose-built dual-flush toilet. Second, the button does not play nice with lever holes that aren't squarely on the front or side of the tank. On one installation where the lever was located at the corner, I had to shim it out with a stack of washers and it looks strange. Lastly, it's kind of an ugly chromed plastic button. Seems a lot of folks prefer the dual-lever version of this. It's a tall ask but I wish they had a choice of buttons to match bathroom decor. All in all, it's one of the few readily-available dual-flush conversions, and IME, they last, and it's cheaper than replacing your whole tank.
F**D
great product great price very simple
I saw the product recommended on a "how to TV Show". Instead of going to store I checked amazon and was pleased to find the product with a cheaper price. It arrived quickly and took about 5 minutes to install. this product will definitely save water for men, because so many flushes don't require paper. with women the amount of time they will use the reduced flow flush is purely a function of how much paper they use. the more toilet paper used the less likely she will use reduced flow. In our house I estimate that we use the reduced flush on at least 40 percent of the flushes. We installed our Hydroright on the master bath toilet so that my wife and I would be the only useres, as I didn't want it confuse house guests with two buttons. The only complaint that my wife has is that the push type flush buttons require more pressure than she likes. It is a valid complaint and could cause older people a problem. Overall this is a great product and I would recommend that everyone try it on at least one of their home toilets. Men will use this about 80 percent of the time, women not so much. the company also has a water valving kit that I will order that I discovered on their website. A very good common sense company.
P**N
Planned Obsolescence
I love the concept but only like the product. It works for us, without leakage or issues. Setting the urinal amount of water is trial and error and it never seems to work as intended. But, it limps along. The full flush does the trick... fully flushes. All of this might remove a star but is not a deal breaker for us. THE PROBLEM I HAVE IS THIS: The actual unit is essentially two connected parts: The flushing device inside the toilet and the push-button assembly for controlling the flush. The push-button assembly, for us, has never lasted more than a few years at which point it begins to fail such that you must continuously push the button for the water to continue flushing. Okay, not in and of itself a big issue because to replace this push-button flush piece is a literal one-minute plut-and-play replacement. BUT THEY DON'T SELL THE PUSH-BUTTON ALONE and, thus, this is an example of PLANNED OBSOLESCENCE. In other words, to replace the simple push-button (one minute) requires you buy a new unit and replace the whole thing (more like 15+ minutes). I get irked by such things... as our land fills overflow... so, thus, my energetic moderately negative review. I hope this helps. IF I have bad info and Danco does sell the push-button alone, I will change this review and add a star or two and change my tune. Until then...
R**1
Works great; but some toilets might need their Fill Valve also. Read my tips.
This thing works great. Always wanting to save water, this is the perfect solution for the toilets. I didn't want to get the type with a split handle you press down but rather the dual pushbutton style that this one has. Initially I bought only one for the first floor half bath to check it out because some people seem to have had a problem with it working properly. It worked out superbly so I went and bought two more for the upstairs bathrooms. As it turns out, for some strange reason, for the third toilet, I couldn't get it to flush well enough for the #1 button. But I determined it to be the toilet's problem and not a reflection of the quality or design of this dual flush converter. If you have problems, you might want to read the following: First, the toilet jets needed to be cleaned out. I did this by cleanly cutting an 8-inch piece of stranded cable (like what is used with a garage door opener) and chucking it up with a variable speed drill. (First flush the toilet with the water cut off at the toilet to lower the water level in the bowl.) Then WITH THE DRILL SET IN THE REVERSE DIRECTION in order not to unravel the twisted cable, I slowly started rotating the cable while inserting the free end of the cable into the toilet jets, one at a time, to ream them out. This helped a lot but still needed more improvement. Second, I temporarily unlatched and set aside the upper housing of the dual flush converter (without uninstalling anything) and inserted a plastic pipe directly into the drain hole in the bottom of the tank. (If you still have the old style flapper type installed, merely lift up on the flapper to insert the pipe.) Then, using a funnel in the top of this pipe, I poured in about half a gallon of acidic toilet bowl cleaner (bought at Home Depot). It drains through the jets and the lower flush port and into the bowl. I removed the pipe and let it sit overnight. It loosens the rust from the jets and all the mineral buildup in the toilet bowl trap. Next morning I reconnected the dual flush converter housing, turned on the water, let it fill, and did a full flush. Third, I noticed that when flushing with the #1 button on this particular toilet, the bowl didn't fill as high as when flushing with the #2 button. This was a function of the old fill valve so I bought the HydroClean HC660 fill valve made by the same company (MJSI, inc.). This fill valve has a really nice feature that lets you adjust with a mini-valve the amount of water that fills the bowl (via the overflow tube). The simple detailed instructions come with the fill valve. I made this adjustment so that the bowl fills just to the point where the toilet trap is full when the tank fills and any more would be a waste. Now everything works perfectly. Addendum: After several days of monitoring, it became evident that the second toilet was "ghost flushing", i.e., the tank would very slowly drain past the seal at the base of the dual flush valve. What I didn't mention above was that this same toilet was doing this before; that is, the old flapper didn't seal well either and once the water level in the tank drops a couple inches, the fill valve turns on to bring the water level back up. So I replaced the old base unit, i.e., flush valve kit which is the part that the old flapper was attached to; this is the part that includes the overflow tube and attaches with big rubber gaskets to the base hole in the bottom of the tank. Of course, I didn't use the new flapper that comes with this kit. Instead I reinstalled the dual flush valve. Now it doesn't leak at all. This is important to understand for those who have had difficulty with the dual flush converter seal not sealing against the old surface that the old flapper sealed against. Good chance that the old flush valve base is at fault. You can't expect the blue silicone dome gasket at the base of the dual flush converter to necessarily seal against a faulty old unit that the old flapper sealed against.
C**W
Great idea - with two BIG problems for common toilets. A response (with fixes) to the complaints...
UPDATE (Dec 2011): At Home Depot today I saw an end cap with an infomercial running about this gizmo. However, I took one out of the box, and I was so disappointed to see the same darn paper-thin gasket that I (and many others) have reported to them over the past 2 years. Additionally, the Home Depot staff said they get a lot of returns on this item. This company knows that their gasket is too thin, causes leaks, and that including a higher grade gasket would cost them very little (approx 20¢ per unit). Somehow they can find the budget to launch a Home Depot marketing campaign & produce a new infomercial, but can't spend an extra 20¢ per product to prevent the headaches they're causing. I'll add that my fixes work, but the silicone seal is NOT a permanent solution (already had to replace it once). If this gizmo is not ready to use out-of-the-box, and requires annual or semi-annual maintenance, it is NOT ready for the market. If you want a dual flush, you can get a brand new dual-flush toilet for under $100. Original Review: ====== Ok, I also had two problems when installing this, and I have fixes for the 30+ people who have complained about similar install problems (same root problem in almost every instance). I predict that for MOST people, this dual flush device will not be an "out-of-the box" solution - you will need some troubleshooting not included in the instructions. But I also predict that because of bad installs, some folks here (not realizing it yet) will have running toilets, or will actually use MORE water on the low-flush feature than they did before! Unless you measure it like I did, you'll never know. This is a SERIOUS problem this company needs to address, costing lots of money and wasted water - and homeowners may never even know it! I feel ~really~ bad for the folks who spent hours & hours wrestling with this device, but I promise these 5-minute fixes will work. I wholeheartedly agree that there are design flaws here, but finding a workaround saved me the hassle of returning it & messing around with another brand (and probably an entirely new set of problems). I'm going to stress - you CAN get this to work with your older toilet, and you do NOT need the HydroClean (or any other) device to make this work. I like the HydroClean unit, but IT IS NOT NECESSARY to install your dual flush converter. FIRST: THE LOW-FLUSH FEATURE ISN'T WORKING FOR YOU Again, I totally agree - the instructions aren't clear. I had to try 20-30 flushes before my "Ah-ha" moment. If your low-flush doesn't work, 99% chance the problem is water level is too low. It's not getting enough water to flush. Do NOT hold down the flush button to get this to work - if you have to do that, it that means you're using more water than before! And do NOT flush twice To "fix" the problem - just read on... Solution (bottom line): You need to set the float level for the low-flush (the blue tab) 1/2" BELOW where you want the water line (yes, below). Then, the water line has to be about 2" ABOVE the float, so it can use roughly 2" of water on a low flush. I know it sounds odd, but try a flush - if it doesn't work, keep adjusting the low-flush water level up a notch. I PROMISE - this will work. I know it sounds backwards - but to save water you will need to keep MORE water in your tank. The water is not actually used each flush - it just needs 1.5" to 2", which should translate to .6 gallons or less. (My low-flush setting uses .4 gallons, which is efficient and also 33% less water than national standards for even a urinal). If you have a HydroClean installed, it may actually be getting in your way. So set the float/fill level to the near maximum setting. With my HydroClean, my previous setting was about 1.1 gallons with my toilet (I thought I was saving water this way). But with the dual converter installed, I had to add nearly 50% more water to the tank - so that the low-flush feature can work right. Now my main flush uses 1.2 gals (about 25% less water than national standards), and my low-flush works great too. SECOND: YOUR TOILET IS RUNNING Some people may not even realize that their new dual flush converter is running. A running toilet will definitely waste more water than it saves - possibly wasting hundreds or thousands of gallons a month!!! The problem is the blue "silicone" flapper gasket is CHEAP thin rubber. If it's not perfectly straight, the rubber will fold or ripple & allow water to seep into the tank. Frankly, I would suspect 75% of all users will immediately or eventually experience this. It's a bad design, almost a defect (it needs to be larger & sturdier). I had to refit this 3 or 4 times, but the problem is, once the entire dual-flush contraption is fully installed, you can't see the blue gasket to confirm it makes a good seal. You MUST listen to the toilet a few hours after install, to see if it runs (or add a blue cleaning disc or some food coloring to your tank, then check the color of the bowl later). This can waste 10-100 gallons per DAY (yes, up to 100 gallons) - so if your goal in using the dual flush is to save water, think twice. Solution (bottom line): You will most likely need to seal it with a waterproof silicone sealant or high-grade waterproof caulk. A third potential problem is replacing your flush handle with the new dual-flush "button". If your handle is off to the side of your toilet tank, if you have a triangle-shaped toilet, or if your toilet is right against the wall, then you (or your guests) won't be able to see which button to push. I give this 5 stars for ingenuity, but 1 star for major design flaws.
N**B
One is for pee, two is for poopies
So said my wife when I asked if the two-button flusher would confuse anyone. This did NOT fit on an almost 40 year old American Standard 5 gallon tank; the shaft on the button was about 1/6" too short for the internal connector to slide in place. Daunted, but not defeated, I took all the hardware upstairs and put it on a 15 year old American Standard Cadet tank. With walls just about 1/8" thinner, everything went in place in around five minutes total. Really. Marked water levels, did a couple of test runs, adjusted flush level for top button, this thing is amazing. Uses about 1-1/2 gallons for small flashes which are the majority of flushes from that bathroom. So now I'm looking into a complete/cheap replacement for the basement Brady-bunch era "almond" toilet as it gets a lot of use too. We like the Toto in our master bath, but $400? Thinking about it. That's a LOT of green to be, um, "green." On the face of it, lacking the actual numbers to crunch for water cost savings, the roughly $20 isn't much to spend so I can at least "feel" like I'm doing something green. Like a lot of other leftists who fly around the planet trying to sell us on their brand of doom gloom and man-made self-destruction, I make myself "feel" better by doing little things like recycling, while owning a pickup truck, an SUV, and generally consuming like I'm still living in the 60's. Until "The Green Police" are real(er... curbside recycling bin and garbage inspections are already being done in some states with hefty fines for failures to recycle), this'll do for a while, and I apply the water savings to my Zoysia grass lawn anyway. Your rationalizations may vary. Buy one.
S**V
Works nice, great customer support
I bought three of these sets. Normally I never complain about instructions, but I had some installation issues. Well, it was installed easily, but I had to hold the buttons to flash. The instruction talks about jammed cable. In my case it was not jammed, it was curved a bit more than device can tolerate. So, I found some examples on youtube and did it in the same way. After that, my issue was resolved. All other sets were installed without problems in 15 minutes each. Later one unit had some issues, but Danco's customer service was fantastic the problem was resolved.
L**A
Ahorrando agua!
Fácil instalación y muy eficiente.
I**D
Easy to install
I am using two of these items. So far, they are working fines. Yes, there is a bit saving in water but difficult to estimate the savings.
M**E
Producto útil y durable.
El producto está bien, es bastante útil y muy eficiente. Es una lástima que el botón de descarga dual sea de plástico y ya no lo manufacturen en metal como solía hacerlo la empresa.
T**N
No tools required!
I had to replace my chain system that was always getting stuck; making me waste water. This is super easy to install and works very well. No tools required!
Trustpilot
5 days ago
2 weeks ago