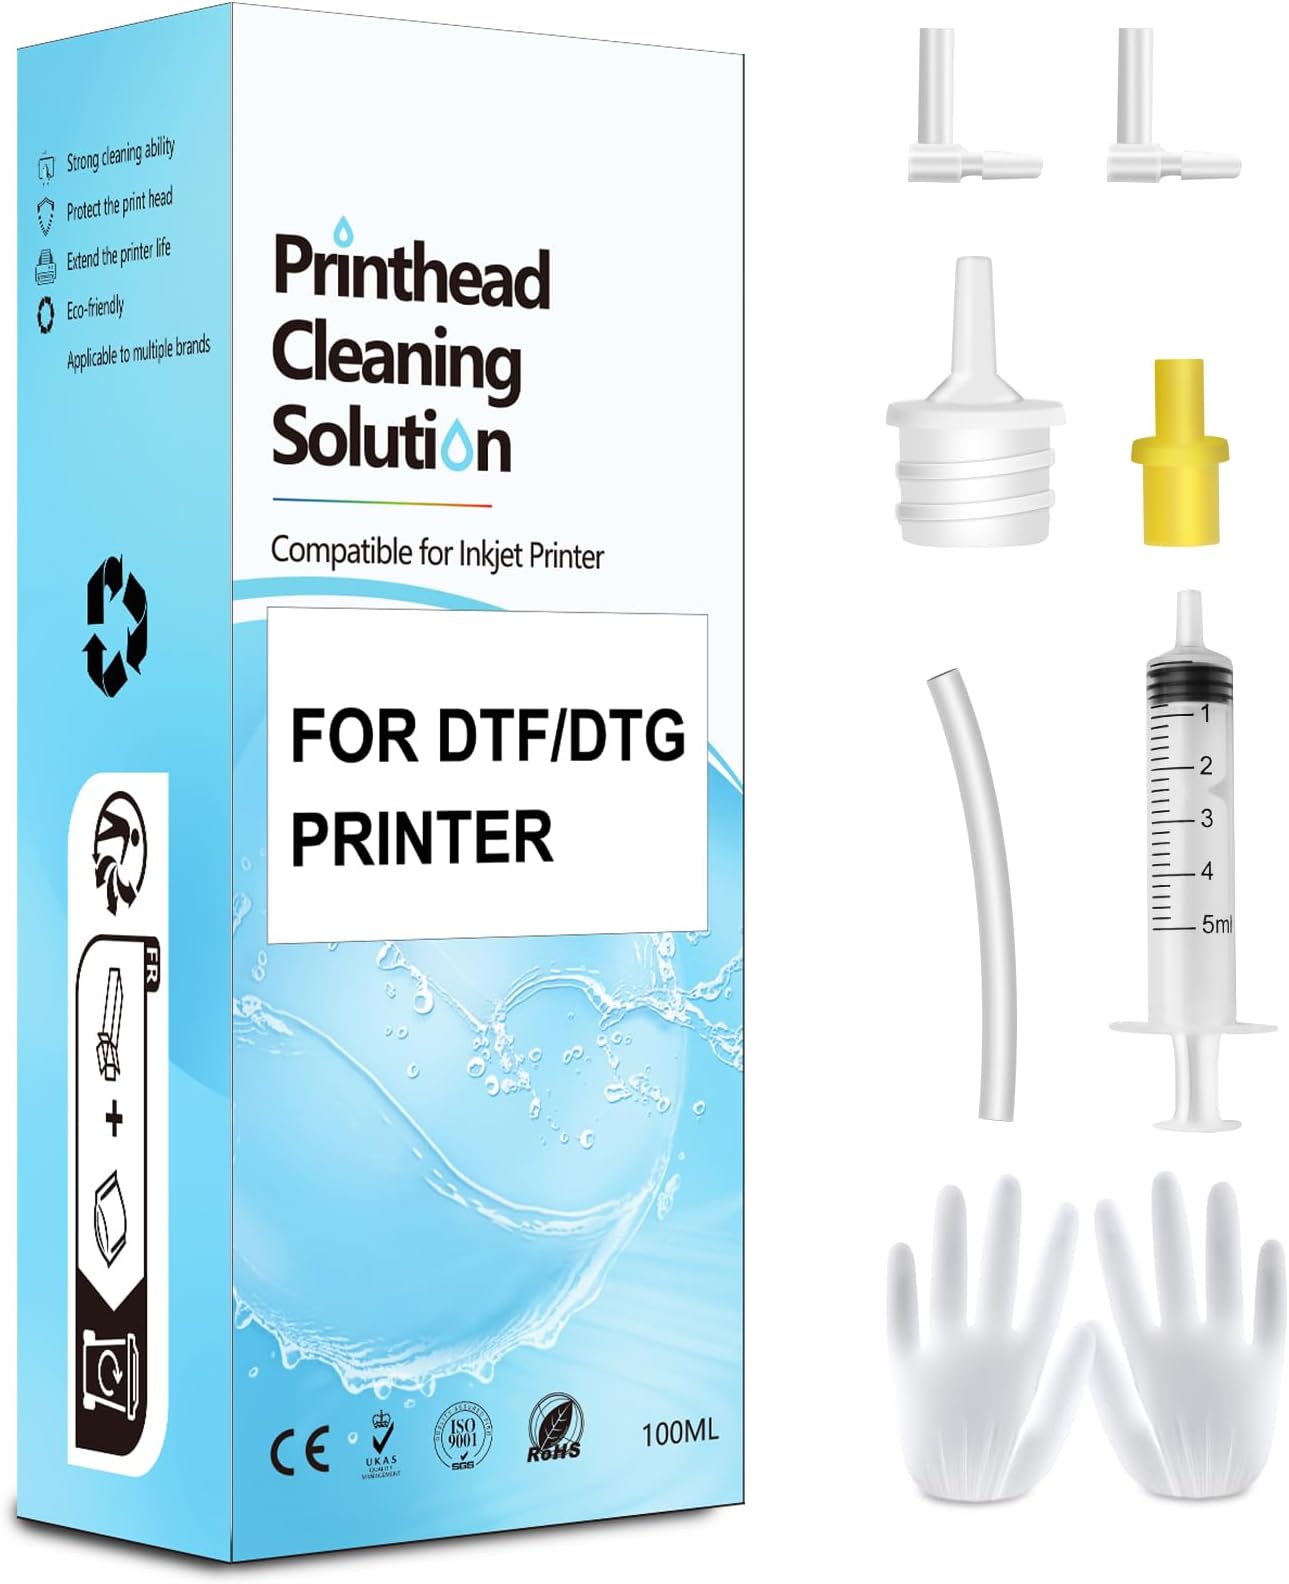


🖨️ Keep your prints flawless — don’t let clogs kill your creative flow!
Fosgoit's 100mL DTF Cleaning Solution is a specialized printhead cleaner designed for direct transfer film and direct-to-garment printers. Compatible with over 30 Epson and other DTF/DTG models, it effectively dissolves hardened ink blockages, restoring nozzle performance and extending printer life. The kit includes all necessary tools for easy, precise cleaning, making it an essential maintenance product for professionals who demand consistent, high-quality prints.


| ASIN | B0CXXJ9PHK |
| Best Sellers Rank | #72,421 in Arts, Crafts & Sewing ( See Top 100 in Arts, Crafts & Sewing ) #91 in Screen Printing Accessories |
| Brand | Fosgoit |
| Color | Multicolor |
| Compatibility Options | Printhead DTF Cleaning Solution |
| Compatible Devices | DTF Cleaning Solution, DTF Printhead Cleaner, DTF/DTG Cleaner Solution, DTG Cleaning Solution, DTG Printhead Cleaner Compatible Devices DTF Cleaning Solution, DTF Printhead Cleaner, DTF/DTG Cleaner Solution, DTG Cleaning Solution, DTG Printhead Cleaner See more |
| Compatible Printer Models | DTF Printer Cleaning Solution, DTF Printer Head Cleaning Solution, DTF Printer Nozzle Cleaning Kit, DTF Printhead Cleaning Solution, DTF Printhead Nozzle Cleaning Kit |
| Customer Reviews | 4.3 out of 5 stars 2,400 Reviews |
| Ink Base | Water |
| Ink Color | Multicolor |
| Ink Colour | Multicolor |
| Item Height | 6.3 inches |
| Item Type Name | DTF Printer Head Cleaning Kit |
| Manufacturer | Fosgoit |
| Model Name | DTF Printhead Cleaning Kit |
| Other Special Features of the Product | DTF Print Head Nozzle Cleaner, DTF Print Head Nozzle Cleaning Kit, DTF Printer Head Nozzle Cleaning Kit, DTF Printer Nozzle Cleaner, DTF Printhead Nozzle Cleaner |
| Page Yield | 1200 |
| Special Feature | DTF Print Head Nozzle Cleaner, DTF Print Head Nozzle Cleaning Kit, DTF Printer Head Nozzle Cleaning Kit, DTF Printer Nozzle Cleaner, DTF Printhead Nozzle Cleaner Special Feature DTF Print Head Nozzle Cleaner, DTF Print Head Nozzle Cleaning Kit, DTF Printer Head Nozzle Cleaning Kit, DTF Printer Nozzle Cleaner, DTF Printhead Nozzle Cleaner See more |
| Unit Count | 3.38 Fluid Ounces |
P**E
Very good investment WOW
I tried printing a copy of a printer purge file that had all colors and check which color was having a clog. Two colors had a 100% clog. I tried printing several times with the same result. Then did a light head cleaning (3 minutes) and that did not work. Stoped doing the 7 minute clean up until I tried this product. I reluctantly purchased it as a last option before I gave up on the printer. Was already looking for new printers. When it arrived, i was ready but my ET-4700 did not readily lifted up to get to the printer heads. You have to remove two little screws right above where the printed page comes out. Then the top part goes up and you have full access to the printer heads. You have to put something to keep the top of the printer opened. The next step is to put paper towel right under the printer heads. You have to fold the paper very tightly as there is not very much clearance between the printer head and the bottom of the printer. The syringe can eject 5mm at a time. This is good so that you don't flood the bottom of the printer. The bottle comes with 100mm and it is recommended to flow no less than 20mm into each color head with a possible clog. After the paper towel is in placed between the printer bottom and the printer head, you have to gently take the soft plastic tubes out of the cassette (a little reservoir box where the ink passes right before it prints to the page) that sits right on top of each printer head. You have a choice to make as to where you plug the tube that comes out of your syringe. 1st Choice: Place the syringe tube on the same place as the soft plastic tubes that flow the ink from the big reservoir. 2nd Choice: Remove the cassette (a little reservoir box where the ink passes right before it prints to the page) that sits right on top of the print head and connect the syringe tube where the cassette makes contact with the print head. I chose the first one as it seemed the most thorough option. The videos I saw stat that it is almost always right on the head but I though why not clean anything in the cassette as well. Plus the syringe connection to the print head did not all that tight (worried about leaks). We did 4 flows (as the syringe has 5mm) for each troubled color (we had Yellow and Cyan with a complete clog). I had to be careful when i replaced the plunger after I filled the syringe with the clear fluid that came with the product. The plunger seems to have a very tight seal and I was afraid of shooting the liquid really fast as I replaced the plunger. After you shoot 10mm of liquid; move the head towards the other side of the paper towel to get that side ready for the other 10mm of clear liquid. If you see the paper towel completely soaked in ink. Then replace it. I recommend using the gloves (plastic bag material) that came with the product of use your own nitrile gloves. The paper towel will be very saturated with a clear solution and remaining ink. Move the head to the left or right and remove the paper towel. Use another paper towel for the next color but if you see too much liquid, clean the printer bottom before moving to the next clogged color. We only had two colors to do so, we used a few more paper towels to clean the bottom of the printer when we were done. Replaced the soft tubes that go to the cassette (gentle and slow proces) the tubes felt pretty delicate. We went ahead and did the full printing head clean regardless (7 minutes). You have to turn the printer off and then hold power button + help button for a few seconds to turn on into full cleaning mode. I had full ink on the tanks before I started this process and then seven minutes later I saw that all had gone down, mostly the black ink for some reason. Test post-product: Printed the head alignment page and surprise!! I SAW ALL FOUR COLORS in all their glory! Then printed a personal document and it was perfect. Very good product and resulted just as intended. Will definitely have this on hand and also use the printer more often from here on. Satisfied Customer.
E**H
Fixed my Epson ET-2400
Worked amazing! It unclogged my printer after it hasnt worked for almost a year. Now I use my printer on a daily all thanks to this product! It worked great with my Epson eco tank 2400 and it didn’t cause any damage. It was super easy to use and if i ever need it, I will buy this one again.
R**K
Take your time and allow extra time for print head to dry!!
Worked after several cleanings- had to wait 48 hours for print head to finally dry out still needs additional cleanings but did remove the clogs and printer is working again
P**L
Printer Cleaning Kit
I usually wait a few months to write a review on a product to see how it works. I had to clean the print heads on my Epson Eco Tank printer. I replaced the print box, it made no difference. I was ready to buy a new printer $300.00, when I saw a video online about this kit. I was fairly easy to do, the instructions are OK, but there are more detailed videos online, that make the job easier. I took me about 15 minuted to do it and the printer has worked perfectly ever since. I highly recommend it! It saved me $300.00
N**S
Worked for me in my Brother MFC-J4710DW
I was prepared for a mess but after having my Brother MFC-J4710DW in storage for over 3 years, the ink was toast. Even with new cartridges and countless cleaning cycles, the print quality was a disaster. I picked up this kit based on the reviews. It was pretty easy to use and made much less of a mess than I thought. It is far from mess-free but it put whatever wonder-juice its made of into the ink system and after many more cleaning cycles, and a week of just ignoring it, my print quality was back. It is not perfect yet, but there is improvement with each print. I'd say its about 99% with only a couple pixel width lines. All in all, i am happy. The kit worked. The fact that I got my printer back without major repairs makes it valuable to me. I can't argue with the cost. Good Value. It did take a bit to get the fluid out of the system and back to good ink, but once there, the print quality was satisfactory and the color accuracy was back to what I expected.
M**S
Maybe the cleaning kit works,... for you?
After my workhorse HP OfficeJet Pro 8600 Premium decided to add stripes to everything requiring cyan ink, I hit the "Clean Printhead". And then again. And again. After reviewing the how-to sources (YouTube, ChatGPT, heck even HP), I decided printhead cleaning needed to go to the next level. Which was soaking the business end of the printhead in distilled water. Which I did, um, three times, All to no avail. So, next up was buying this kit. I thought since you actually squeeze the cleaning solution through the printhead and out through the little holes, it would do the trick. It didn't. After going through the cleaning process three separate times (followed by the recommended "Clean Printhead" steps built into the printer menu, the result was basically the same as when I started. Sigh. I got the cleaning kit as the step before buying a whole new printhead. This is now my next step--and it's a way more expensive step. So I don't begrudge buying the cleaning kit; had it worked it would have saved me a lot of money, Since it didn't it cost me a little money. So, why three stars, if it didn't work? Three reasons: 1. It seems the printhead on this printer has run its course. The cleaning kit can't be blamed for this and the printhead on my 8600 has printed a LOT of pages over the dozen or so years I've had it. It's just end-of-life. 2. The cleaning kit might well work for you,. It's inexpensive so worth a try. 3. It's a logical step between the printer inbuilt cleaning routine and buying a new printhead (or even a new printer). Last thoughts: when handling the cartridges and printhead do use the supplied disposable gloves if you don't want to have to scrub your hands clean of ink for the next few days. Using disposable vinyl gloves would be even better, Ditto for keeping the cartridges and printhead off and surfaces: first cover with something impermeable (like a plastic shopping bag), then a layer of paper towels, then a clean sheet of printer paper or two, and then rest the printhead and cartridges on this layer. The reason for this order is: + The printer paper won't push paper paper particles into the printhead ports (which the paper towel might do). You're supposed to not rest the printhead with the nozzles down, but its easy to forget that. + The paper towel better absorbs the ink that leaks through the first layer. + The plastic shopping bag stops any ink getting though to whatever surface you put the stuff on. So there you have it. The cleaning kit did not work for me, was a lot of rather messy work for me, but might work for you.
N**E
good value and it works!
The kit arrived compete and not damaged. The instructions were clear and easy to follow. I had to to run the process 3 times and let it set overnight to get my printing to work.
A**R
It worked!
This saved me from buying a new sublimation printer. It was easy to use and fixed the issue I was having. My clogs were pretty bad so I had to flush each color 2-3 times.
Trustpilot
3 weeks ago
1 month ago