🪞 Reflect your style, tilt your vibe.
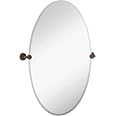
The Hamilton Hills 24x36 inch frameless oval pivot wall mirror combines elegant oil-rubbed bronze brackets with durable, corrosion-resistant materials. Designed for bathrooms, bedrooms, or vanity spaces, it features a smooth tilt mechanism and includes a full installation kit. Crafted with over three generations of expertise, this mirror offers both timeless style and lasting quality.


K**R
we thought they were well worth the cost.
We ordered 3 of these mirrors to replace the builders flat wall mirrors. All 3 mirrors arrived quickly in perfect condition. The packaging was exceptional. On careful inspection, all hardware and mirrors were flawless. I did not use the enclosed wall anchors as I prefer to use my own. I did the installation by myself even though the mirror is pretty hefty. Just took my time and no issues, even then it only took about an hour to mount all 3. I would definitely recommend these to anyone looking for a quality mirror that adds a bit of flair to the wall.
A**R
Exactly as described
These were installed in my bathroom and are perfect for the decor I used in that room. They were delivered promptly and communication was excellent. I might used this supplier again as I have another project starting soon.
P**L
very nice product, but the installation instructions provided are inadequate
The mirrors are a very good quality product. However, the instructions provided could be improved upon. Anyone can use the 'quick and easy' way to do things (and possibly suffer the consequences) or they can take the extra time and effort to things correctly and have a good quality end result.Any time you are mounting items to (i.e. grab bars, towel bars, towel hooks, robe hooks, mirrors, etc.) to drywall (sheetrock) walls, 'backing' is very important. If you mount these type of items just to the sheetrock with drywall-type anchors, you bear the risk of these items (or the anchors supporting them) pulling out of the wall and/or ruining the sheetrock itself - and, in this case, breaking the mirrors. For 'new' construction, it is better to plan ahead and install proper 'backing' (i.e. horizontal 2x4 or 1x4 wood backers) notched into the wall studs exactly where you will be mounting the anchors for these type of items and then sheetrock over the wall. Because my project was a retrofit/remodel, I took the time to cut horizontal openings in the sheetrock where the mirror anchor brackets and for my towel hook would be mounted. Then I ripped 1"x4" pine boards to a thickness appx. 1/8" thinner than the drywall (this allows one to apply a 'skim coat' of drywall compound and drywall tape to 'finish' over the backers. In my case, I 'backed' these boards with a layer of sheet metal so that the screws holding the anchors in place would have more to 'bite' to so it would further minimize the chance of the screws pulling out from the wall. I then used drywall screws to hold these backer boards to the wall studs, and then skimmed the area with drywall paste to provide a level/flat surface to mount my travertine tile. I then laid out the wall tile so that I would have horizontal (and exactly 'level') grout joints at the exact height I needed (these were aligned for the screw holes in the anchor plates for the mirrors and for the towel hook).I laid the mirrors face down on the floor on a soft, protective blanket and mounted the brackets to the sides of the mirrors according to the instructions provided. Then I took my tape measure and measured from the 'center' of one mount across to the 'center' of the other mount so I would know the exact horizontal distance I needed for positioning the wall brackets to the walls. Also, I had temporarily put the new vanity top in place so that I could 'mark' the location of each faucet (faucet spout) and used these 'marks' as the exact 'center' for each mirror (so they would be exactly 'centered' over each sink basin). Hope this makes senseI installed the wall tiles, but before I grouted the walls, I mounted the anchor plates for the wall mirrors and for the towel hook, and then covered them with painters' tape so I wouldn't get them covered with grout.I then permanently installed the new vanity top with faucets attached, and then taped the edges and covered the top so I wouldn't get grout all over it. After grouting the walls, I waited the required time period and then applied 2 coats of solvent-based grout/tile sealer. Then I mounted the mirrors to the previously-installed wall anchor brackets using the Allen wrenches supplied. Because I had pre-measured and pre-leveled everything, the mirrors and the towel hook mounted perfectly - just where I wanted them to be...AND THEY WILL NOT PULL OUT FROM THE WALLS. Overall, the installation was time-consuming, but the end result was worth itThere was a lot of other work required for this 'remodel' but is unrelated to the installation/mounting of these mirrors.Hope this information is useful to someone else.
C**K
Great mirror!
We bought these after we discovered the Moen Sage mirrors we bought were too small for our renovated space. We wanted a stainless or brushed nickel finish, but it wasn't available. We bought the chrome option, but it's not shiny, so it coordinated with the rest of our fixtures. Very large, so measure well. Mirror tilts and softens the look of a lot of the straight edges we have in our room. Highly recommend!
L**I
Cute mirror
Nice mirror. Just a bit pricey.
N**Y
Quality craftsmanship tilt mirror. Highly recommend!
The mirrors (I ordered 2) were beautifully packed and even included a certificate of authenticity (which I initially found amusing but it did show some pride from the manufacturer) along with all directions and hardware needed, including 2 sizes of Allen wrenches needed for final steps to adjust mirror tilt and secure mirror onto side mounts. Overall this is a terrific upgrade to what I had before and looks expensive. On future projects, I will be looking at other products made by Hamilton Hills.
J**M
Good product. Very poor mounting instructions.
This product is a 5 star product with 1 star mounting instructions. I'm an engineer that built my own house and have mounted hundreds of items and I had no problem hanging the mirror but when I got done I stepped back and said "Wow, I pity the regular DIY'r that tries to mount that".Here is my abbreviated instructions.1) Lay the mirror on it's face and mount the mounting blocks to the mirror. Make sure the mirror edge is fully engaged into the mouth of the mouting bracket.2) Loosen up the steel mounting cup in the base of each mounting block and rotate them so that the two mounting holes are side-by-side rather then on oriented on top of each other. When you drill the 2 holes in the wall for each cup they should be side-by-side rather than on top of each other.3) Measure the distance from the INSIDE hole of one bracket to the inside hole of the other bracket. Measure to the nearest 1/16". In my case with the mirror mounted vertically my distance was 25 and 2/16" (if I recall correctly). Don't use my measurement, use yours. Measure from the center of each INSIDE hole to the center of the other INSIDE hole. Be exact. Now remove the cups from the mounting blocks by unscrewing their set screws somewhat and make sure the set screw is not projecting into mounting block body because if so it will likely want to interfere when you actually mount the mirror in step 7.4) Draw a long level line on wall where you want bracket mounted. Mark the center of where you want mirror. Then mark to the left 1/2 the distance of step #3 (in my case that would be 12 and 9/16". From that left mark measure off the full width (in my case 25 and 2/16") and make the mark for the right side. Check your measurement 2 more times to make sure. Call your spouse and have them measure it and check it.5) yeah it's probably best to get better quality mounting bolts but the ones provided will work.6) Drill the first hole for each bracket for the INSIDE hole position.. Mount their cups loosely. Now that they are loosely mounted on the wall rotate the cups to locate the exact position for each of their OUTSIDE holes. Obviously these outside holes should be centered on your long level line. Drill those outside holes and mount those screws and them tighten down each cup.7) Get a second person to mount the mirror onto the cups. Make sure the set screws are not projecting into the cup receptacle in the mounting block or it will be harder to mount the mirror. Once the mirror is in place tighten set screw on each side to fasten mirror to wall.8) tighten set screws to pivot the mirror to the angle you want.
Trustpilot
2 months ago
2 months ago