


🚗 See All, Fear None: Drive with the ultimate 360° confidence!
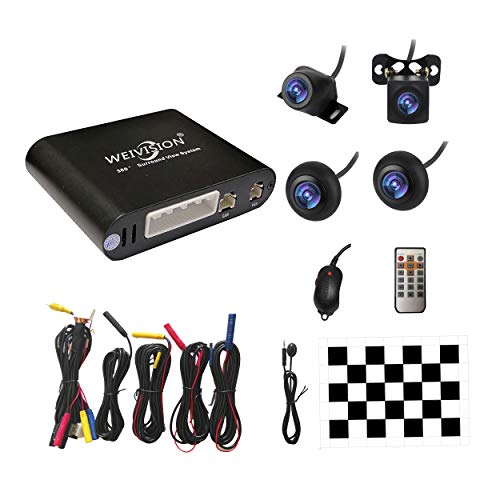
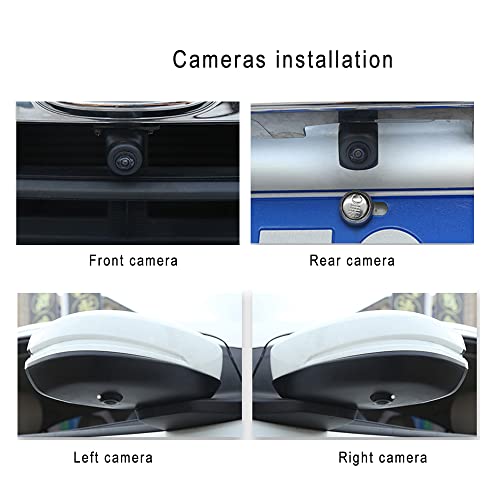
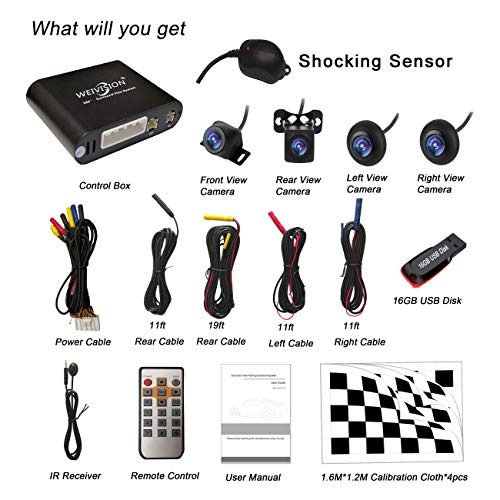
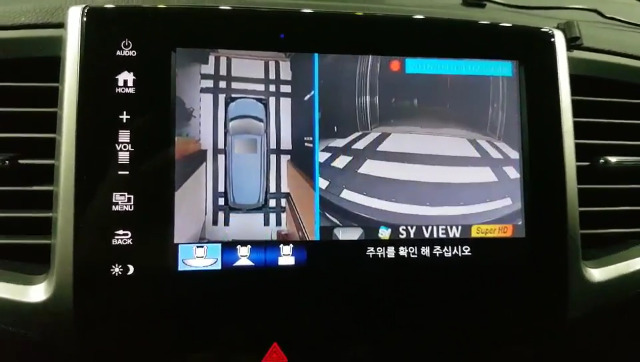
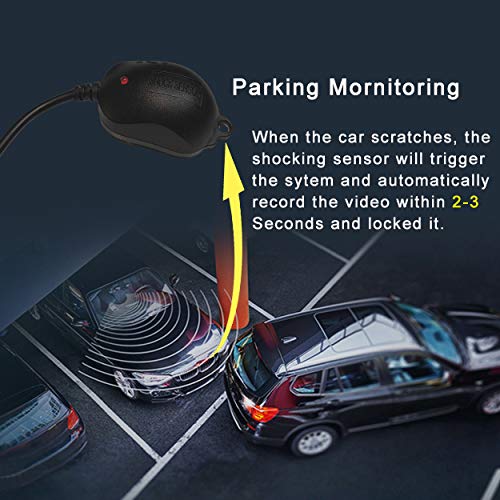
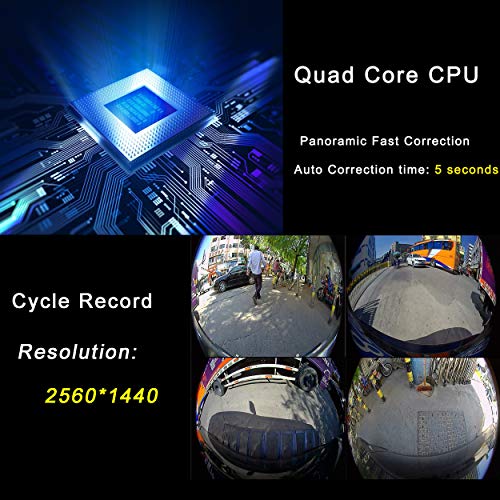
The Weivision Universal 360 Degree Bird View System is a professional-grade car DVR and panoramic camera setup featuring four ultra-wide 170° waterproof cameras with night vision. Designed for nearly all vehicles, it provides a seamless 360° bird’s-eye view that eliminates blind spots and enhances parking safety. The system auto-switches camera views based on driving actions and includes parking monitoring with shock detection, recording footage in MP4 format accessible on PC or mobile. Installation requires drilling a 20mm hole in the side mirror and professional setup, ensuring a reliable, durable, and smart driving aid.


| ASIN | B00ZR65O2G |
| Batteries | Lithium Metal batteries required. |
| Best Sellers Rank | #31,552 in Electronics ( See Top 100 in Electronics ) #284 in Vehicle Backup Cameras |
| Color | Black |
| Connectivity technologies | USB |
| Customer Reviews | 4.0 4.0 out of 5 stars (153) |
| Date First Available | June 17, 2015 |
| Display technology | LCD |
| Is Discontinued By Manufacturer | No |
| Item Weight | 4.29 pounds |
| Item model number | BDV001 |
| Manufacturer | Weizhen Technology |
| Other display features | Wireless |
| Product Dimensions | 5 x 3 x 1 inches |
| Special features | Reverse Assist |
| Whats in the box | Cable, Memory Card |
M**V
The best purchase ever
I purchased a Weivision 360 bird view camera system back in July 2020 and installed it on my Scion Xb 2010. I have no experience at all in car wiring but with the help from YouTube reviews, the wiring diagram that comes with the cameras and tech support from Weivision I was able to install the whole Weivision 360 camera system on my own. I followed the installation, wiring and calibration instructions to the T and completed the installation. The system works as intended: the rear camera pops as soon as you shift to reverse and goes back to the front view camera automatically when shifting to Drive. The left and right view cameras works when you signal to turn. All of this due to the clear wiring instructions provided by Weivision that allowed me to tap into the right wires. The quality of the hardware is great from the insulated wires, the cameras, the host, the quality of the video and down to the color of the connectors: red, blue, yellow and black that leaves the guess work out to make the installation. a breeze. I called tech support to have the picture of my car displayed instead of the default one and the response from Lucy was fast. This is the best value package from the hardware to tech support for the money I paid that I purchased and received on 12-05-20. a second Weivision camera system to install it on my son’s Jeep. This time When running the wires through the doors I didn’t realize that the wires got pinched causing the cameras to fail. All I got was adjusting color bars displayed in the unit head. Thinking that I had bad cameras I reached out to Lucy again and she responded advising to disconnect the side and rear cameras leaving just the front camera connected. I right away got the front view camera displayed in the head unit. Since I had installed my first camera system on my car back in July, I went to it and borrowed from it the long blue and red extension cables, Disconnected the two side cameras from the bad extension cables and I re-connected, one by one, first the side cameras and lastly the rear camera using the good extension cables borrowed from my car. By Doing this I was able to have all the cameras working thanks to Lucy’s help in trouble shooting to resolve the lack of live video. When I removed the bad extension cables I found them really crushed, one of them almost cut off. It seems I got them too close to the window rack while testing the windows to make sure they were out of its way. Duh. Obviously they were not. Right there and then I realized that the system was really good and reliable as this mistake of mine did not get the host, the cameras nor my son’s car fried. I completed the installation today, 12-07-20. The camera system is great. It comes with everything needed to have a successful installation even if you know little to nothing about setting these systems up into your car’s wiring system. Take it from me who knew nothing about it and managed to have two successful installations even through the big mistake I made crushing the wires. Now I have two old cars from 2010 and 2012 with Weivision 360 bird view camera systems. This experience I got schooled me to install blind spot and back up sensors on the same cars.
D**I
surrounding camera, 360 view
Great. Installed and performed the right way.thanks
E**K
Doa
Worked for about 2 minutes, then blank screen. Rebooting it shows video for a brief moment, then nothing. Support not helpful. Waste of money
A**R
Installation/Alignment details
Takes time to physically install, cables limited the placement of either the cameras or the brain. Routing through the vehicle takes more cable and shorten the choice locations. Should be an option to purchase extension cables. After install, powering up and displaying on a 7 inch monitor, all camera's provided a very good image. There was an issue with the bird's eye view from the front to both sides were not seamless. Did the auto-align which made it worst so (after seeing the u-tube video) entered the vehicle width, length, and offset. This created large black blank areas between camera, maybe using inches instead of Metric Millimeters caused it. Before switching to metric measurements, (do not do this) pressed the camera sync button and all video stopped -- display blue screen and no video input. Hoping to find some way to factory reset, but in the mean while have power completed disconnected. Highly suggest more written explanation of the alignment procedures and what the buttons do.
D**Z
Love it! Works as described.
I saw a similar system built into my brother-in-law's Mercedes and was totally impressed. I assumed incorrectly that a similar system for my lowly Chevy would be way too expensive. Now after I've got it installed and setup, I'm completely happy. This Weivision Universal 360 was a bargain. Now I have to say that installation was not trivial. The instructions were actually very good and helped me avoid most installation errors. The most difficult part was mounting the side view cams inside the side mirrors and running the single camera cable from the door into the car interior. The single thin connector/cable made this much easier than traditional phono type connectors. I used manual setup, with the checked cloths provided and the display looks great. For the front cam, I made a custom mount using a short piece of 3/4" PVC pipe , extending it so it could look down and see the bumper edge. The rear bumper mount worked fine as is. Velcroed the little IR remote to the shift console. This system makes NYC parallel parking actually fun. I have not tried the recording system. Words of warning: Although the installation instructions are excellent, I consider myself fairly "handy" and installation took many hours. Also, the cams are custom made for this system, wide angle and not 12v. I blew out the front cam while experimenting before installation. However, the excellent customer service from WEIVISION quickly sent me a replacement.
R**Y
night vision
It has no night vision.
J**M
One of the best sellers on Amazon by far
Ok ... I was ify at first but I'll tell u what .. seller a++++.... great product . For the most ey there Birdseye view is killer ... and there product support was best I've ever seen on Amazon... seller is more than words can say.... thank u and don't hesitate to buy from this seller... and Lucy great product support . She took care of every issue I had.. God bless all or u....
R**Y
This kit was the best upgrade I gave my father's truck (as Nissan frontier, 2016). He absolutely loved the feature that my Genesis came with and when I found this, I had to give it a shot. The installation instructions could have been clearer, but the company was responsive and helpful. My dad now has a very functional, helpful birds eye view of his truck when he parks it, and never leaves the truck sticking out anymore. Also super handy for hooking up the boat trailer. Overall, excellent image quality, even in low light conditions. If you're thinking about it, just do it! You won't regret it at all!
ゴ**ン
日本語説明書があればもっと簡単に画像調整などフルに活用出来ると思う なんとか翻訳しながらがんばります しっかりアラウンドビューになってるし、値段相応だとおもう 初めてのアラウンドビュー装着でかなり苦労したが、ケーブルの長さも十分で、ハイエースにも取り付けできました。 全体的に満足です
た**つ
メーカー純正は手が届かず、 この商品をみつけました。 某YouTuberさんが、取付動画を あげてみえたので、取付けと 調整は問題なく行えました。 メーカー純正品と遜色ないです。 ステアリング連動のガイドライン などは当然ありません。 常時電源への接続で24時間の 監視モニターになりますが、 バッテリーの消耗を気にして ACC接続としています。 その際、画面右上の日時が 常に初期値となるので、 日時の表示が消せると嬉しいかな? 本来のには機能は充分満足です。
フ**ド
一発OK!というと聞こえは良いのですが、実は長い長い道のりがありまして。。。 今年春に購入、少々マニアックな旧車を手に入れたのはいいが、 今まで乗っていたSUVには当たり前のように360°バードビューカメラがついており そいつを見ながら白線の真ん中にピタッと駐車することに快感を覚えていたのと、 小回りが利かない車なので今までと同じようにバック駐車しようとすると めっちゃずれる!こりゃやばいわ。隣の車にでも当てたら大変。 ってことで後付けの360°バードビューカメラはないかなとAmazonを探ると あるじゃん! しかもそんなにお高くない、10万超えるなら止めとこと考えていたのだが なんと\33,280(今はもっと安くなってますね)! とはいえ他にもあるのでは?。。。。あった!MiCarBa しかもこっちは値段違いが何個も。 どっちがいいんだろう。。。全部のレビューを読み漁る漁る。 うーんよくわからんが、あっちのほうが不具合が多いような気がする。 よし!こっちをポチッと。 ほどなく届いたのでインストールは馴染みのカーショップにお願いしました。 さて車が帰ってきてどうかなー見えるかなー。 あちゃ~。歪まくり。駐車場の枠線は斜めや映ってないやとワヤワヤ。 店長は色々やってみたんですが、うまくいかなくて(^^;と しゃーない自分で調整してみよう! 会社の駐車場 説明書を読んで計測して周囲にガムテープでラインを引いて キャリブレーションクロスを地面に貼り付け、んークロスが2枚しかない! あちゃー。 確かMiCarBaの方のレビューでは位置さえわかればいいんでクロスいらんとか書いてあったなー。 じゃあマニュアルキャリブレーション前提でポイントになりそうな点をガムテープで印付けして マニュアル設定前提で位置決めをしていく。数値も測ってと。 さあ設定するぞ! ところがこれがまったくもって分かりにくい。 表示言語を選べるので日本語にしたのがまずかった。 訳が変な訳なので意味するものがよくわからない。 それでも説明書に沿って設定していくのだけど 説明書がまったくもって説明不足。 パラメーターがあってもこんな時はこのパラメーターを選ぶとかの説明が一切ない。 例えば、カメラビューを選ぶのに 近い・中間・遠いと書かれていても その基準はどこなのかわからない。おそらくカメラから地面が遠い近いなんだろうけど クーペでナンバープレートの辺に付けたら近いなんだろうなぁ。 うちのは4駆なんでカメラの位置は高めではあるけど、中間の範囲なのか、遠いを選ぶべきか。 俯瞰で範囲を大きくみるために1BOXでルーフの当たりにカメラを装着する人もいるかもとか いや、ねーだろってことまで考えてしまう。 じゃまぁ中間でって具合に類推。 カメラでポイントを見ながら合わせていくのも どこに合わせろとも書いてないので なんとなくクロスの真ん中に合わせるのかな。 次のは4隅を合わせていくのかな。 あれ?エラーになっちゃった。 このリモコン使いにくいんだよなー。 じゃあ隅からちょっとずらして、、いけた! とまあこんな調子で、おそらくこういう意図なんだろうを類推を繰り返し。 ふーそれではキャリブレーション! おっまあまあいけた、でもこの線斜め、隣の車止めがエライずれてる。 もう一度修正。 まあなんとかそれなりにそろった、これなら使えるわ。ふー。 駐車の際使っていくと、いいじゃんいいじゃん。 となると欲が出て。 そういえば取説書の最後に 画面に映る自車を自分の車に変えられますよって 書いてあったのを思い出し。 メーカーにメールしてみました。 前の型のディフェンダーなんですがいけます? するとルーフトップの写真を撮って送ってこいとのこと。 屋根の写真ってどうやって撮ったらいいの?困った。 そこで会社の外階段の横に止めて会談の上から撮って送った。 そしたら真上からの写真を送れという。 真上からの写真なんて撮れます? 歩道橋の下に停めて上から撮る? いかんいかん。 どーしよう。 そうだ!この車のミニカー持ってたよ! ミニカーなら真上から写せる! ヨシッと、撮りました。(実際にはスマホの影が入ったりして意外と難しい) 送ると作ったぞーとファイルとともに画像変更の方法の説明書がメールできました。 やった!早速変更!ファイルをUSBに移し、コネクタに接続。 何々これでリカバリーを押すと良いのね。 よし!これでどうだ! 自動的に再起動となりモニターに映ったのは ぐちゃぐちゃになった駐車場の枠線でした((+_+)) 苦労して設定した値が全部初期化されてしまったのでした・・・ しばし呆然。 ま、でも車が変更できたなら・・できてない((+_+)) なんのためにデータをパーにしたのか。 リカバリーをクリックする前に一度セーブをかけときゃ良かった。 これでしばらくやる気出ず。 もともと計測してテープ貼ったりかなり手間なんで 休みの日で時間があってしかも天気が良くて駐車場が空いている時しか作業できないのです。 バードビューじゃなくなったモニターを見てため息でしたが もう一度チャレンジすることにしました。 MiCarBaのほうでキャリブレーションクロスを購入。 ガムテープだと幅が広すぎるので 黄色のマスキングテープとアスファルトにポイントを書き込むチョークを100均で購入。 チャンスを待っていざ設定へ! 周囲の白線などに影響されないよう駐車枠ではなく通路部に停めて 車体から10cm離れたところにマスキングテープで線を引く バックドアにスペアタイヤがついているので、それ込みで位置決め 車検証でなく実測で数値をメモしていく、 サイドのシートはどこを基準にするかはっきりと記載はないが 図を見てドアミラーに付けたカメラの真下がクロスの長径の真ん中に来るように設置 この間風にあおられ何度かシートをテープで留めなおす。 ここも数値実測。あれ?左右でずれてる。微調整。 では本体設定!行くぞ! 言語はややこしいので取説と同じ英語で! 英語であることを抜きにしても不親切な取説書。 各選択肢のどれを選んだら良いかの基準が不明。 それでも発見したのは日本語表記の時”越野”と書いてあった車種を これがSUVのことだろうと選んでいたが英語表記では”PickUp”だった。 よってこれはSUVに設定。すると何と! モニターに愛車が映っているではないか!(正確には同車種のミニカー) テンション上がる~。 基本設定のパラメーターを設定していく、数値は実測値 選択肢は相変わらずよくわからないけど類推 例のカメラビューは”遠い”で。 一通り入力し終えて、各カメラでの見え方を確認。 まあまあ説明書の写真に近くなった。 まずオートキャリブレーションでほどほど合わせてから マニュアルセッティングで追い込んでいこう。 とりあえず一度セーブね。 ではオートキャリブレーション、オン! 数秒待って出た画面は 車周囲に引いたテープがきれいに直線になっており キャリブレーションクロスも変形なくマスがそろっていて 見るからに整ったバードビューの感じです。 おーいんじゃね! マニュアル調整いらんか。 良さそう。良いと思うけど。 駐車枠に停めてみないと本当にできたかどうかわからない。 でもこの位置から動かすと二度と同じ位置には戻れない。 またテープ、クロス貼りと実測をイチからやらないといけない。 うーんどうしよう。 えい!このままでは埒があかん。 動こう!と車を動かし駐車枠へ。 するとアップした写真のようにバッチリでした! マニュアル調整は要りませんでした。 といった次第。 この後画像の明るさやコントラストなど調整して何度もしつこいくらいセーブ! 書き忘れましたが、このシステムから出力されるモニターの方も 先に調整して明るくよく字が判別できるようにしておくとやりやすいです。 システムの方も輝度、コントラストなど調整ができるので 最明るいくらいに調整しておくと良いです。 なぜならリモコンで数値を入れていく際に 画面の入力窓に立体感を出したいのか妙なグラデーションがかかっていて 入力した数値が読みにくいのです。 以上長文お読みいただきありがとうございました。
車**泊
論より証拠ですね。 先ずは、動画を見てください。 「中国製激安アラウンドビューモニター(バードビューモニターシステム)をDIYでハイエースに 後付けしました。4台のカメラで360度バードビューを実現、キャンピングカーなど死角の多い車両には最適(前編) で検索です。
Trustpilot
1 day ago
1 month ago